Table of Contents
Advertisement
Quick Links
Digital Cam Switch Unit
CamCon DC16
Digitronic Automationsanlagen GmbH
Steinbeisstraße 3 • D - 72636 Frickenhausen • Tel. (+49)7022/40590-0 • Fax -10
Auf der Langwies 1 • D - 65510 Hünstetten-Wallbach • Tel.(+49)6126/9453-0 • Fax -42
Internet: http://www.digitronic.com • E-Mail: mail@digitronic.com
2 rue René Laennec 51500 Taissy France
E-mail:hvssystem@hvssystem.com
Fax: 03 26 85 19 08, Tel : 03 26 82 49 29
Site web : www.hvssystem.com
Advertisement
Table of Contents

Subscribe to Our Youtube Channel
Related Manuals for Digitronic CamCon DC16


Summary of Contents for Digitronic CamCon DC16
- Page 1 Steinbeisstraße 3 • D - 72636 Frickenhausen • Tel. (+49)7022/40590-0 • Fax -10 Auf der Langwies 1 • D - 65510 Hünstetten-Wallbach • Tel.(+49)6126/9453-0 • Fax -42 Internet: http://www.digitronic.com • E-Mail: mail@digitronic.com 2 rue René Laennec 51500 Taissy France E-mail:hvssystem@hvssystem.com Fax: 03 26 85 19 08, Tel : 03 26 82 49 29 Site web : www.hvssystem.com...
- Page 2 The CamCon DC16 and this instruction manual are protected by copyright. All rights are reserved. Neither the CamCon DC16, nor this document may be copied as a whole or partially, photocopied, reproduced, translated or transferred to electronic media of any kind or into machine readable format without prior written permission by the company Digitronic Automationsanlagen GmbH.
-
Page 3: Table Of Contents
Digitronic Digital Cam Switch Unit Automationsanlagen GmbH CamCon DC16 Table of contents 1. Introduction ............................7 2. Operating Pinciples..........................8 2.1. Speed Compensation ........................9 2.1.1. Measuring delay time for Speed Compensation................11 2.1.1.1. Measuring delay time through actual differences ..............11 2.1.1.2. - Page 4 Digitronic Digital Cam Switch Unit Automationsanlagen GmbH CamCon DC16 7.2.2. Program change .......................... 30 7.2.3. Program name ..........................30 7.3. Cam programming .......................... 31 7.3.1. Output selection for programming ....................31 7.3.2. Program selection for programming .................... 32 7.3.3. Programming the delay time/speed compensation..............32 7.3.4.
- Page 5 Digitronic Digital Cam Switch Unit Automationsanlagen GmbH CamCon DC16 7.4.4. Cable length / Cycle time ......................58 7.4.4.1. The cable length ........................58 7.4.4.2. The cycle time of the CamCon....................58 7.4.5. The special outputs........................58 7.4.5.1. The security output........................58 7.4.5.2.
- Page 6 Digitronic Digital Cam Switch Unit Automationsanlagen GmbH CamCon DC16 9.5. Problem: "Pos - Err:5"........................79 9.6. Problem: An "Pos-Error:" occurs during operation................79 9.7. Problem: "RAM-Full" = RAM memoryis full..................79 9.8. Problem: The EEProm memory is full..................... 80 9.9. Problem: Outputs will not activate....................80 9.10.
-
Page 7: Introduction
S7 Components group for S7 300 on CamCon DC300 AB Components group for ControlLogix ® 1756 on CamCon 1756-DICAM S5 Switch-ON via PG interface with L1 - Bus on CamCon DC16,40,50,51 and 90 PLC Logic Module (optional) Shift register (optional) -
Page 8: Operating Pinciples
Digitronic Digital Cam Switch Unit Automationsanlagen GmbH CamCon DC16 2. Operating Pinciples Diagram: Principles of a Cam Switch Unit A principle for better comprehension of the function of a Cam Switch Unit is here presented. It has 3 outputs with the following cams:... -
Page 9: Speed Compensation
Digitronic Digital Cam Switch Unit Automationsanlagen GmbH CamCon DC16 2.1. Speed Compensation Each mechanical switch component (e.g. shield, magnetic valve) has a delay time, i.e. the time between the start signal and the actual switching of the contacts. In processes where positioning is executed on a moving system, this can cause problems. - Page 10 Digitronic Digital Cam Switch Unit Automationsanlagen GmbH CamCon DC16 A small example in figures was designed to eludicate: Supposing the drive cylinder with the measuring system has a circumference of 360mm, so that one millimeter of the circumference corresponds to exactly one angle degree of the measuring system.
-
Page 11: Measuring Delay Time For Speed Compensation
Digitronic Digital Cam Switch Unit Automationsanlagen GmbH CamCon DC16 2.1.1. Measuring delay time for Speed Compensation Several ways of measuring delay time of a relay or valve are available. 2.1.1.1. Measuring delay time through actual differences First the switch-ON point of a valve or relay is programmed. We assume that the programmed switch point lies at 200 degrees in this case. -
Page 12: Speed Compensation Using Off-Centre Pressure, E.g. Brake Functions
Digitronic Digital Cam Switch Unit Automationsanlagen GmbH CamCon DC16 2.1.2. Speed Compensation using off-centre pressure, e.g. brake functions The Speed Compensation of the CamCon Cam switch unit works using a linear function. If, for example, the speed doubles, then the shift of the compensated cam changes and also moves forward by twice the amount. -
Page 13: Separate Delay Time For Speed Compensation Of Switch-On And Switch-Off Points
Digitronic Digital Cam Switch Unit Automationsanlagen GmbH CamCon DC16 2.1.3. Separate delay time for Speed Compensation of switch-ON and switch-OFF points For CamCon devices of Software from 3/2002 Speed Compensation is now available for separate switch-ON and switch-OFF points. This is necessary since some valves need longer to switch OFF than to switch ON. -
Page 14: Installation
(SSI - measuring system) in strong electromagnetic machines, the illustration to the right demonstrates in a connection example, how the high EMV resistance of the CamCon DC16 can still be increased. Device earth Here the device grounding and the cover connection of the... -
Page 15: Electrical Connections
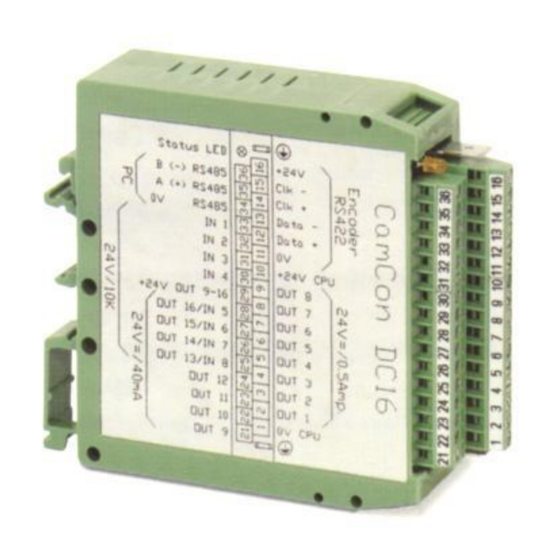
Digitronic Digital Cam Switch Unit Automationsanlagen GmbH CamCon DC16 4. Electrical connections Before you begin with wiring, please consult the following chapters: "4.4. The outputs" on page 24, "4.5. The inputs" on page 24 and "4.3. The measuring system" on page 20. -
Page 16: Pin Allocation Of The Serial Rs485 Interface
4.1.7. Pin allocation of the serial RS485 interface The CamCon DC16 has a serial RS485 interface as a standard. This is used for programming from a PC or via a CamCon DC50/51 terminal. The cable length of this RS485 interface is limited to a maximum of 1000m. -
Page 17: Closedown-Resistors Of A Serial Rs485 Interface
At the RS485 interface the ends of the data cables have to be switched with closedown resistors. For this purpose the CamCon DC16 has soldering bridges that have to be adjusted before commisioning. These bridges may only be closed at the beginning or end of a linked chain or single device, as well as at the interface converter (Pin 1 with Pin 2 and Pin 3 with Pin 4). -
Page 18: Closedown Resistors With Solding Bridges
4.1.8. Clamping allocation of a serial RS232 interface (optional) Since february 2002 CamCon DC16 may be equiped with an RS232 interface (optinal). The wiring distance of this interface is limited to a maximum of 10 meters. -
Page 19: External Interface (Option)
CamCon DC16 4.2. External interface (option) If you ordered your CamCon DC16 with the external interface (an X at the end of the ordering number), you can later upgrade your CamCon with one of the following modules: CP16, DC16/IO, or DAC16. -
Page 20: The Measuring System
Note: Since the outputs are partly switched parallel to the inputs in CamCon DC16, DC115, DC300 and CamCon 1756-DICAM, these must not be programmed under any circumstances and this reduces the number of available outputs. -
Page 21: Incremental Measuring System Input
(Order number Option: H) Note: For the CamCon DC16 and DC300 only the version with 24V PNP signal is available. For the CamCon 1756-DICAM the version with 24V PNP signal and Hiperface Signal is available. If a different signal level is necessary, this can be converted externally with the INCDRV converter. -
Page 22: Incremental Hiperface Measuring System Input With Sincos Level
Digitronic Digital Cam Switch Unit Automationsanlagen GmbH CamCon DC16 4.3.3.3. Incremental Hiperface measuring system input with SINCOS level The Hiperface measuring system is a feedback system for servo-motors of the company Stegmann. It is a mixed system and consists of an absolute measuring system and an incremental measuring system. -
Page 23: Pll Measuring System Input
Digitronic Digital Cam Switch Unit Automationsanlagen GmbH CamCon DC16 4.3.5. PLL measuring system input Systems with Phase - Lock - Loop data recording. In these systems the actual value is found through interpolation of initiator impulses. This measuring system is applied to machines with constant speed and with a cyclic pulse. -
Page 24: The Outputs
Digitronic Digital Cam Switch Unit Automationsanlagen GmbH CamCon DC16 4.4. The outputs The CamCon 16 has 8 or 16 short circuit-proof outputs. They supply 24V high active signals and are not free of electrical potentials. The output voltage runs thus with the supply voltage of the device. The outputs of the device are supplied with 24V by pins 10 and 29 and with 0V by pin 1. -
Page 25: General Programming Information
Digitronic Digital Cam Switch Unit Automationsanlagen GmbH CamCon DC16 5. General programming information To program CamCon units without integrated input devices (CamCons DC16/90 and CamCon DC115) you can use any IBM or compatible PC as well as the DIGISOFT programingset order number Best.Nr.: PC/SET/WIN. -
Page 26: Text Input
Digitronic Digital Cam Switch Unit Automationsanlagen GmbH CamCon DC16 5.4. Text input With menu points, in which texts have to be implemented, the keys function together with keys like a coordinate control. You select the desired position for the first character, using the keys. -
Page 27: Commissioning
Digitronic Digital Cam Switch Unit Automationsanlagen GmbH CamCon DC16 6. Commissioning Before switching the device on for the first time, please check its wiring (see chapter "4. Electrical connections" on page 15). Attention: With induced loads the outputs have to be switched with a freewheeling diode. - Page 28 Digital Cam Switch Unit Automationsanlagen GmbH CamCon DC16 After about 5 sec. the display returns to the configuration menu. This waiting time depends on the size of the used EEPROM, since the memory has to be formatted. With the use of a 32k - EEPROM it is increased to approximately 2 min.
-
Page 29: Operation Of The Camcon
Digitronic Digital Cam Switch Unit Automationsanlagen GmbH CamCon DC16 7. Operation of the CamCon 7.1. The main menu The programming always starts at the main menu. No matter in which state of programming you are, you can always reach the main menu by pressing the (several times, if necessary). -
Page 30: Program Change
Digitronic Digital Cam Switch Unit Automationsanlagen GmbH CamCon DC16 7.2.2. Program change With the CamCon you are capable of storing several programs. To choose one of these programs you have to be in the standard display. The selection of a desired program is done as follows: Press the key, the display shows the request for your user code. -
Page 31: Cam Programming
Digitronic Digital Cam Switch Unit Automationsanlagen GmbH CamCon DC16 7.3. Cam programming To get to the actual cam programming select "Cam programming" in the main menu. The display switches to the programming menu: The upper part shows the current actual position, the switched state of the selected output and the chosen program. -
Page 32: Program Selection For Programming
Digitronic Digital Cam Switch Unit Automationsanlagen GmbH CamCon DC16 7.3.2. Program selection for programming You reach the input of the output number by pressing the key. You skip this by pressing the and enter the program selection for the programming. -
Page 33: Programing Time-Cams
Digitronic Digital Cam Switch Unit Automationsanlagen GmbH CamCon DC16 7.3.4. Programing Time-Cams By pressing you get to enter the starting number, which can be adopted by confirming with key . After that, you are put forward to entering the delay time. -
Page 34: Programming The Output Name
Digitronic Digital Cam Switch Unit Automationsanlagen GmbH CamCon DC16 7.3.5. Programming the output name You reach the input of the output number by pressing the key. You skip this by pressing the and enter the input of the output name of this output. -
Page 35: Adding Cams
Digitronic Digital Cam Switch Unit Automationsanlagen GmbH CamCon DC16 7.3.7. Adding cams In case you want to program additional cams on this output, you have to use the key. When you press this key the following is displayed on the display: Here you can enter the positions for the activation and the deactivation point for the cam, as is described in the chapter "7.3.6. -
Page 36: Cam Deletion
Digitronic Digital Cam Switch Unit Automationsanlagen GmbH CamCon DC16 7.3.10. Cam deletion If you want to completely erase a cam, select the cam using the keys and press the key, causing the following question to be displayed: To delete the cam, move the cursor to "yes" with the... -
Page 37: Copying Programmed Outputs (Cam Tracks)
Digitronic Digital Cam Switch Unit Automationsanlagen GmbH CamCon DC16 7.3.12. Copying programmed outputs (cam tracks) With the CamCon you have the option to copy all the cams you have programmed on one output to additional outputs. First press the key to enter the input of the output number. Select the output that you want to copy to the previous selected output with the numeric keys. -
Page 38: Deleting Programs
Digitronic Digital Cam Switch Unit Automationsanlagen GmbH CamCon DC16 7.3.14. Deleting programs If you want to erase a whole program, you have to press the key to enter the input of the output number. Skip it by pressing the key, and you enter the program selection for programming. -
Page 39: Examples For Cam Programming
Digitronic Digital Cam Switch Unit Automationsanlagen GmbH CamCon DC16 7.3.16. Examples for cam programming 7.3.16.1. First cam programming Task: After a complete deletion of the program memory and a successful initialization of the system, a cam shall be programmed for output 4 from 100° to 200° with a speed compensation of 100ms Solution: Choose the main menu point "Programming". -
Page 40: Programming Additional Cams On An Output
Digitronic Digital Cam Switch Unit Automationsanlagen GmbH CamCon DC16 7.3.16.2. Programming additional cams on an output Task: Program an additional cam from 300° to 330° in program 0, on output 4 with the cam from 100° to 200°. Solution Select the menu point "programming" in the main menu. -
Page 41: Deletion Of A Particular Cam
Digitronic Digital Cam Switch Unit Automationsanlagen GmbH CamCon DC16 7.3.16.3. Deletion of a particular cam Task: In program 0 the inserted cam between 300° and 330° shall be erased. Solution: Select the menu point "cam programming" in the main menu. -
Page 42: Programming Analog Cams
Digitronic Digital Cam Switch Unit Automationsanlagen GmbH CamCon DC16 7.3.17. Programming analog cams If your CamCon is equipped with analog outputs, and you have activated the option of analog cams (see chapter "7.4.5.7. Configuration of the analog cams" on page 60), the last "normal" output will be displayed as the first analog output after pressing the . -
Page 43: Creating The First Analog Cam
Digitronic Digital Cam Switch Unit Automationsanlagen GmbH CamCon DC16 7.3.17.1. Creating the first analog cam To program your first analog cam, choose the program and the desired output for programming (see chapters: "7.3.2. Program selection for programming" and "7.3.1. Output selection for programming"). -
Page 44: Unit Configuration (System Setting)
Digitronic Digital Cam Switch Unit Automationsanlagen GmbH CamCon DC16 7.4. Unit configuration (system setting) Before you are able to use this device, you have to give it all the information about the parameters of your measuring system. Select the menu point "System setting"... -
Page 45: Controlling The Measuring System
Digitronic Digital Cam Switch Unit Automationsanlagen GmbH CamCon DC16 7.4.1.3. Controlling the measuring system The option "Vmax" of the menu enables entering the tolerated steps per cycle of the actual value.. This enables controlling a measure-system. The required value is calculated of the CamCon's actual cycle-time, the measuring system's physical resolution und the device's Speed. -
Page 46: The Electronic Gear
Digitronic Digital Cam Switch Unit Automationsanlagen GmbH CamCon DC16 7.4.1.4. The electronic gear In the menu point "Measuring system" a factor for a measuring range transformation can be entered. Through this the physical measuring range e.g. of a rotation encoder is transformed into a new, for the user effective visible measuring range. -
Page 47: Configuration Of A Special Measuring System
Digitronic Digital Cam Switch Unit Automationsanlagen GmbH CamCon DC16 7.4.1.6. Configuration of a special measuring system You have the possibility with CamCon to configure a special measuring system, according to the following steps: To configure the special measuring system press key. -
Page 48: Parallel - Gray Measuring System
Digitronic Digital Cam Switch Unit Automationsanlagen GmbH CamCon DC16 7.4.1.6.2. Parallel - Gray measuring system If you selected "PARAL." for your special measuring system in the measuring system input, the following menu is created: Enter the resolution of the parallel gray measuring system. -
Page 49: Multiturn Measuring System With Electronic Gear
Digitronic Digital Cam Switch Unit Automationsanlagen GmbH CamCon DC16 "C1 or áC2" Counter is set to 0, If input C1 is high or a signal at input C2 changes from low to high. "C1 or âC2". Counter is set to 0, If input C1 is high or a signal at input C2 changes from high to low. -
Page 50: Pll Measuring System
Digitronic Digital Cam Switch Unit Automationsanlagen GmbH CamCon DC16 7.4.1.6.5. PLL measuring system If you selected "PLL" for your special measuring system in the measuring system input, the following menu is created: The PLL measuring system determines the way out of temporal interpolation of a measuring impulse. -
Page 51: Rs232 Measuring System
Digitronic Digital Cam Switch Unit Automationsanlagen GmbH CamCon DC16 7.4.1.6.7. RS232 measuring system The RS232 way gathering is needed, if the measuring system used by you does not contain any of the interfaces described in the previous chapters. To use this system you have to select "RS232" in the... -
Page 52: Sim - Measuring System Simulator
Digitronic Digital Cam Switch Unit Automationsanlagen GmbH CamCon DC16 7.4.1.6.9. SIM - measuring system simulator Having selected "SIM" in the measuring system menu, the following menu appears: The SIM - measuring system - simulator enables crearting ways or time actual values without measuring system, i.e. -
Page 53: Deleting The Special Measuring System
Digitronic Digital Cam Switch Unit Automationsanlagen GmbH CamCon DC16 7.4.1.7. Deleting the special measuring system The special configuration of the measuring system can be removed as follows: Select the menu point "Measuring system" in the configuration menu. following menu displayed: Select the special measuring system with the keys. -
Page 54: The Measuring Offset
Digitronic Digital Cam Switch Unit Automationsanlagen GmbH CamCon DC16 7.4.2. The measuring offset If you selected the menupoint "Measuring offset" in the system setting menu, the measuring offset menu appears on the menu: Here you can indicate, using the keys, wether your controlling system is a rotatory (e.g. -
Page 55: Actual Position Preset
Digitronic Digital Cam Switch Unit Automationsanlagen GmbH CamCon DC16 7.4.2.4. Actual position preset In the measuring offset menu you have the possibility with the rotary system and the linear system to set the actual position to a new value by creating a new input (preset). -
Page 56: The Speed Adjustment
Digitronic Digital Cam Switch Unit Automationsanlagen GmbH CamCon DC16 7.4.3. The speed adjustment If you selected the menu "Speed" in the system setting menu, the speed adjustment menu appears on the display: You can use it to optimally adjust the speed of the device to the speed of the gear. -
Page 57: Accuracy Of The Speed Display
Digitronic Digital Cam Switch Unit Automationsanlagen GmbH CamCon DC16 7.4.3.4. Accuracy of the speed display During operations the speed display usually fluctuates by a certain value. These fluctuations are accounted for in the measuring priciple for the speed, since it is a scanning system. -
Page 58: Cable Length / Cycle Time
Digitronic Digital Cam Switch Unit Automationsanlagen GmbH CamCon DC16 7.4.4. Cable length / Cycle time If you selected the menu "Cable length/Cycle time" in the system setting menu, the following menu is set up on the display: 7.4.4.1. The cable length... -
Page 59: The Output Of The Actual Position
Digitronic Digital Cam Switch Unit Automationsanlagen GmbH CamCon DC16 7.4.5.2. The output of the actual position The CamCon offers the possibility to put the physical actual position out to outputs. It is used when several CamCon need the same actual position (Master Slave connection). -
Page 60: The Analog Speed Output
Note: At the time, there are no integrated analog outputs available for CamCon DC16 and DC90. You can add analog outputs by connecting a CamCon DAC16 digital - analog - converter module to the external interface of the CamCon. - Page 61 Digitronic Digital Cam Switch Unit Automationsanlagen GmbH CamCon DC16 When you confirm the format with the , you enter the input for the minimum value. Note that CamCon always calculates with an accuracy of 16 Bit. The minimum value is the bit value 0 (e.g. -10V or 4mA) and the maximum value is the bit value 65535 (e.g.+10V or 20mA).
-
Page 62: The Analog Position Output
Digitronic Digital Cam Switch Unit Automationsanlagen GmbH CamCon DC16 7.4.5.8. The analog position output The analog position output of the CamCon can be programmed with a software version of at least DC50.20, by the input of an analog cam. Herefore you program an analog cam, that emitts -10V at an actual position of 0 degrees and +10V at an actual position of 359 degrees (see chapter "7.3.17. -
Page 63: Setting The External Program Selection
Digitronic Digital Cam Switch Unit Automationsanlagen GmbH CamCon DC16 7.4.6.7. Setting the external program selection With the CamCon you have the possibility to externally select the desired program number through the inputs. Here you enter the number of programs that can be selected externally, and this simultaneously predefines how many inputs will be used for this purpose. -
Page 64: Masterprogram
Digitronic Digital Cam Switch Unit Automationsanlagen GmbH CamCon DC16 7.4.7. Masterprogram Having selected "Masterprogram" in the menu "system config" you will get to the following display. Here you are able to define Cams for different products and programms. They could be necessary if your plant produces different types of products that have only very little differences concerning their Cam-adjustement. -
Page 65: Unit Configuration
This can be overcome by sending the unit back to Digitronic or with the entry of a special supervisor number. You can aquire this number with a phonecall to Digitronic Automationsanlagen. -
Page 66: Deletion Of A User Key
Digitronic Digital Cam Switch Unit Automationsanlagen GmbH CamCon DC16 13. Choose between "yes" and "no" with keys 14. Press the key. The cursor moves to the input field for the access to the outputs, generally and for every output. 15. Choose between "yes" and "no" with keys 16. -
Page 67: Complete Deletion
Digitronic Digital Cam Switch Unit Automationsanlagen GmbH CamCon DC16 7.5.2. Complete deletion If you selected the menu point"Complete deletion" in the "Unit configuration" menu, the display shows : You can move the cursor to "yes" with the key and confirm it with After a short while the display returns to the main menu. -
Page 68: Unit Configuration
Digitronic Digital Cam Switch Unit Automationsanlagen GmbH CamCon DC16 7.5.3. Unit configuration If you selected the menu point "Configure unit" in the "Unit configuration" menu, configuration menu appears on the display: 7.5.3.1. Setting the serial interface You can select the mode of the serial interface with keys in the input field "Ser.mode", confirming your... -
Page 69: Input Of The Unit Number
CamCon. 7.5.3.2.1. PLC Logic Module The firm Digitronic Automationsanlagen GmbH is an accomplished and well-known supplier and developper of electronic cam controllers for the industry. The experiences of connecting PLC controlls and cam controllers, collected in years of close cooperation with the users, have been regarded during the creation of the PLC Logic Module. -
Page 70: Plc Logic Module With Text Display
Digitronic Digital Cam Switch Unit Automationsanlagen GmbH CamCon DC16 Example 2: Output depending on the rotation direction. Output 1 of the CamCon is Output 1 of the CamCon is enabled when the rotation enabled when the rotation direction output 32 direction output 32 is active. -
Page 71: Analog Outputs
Note: With units CamCon DC16, DC90 and DC300 you can only use the analog outputs by connecting a CamCon DAC16 digital - analog - converter to the external interface. 7.5.3.3.1. Clearing the integrated analog outputs... -
Page 72: Locking Eeprom Memory
Digitronic Digital Cam Switch Unit Automationsanlagen GmbH CamCon DC16 7.5.3.4. Locking EEProm memory If an PLC-controll writes or programs parameter, Cams or Delay-Times cyclical (eg. DC300 or CP16) the unit's EEProm-Memory will be destroyed after a short time. If cyclical programming is, for a certain reason, necessary, you therefore have to lock the EEProm. -
Page 73: Language
Digitronic Digital Cam Switch Unit Automationsanlagen GmbH CamCon DC16 7.5.4. Language If you selected the menu point "Language" in the "Configuration" menu, the menu for the language setting appears: Here you can move the dark field to the desired language using the keys . -
Page 74: User-Menu/Op-Functions
Digitronic Digital Cam Switch Unit Automationsanlagen GmbH CamCon DC16 7.5.5.2. User-Menu/OP-functions If you choose the menu-point "Configure User" in the menu "User menu", the following menu appears on your display. Here you are able to feed in own input- or displayfunctions into the CamCons Standart-Display. This helps the final customer to change or controll Cams, delay-times and Variables of the PLC-Logic- Module without having to interfere with the units sub-menus. -
Page 75: Device Info
Digitronic Digital Cam Switch Unit Automationsanlagen GmbH CamCon DC16 8. Device info If you want to get an overview of whole configuration of the CamCon, you should select the information menu of the unit configuration. Select the main menu point "Unit configuration", and press the key during the input of the user code (the input of the user key is not required here) or you press the key in the "configuration menu". - Page 76 Digitronic Digital Cam Switch Unit Automationsanlagen GmbH CamCon DC16 Factor of the speed display Display format of the speed display 100% value for the speed display Accuracy of the speed display Display menu of the display type / Input for the display change.
-
Page 77: Stack Info
Please note their content and send it by fax to. +49/6126/945342. Note: Using a CamCon DC16; 40; 50/51 and DC90 only 4 stack-menus are shown. these are called iotask, rs232task, dc40task and main A CamCon DC 115 also shows tasks called DC115_0, DC115_1;... -
Page 78: Error Messages And Removal Of Errors (Faq)
9. Error messages and removal of errors (FAQ) The error messages appear on the standard display or in CamCon DC16, 90, 115, 300 and 1756- DICAM without a display of their own through the status LED or status bits. See Chapter 4.7. The status LED on page 24. -
Page 79: Problem: "Pos - Err:3
Digitronic Digital Cam Switch Unit Automationsanlagen GmbH CamCon DC16 9.4. Problem: "Pos - Err:3". Possible causes: The resolution of the connected measuring system is not in accord with the input resolution. The measuring system is faulty. The actual value is outside the range which was entered in the menu path setting for linear systems. -
Page 80: Problem: The Eeprom Memory Is Full
Digitronic Digital Cam Switch Unit Automationsanlagen GmbH CamCon DC16 9.8. Problem: The EEProm memory is full. Cause: Too little memory space available in the EEPROM for the storage process. Solution: Please contact your customer service representative if you require an EEProm storage extension. -
Page 81: Problem: "Clear
Set the Clear signal ON or activate an actual value Preset. The result is the immediate release of the Cam Switch Unit. Note: The incremental measuring system is only available as an option for CamCon DC16, DC50/51, DC115, DC300 and CamCon 1756-DICAM. See chapter "7.4.1.6.3. Incremental - measuring system" on page 48. -
Page 82: Menu Outline
Digitronic Digital Cam Switch Unit Automationsanlagen GmbH CamCon DC16 10. Menu outline Version: Aug. 04 Page: 82 2 rue René Laennec 51500 Taissy France E-mail:hvssystem@hvssystem.com Fax: 03 26 85 19 08, Tel : 03 26 82 49 29 Site web : www.hvssystem.com... -
Page 83: Calculation Eeprom Cam Storage
Digitronic Digital Cam Switch Unit Automationsanlagen GmbH CamCon DC16 11. Calculation EEPROM cam storage In the CamCon you have the opportunity to extend the EEPROM Cam storage. The storage space required for programming is influenced by the following factors: 1. Basic requirement = 256 Bytes 2. -
Page 84: Calculation The Ram Storage-Requirement For Camcon
Digitronic Digital Cam Switch Unit Automationsanlagen GmbH CamCon DC16 12. Calculation the RAM storage-requirement for CamCon The required RAM-main storage (not similar to the constand value - Camstorage or the EEPROM) depends on 7 factors: 1. Standard consumption (approximately 100000 Byte) 2. -
Page 85: Technical Data Of The Camcon
9 - 16 / 40mA per output, short circuit-proof Programming ........By PC with software DIGISOFT for DC16/40/50/90/115, CamCon DC50/51 terminal or CamCon DC16 terminal. Connections for: Measuring system ........through screwing pins IP20 Voltage supply........through screwing pins IP20 Cam outputs.........through screwing pins IP20 Assembly..........comfortable snap-on assembly on symmetrical carrier rail... -
Page 86: Keywords
Digitronic Digital Cam Switch Unit Automationsanlagen GmbH CamCon DC16 14. Keywords 3964(R) ..............................68 Actual position preset..........................55 Actual position, Output........................... 59 Adding cams ............................35 Adding cams, Example .......................... 40 AG615 - Single - Multiturn - Measuring system ..................51 Analog cam, Adding.......................... - Page 87 Digitronic Digital Cam Switch Unit Automationsanlagen GmbH CamCon DC16 Dis.input. with analog cams ........................61 Dis.value with analog cams ........................61 Display format, Actual position....................... 46 Display, Change............................. 29 Display, Standard........................... 29 Display, Type ............................57 DP adresse ............................74 EEPROM cam storage, Calculation.......................
- Page 88 Digitronic Digital Cam Switch Unit Automationsanlagen GmbH CamCon DC16 millenium ..............................2 Movement direction, Change ......................... 46 Multiturn measuring system with electronic gear................... 49 Multiuser..............................68 No contact to unit XX ..........................78 Offset ..............................54 OP - Function............................74 Options, Additional..........................
- Page 89 Digitronic Digital Cam Switch Unit Automationsanlagen GmbH CamCon DC16 RS232 measuring system........................51 S5 - L1..............................68 Security output ............................58 Ser.mode ............................... 68 Serial interface, Configuation......................... 68 serial RS232 interface..........................18 Serial RS485 interface ........................... 16 Shifting cam tracks ..........................37 SIM - measuring system simulator ......................
Need help?
Do you have a question about the CamCon DC16 and is the answer not in the manual?
Questions and answers