Table of Contents
Advertisement
Quick Links
Congratulations on purchasing ET-87Pn - the most popular automation solution for
remote monitoring and control application. This Quick Start Guide will provide
information needed to get started with ET-87Pn. Please also consult the User Manual
for detailed information on the setup and use of ET-87Pn.
In addition to this guide, the package includes the following items:
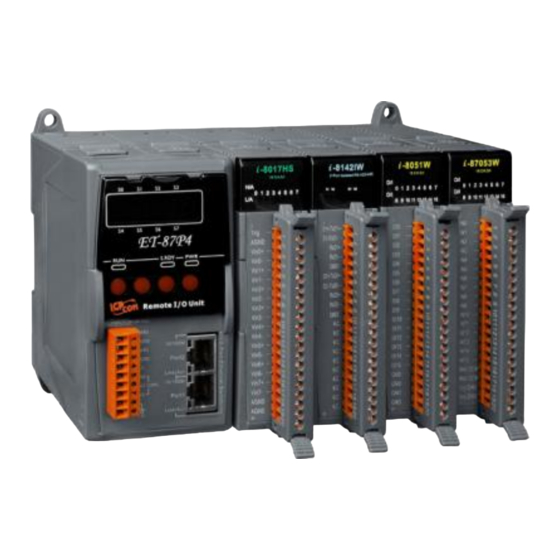
ET-87Pn Module
(ET-87P2/4/8)
ET-87Pn User Manual
CD:\NAPDOS\NAPDOS\u87pn_io_unit\ET-87Pn\Document\
http://ftp.icpdas.com/pub/cd/8000cd/napdos/87pn_io_unit/et-87pn/document/
ET-87Pn Website
http://www.icpdas.com/products/io_expansion_unit/et-87pn.htm
ICP DAS Website
http://www.icpdas.com/
Copyright © 2010 ICP DAS Co., Ltd. All Rights Reserved. E-mail: service@icpdas.com
Quick Start Guide for
ET-87Pn Series
October 2010, Version 1.0.1
Software Utility CD
Screw Driver
(1C016)
1
Advertisement
Table of Contents

Subscribe to Our Youtube Channel
Related Manuals for ICP DAS USA ET-87Pn Series


Summary of Contents for ICP DAS USA ET-87Pn Series
- Page 1 Quick Start Guide for ET-87Pn Series October 2010, Version 1.0.1 Congratulations on purchasing ET-87Pn - the most popular automation solution for remote monitoring and control application. This Quick Start Guide will provide information needed to get started with ET-87Pn. Please also consult the User Manual for detailed information on the setup and use of ET-87Pn.
- Page 2 ---------------------------------------------------------------------------------- Mounting the Hardware The ET-87Pn installation must provide proper ventilation, spacing, and grounding to ensure the equipment will operate as specified. A minimum clearance of 50mm between the ET-87Pn and the top and bottom side of the enclosure panels must be provided. ----------------------------------------------------------------------------------- Connecting to PC, Network and Power The ET-87Pn is equipped with RJ-45 Ethernet ports for connection to an Ethernet...
- Page 3 --------------------------------------------------------------------------------- Installing the Tools and Utilities Step 1: Install the MiniOS7 Utility tool The MiniOS7 Utility can be obtained from companion CD or our FTP site: CD:\Napdos\minios7\utility\minios7_utility\ ftp://ftp.icpdas.com/pub/cd/8000cd/napdos/minios7/utility/minios7_utility/ Step 2: Install the VxComm Utility tool The VxComm Utility can be obtained from companion CD or our FTP site: CD:\NAPDOS\Driver\VxComm_Driver\ ftp://ftp.icpdas.com/pub/cd/8000cd/napdos/driver/vxcomm_driver/ Step 3: Install the DCON Utility tool...
- Page 4 Step 1: Run the MiniOS7 Utility Double-click the MiniOS7 Utility shortcut on your desktop. Step 2: Press “F12” or choose “Search” from the “Connection” menu After pressing F12 or choosing Search from Connection menu, the MiniOS7 Scan dialog will appear, that will display a list of all the MiniOS7 modules on your network. See the status tip, waiting for the search to be done.
- Page 5 Step 3: Choose the module name and then choose “IP setting” from the toolbar Choose the module name for fields in the list, and then choose IP setting from the toolbar. 1. Choose the field “192.168.255.1” Step 4: Assign a new IP address and then choose “Set” button Step 5: Choose “Yes”...
- Page 6 ---------------------------------------------------------------------------------- Using VxComm Utility to Create Virtual COM Ports You can join Ethernet ports into one virtual COM port in order to let one application receive data from your ET-87Pn. Step 1: Run the VxComm Utility Double-click the VxComm Utility shortcut on your desktop.
- Page 7 Step 3: Choose the IP Address field you specified easier and press “Add Server(s)” button from the toolbar Choose the IP Address field you specified in the list, and then press Add Server(s) from the toolbar. 1. Choose the IP Address field you specified Step 4: Choose the Valid COM Port number you wish to use 1.
- Page 8 ---------------------------------------------------------------------------------- Inserting and Wiring I/O modules There are various types of I/O expansion modules for interfacing many different field devices to the ET-87Pn system. For more information about I/O expansion module, please refer to http://www.icpdas.com/products/PA C/i-8000/8000_IO_modules.htm These modules have their own manuals, so if you are using them you should supplement this manual with the manual specifically...
Need help?
Do you have a question about the ET-87Pn Series and is the answer not in the manual?
Questions and answers