Table of Contents
Advertisement
Quick Links
I N S T A L L A T I O N I N S T R U C T I O N S
Instrucciones de instalación
Installationsanleitung
Instruções de Instalação
K1D100
K1D200
Height-adjustable Monitor Arm Series
K1C100
K1C200
Istruzioni di installazione
Installatie-instructies
Instructions d´installation
K1W100
K1W200
K1P100
Spanish Product Description
German Product Description
Portuguese Product Description
Italian Product Description
Dutch Product Description
French Product Description
K1 Series
K1P200
Advertisement
Table of Contents

Related Manuals for CHIEF K1C100


Summary of Contents for CHIEF K1C100
- Page 1 I N S T A L L A T I O N I N S T R U C T I O N S Instrucciones de instalación Istruzioni di installazione Installationsanleitung Installatie-instructies Instruções de Instalação Instructions d´installation K1D100 K1W100 K1C100 K1W200 K1D200 K1C200 K1P100 K1P200 Height-adjustable Monitor Arm Series Spanish Product Description German Product Description...
-
Page 2: Installation Instructions
Do not use this product outdoors. no responsibility for accuracy, completeness or sufficiency of the information contained in this document. --SAVE THESE INSTRUCTIONS!-- Chief® is a registered trademark of Milestone AV Technologies. All rights reserved. IMPORTANT SAFETY INSTRUCTIONS! WARNING: A WARNING alerts you to the possibility of serious injury or death if you do not follow the instructions. - Page 3 Installation Instructions K1 Series DIMENSIONS K1D100 3.94 EXTENSION 2.95 MIN 2.09 [53.14] MAX 19.9 [505.5] 90 INTERFACE CABLE ROTATION MANAGEMENT PITCH RANGE COVER QUICK RELEASE 10 DOWN VESA INTERFACE 75 UP PITCH TENSION ADJUSTMENT 14.70±6.5 CABLE MANAGEMENT COVER DESKTOP THICKNESS RANGE 19.05 MAX 2.50 [63.5] 4.66...
- Page 4 K1 Series Installation Instructions DIMENSIONS (CONTINUED) K1W100 188.1 7.41 QUICK RELEASE 3.94 VESA INTERFACE EXTENSION MIN 2.09 [53.2] 90 INTERFACE MAX 19.9 [505] 2.95 ROTATION PITCH RANGE CABLE 10 DOWN 75 UP MANAGEMENT COVER PITCH TENSION ADJUSTMENT 284.9 11.22 HEIGHT ADJUSTMENT 15.71 399±165.1...
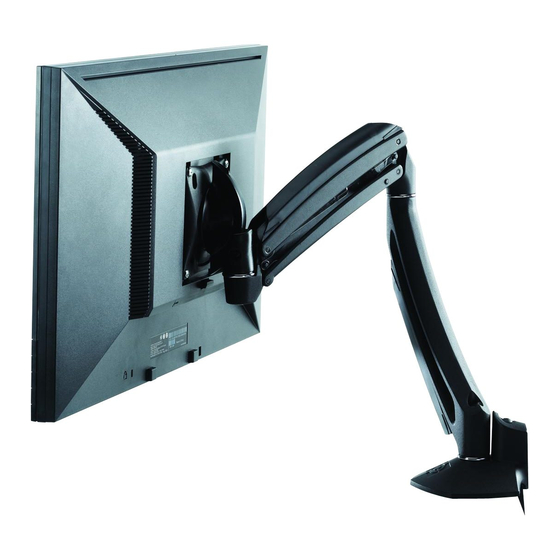
- Page 5 Installation Instructions K1 Series DIMENSIONS (CONTINUED) K1C100 7.41 LOWER PROFILE INSTALL 3.94 90 INTERFACE QUICK RELEASE ROTATION 2.95 VESA INTERFACE CABLE MANAGEMENT PITCH RANGE COVER 10 DOWN 75 UP 13" LIFT ARM HEIGHT PITCH TENSION ADJUSTMENT ADJUSTMENT TOTAL HEIGHT ADJUSTMENT...
- Page 6 K1 Series Installation Instructions DIMENSIONS (CONTINUED) K1P100 POLE CLAMP RANGE 1.50" - 1.90" [38.1 - 50.8] 188.1 7.41 2.297 (MAX 19.12) QUICK RELEASE VESA INTERFACE 3.94 90 INTERFACE 2.95 ROTATION PITCH RANGE CABLE 10 DOWN MANGEMENT 75 UP COVER PITCH TENSION ADJUSTMENT 13.60±6.50 HEIGHT ADJUSTMENT...
- Page 7 Installation Instructions K1 Series LEGEND Tighten Fastener Pencil Mark Apretar elemento de fijación Marcar con lápiz Befestigungsteil festziehen Stiftmarkierung Apertar fixador Marcar com lápis Serrare il fissaggio Segno a matita Bevestiging vastdraaien Potloodmerkteken Serrez les fixations Marquage au crayon Loosen Fastener Drill Hole Aflojar elemento de fijación Perforar...
-
Page 8: Tools Required For Installation
K1 Series Installation Instructions TOOLS REQUIRED FOR INSTALLATION 3/16" (included) 1/8" (included) 5/32" (included with K1P Series only) PARTS A (1) [monitor arm] (K1D100 shown) *8 screws and spacers B (4 or 8)* C (4 or 8)* D (4 or 8)* included with dual arm mounts M4x25mm M4x14mm... - Page 9 Installation Instructions K1 Series Assembly And Installation Low Profile Installation (K1C Series Only) Remove top cap from column. (See Figure 3) Connecting K1C Series (column mount) to Desk Slide mount assembly off of column. (See Figure 3) Standard Installation Loosen clamp screw until enough space is created between clamp and mount to allow for desk mounting.(See Figure 1) NOTE: If space is limited behind desk (i.e.
- Page 10 K1 Series Installation Instructions Connecting K1D Series (desk mount) to Desk Connecting K1W Series (wall mount) to Wall Loosen clamp screw until enough space is created between Determine mounting location on wall. clamp and mount to allow for desk mounting. (See Figure 5) Use a stud finder to locate 2"...
-
Page 11: Display Installation
Installation Instructions K1 Series Connecting K1P Series to Pole Determine approximate location for mount keeping in mind WARNING: Only remove display from mount when the display size, extension, height adjustment requirements. display can be lifted up from the mount! DO NOT remove display unless the display is in the upright position! See Place mount (A) against pole with clamp (H) on opposite side of pole. -
Page 12: Height Adjustment
K1 Series Installation Instructions Adjustments (for recessed mounting holes) Head Tilt Adjustment Adjust head tilt to desired tilt position. (See Figure 12) Adjust head tilt tension screw to change the adjustment tension. (See Figure 12) quick release (C) x 4 faceplate Height Adjustment Adjust height to desired level. - Page 13 Installation Instructions K1 Series Pivot Adjustment Range Single Arm Models (K1D100, K1C100, K1W100 and K1P100) edge of desk or wall face (top view) Adjust arm angle as desired up to 90 degrees in either direction. (See Figure 13) WARNING: Swinging the arm beyond 90 degrees may...
-
Page 14: Cable Management
K1 Series Installation Instructions Portrait Adjustment The monitor may be adjusted 90 degrees in either direction in order to provide a portrait view of the monitor. (See Figure cable (typical) Figure 18 Route cables through cable management channels. (See Figure 18) IMPORTANT ! : Be sure to leave enough slack in the Figure 16 cables near display and arm joint to allow for full arm... -
Page 15: Display Removal
Installation Instructions K1 Series Display Removal WARNING: Only remove display from mount when the display can be lifted up from the mount! DO NOT remove display unless the display is in the upright position! (See Figure 19) Make sure display is in the upright position. Remove quick release faceplate from mount by pressing quick release tab and sliding faceplate off mount. - Page 16 Europe A Fellenoord 130 5611 ZB EINDHOVEN, The Netherlands P +31 (0)40 2668620 F +31 (0)40 2668615 Chief Manufacturing, a products division Asia Pacific A Office No. 1 on 12/F, Shatin Galleria of Milestone AV Technologies 18-24 Shan Mei Street...
Need help?
Do you have a question about the K1C100 and is the answer not in the manual?
Questions and answers