Table of Contents
Advertisement
Quick Links
Advertisement
Table of Contents

Related Manuals for Jetter JM-200-ETH


Summary of Contents for Jetter JM-200-ETH
- Page 1 User Manual JM-200-ETH - Ethernet module 60880727 We automate your success.
- Page 2 In the case of modifications, further developments or enhancements to products shipped in the past, a revised document will be supplied only if required by law, or deemed appropriate by Jetter AG. Jetter AG shall not be liable for errors in form or content, or for missing updates, as well as for damages or disadvantages resulting from such failure.
- Page 3 +49 7141 2550-484 E-mail - Sales: sales@jetter.de E-mail - Technical Hotline: hotline@jetter.de Assignment to product This User Manual is an integral part of JM-200-ETH: Type: Serial #: Year of manufacture: Order #: To be entered by the customer: Inventory #:...
- Page 4 Significance of this User This document is an integral part of the JM-200-ETH: Manual Keep this document in a way that it is always at hand until the JM-200-ETH will be disposed of. Pass this document on if the JM-200-ETH is sold or loaned/leased out.
-
Page 5: Table Of Contents
The configuration memory ......................38 The configuration file ........................39 Configuration registers ......................... 43 Changing the IP address of JM-200-ETH ..................44 Setting the default IP Address 192.168.10.15 ................45 Setting the IP address via configuration file ................. 46 Setting the IP address via configuration file and DIP switch ............47 Setting the IP address during runtime.................. - Page 6 Setting the startup delay ......................92 Updating the operating system OS update by means of JetSym ....................94 Operating system update via FTP ....................95 Quick reference - JM-200-ETH Appendix Technical specifications ......................102 Technical specifications ......................103 Notes on operating parameters ....................104 Index ............................
-
Page 7: Safety Instructions
JM-200-ETH Safety instructions Safety instructions Introduction This chapter informs the user of basic safety instructions. It also warns the user of residual dangers, if there are any. Contents Topic Page Basic safety instructions ................. 8 Residual dangers and protective measures ..........10... -
Page 8: Basic Safety Instructions
Usage according to the intended conditions of use implies operation in accordance with this User Manual. The JM-200-ETH has been designed as a peripheral module for use in machines and is intended for connection to an already existing controller. The JM-200-ETH is an Ethernet module. - Page 9 Jetter AG. The installation of such parts may impair the safety and the proper functioning of the device. Any liability on the part of Jetter AG for any damages resulting from the use of non-original parts and equipment is excluded. Shipping The JM-200-ETH contains electrostatically sensitive components which can be damaged if not handled properly.
-
Page 10: Residual Dangers And Protective Measures
Wait at least 7 minutes after switching off, before you disconnect any terminal leads. Do not open the device. While the device is in operation, do not touch the following terminals: Power supply, motor voltage and DC link voltage. Jetter AG... -
Page 11: Product Description And Design
Product description and design Introduction This chapter covers the design of the device and provides an overview of existing documents. Contents Topic Page JM-200-ETH - Product description ............... 12 Parts and interfaces ..................13 List of documentation..................14 Jetter AG... -
Page 12: Jm-200-Eth - Product Description
2 Product description and design JM-200-ETH - Product description Ethernet module The Ethernet module JM-200-ETH is integrated into a servo amplifier JM-2xx JM-200-ETH and provides it with an Ethernet interface. This Ethernet interface lets you connect the servo amplifier to Jetter's Ethernet system bus and thus integrate it as an axis into a path group. -
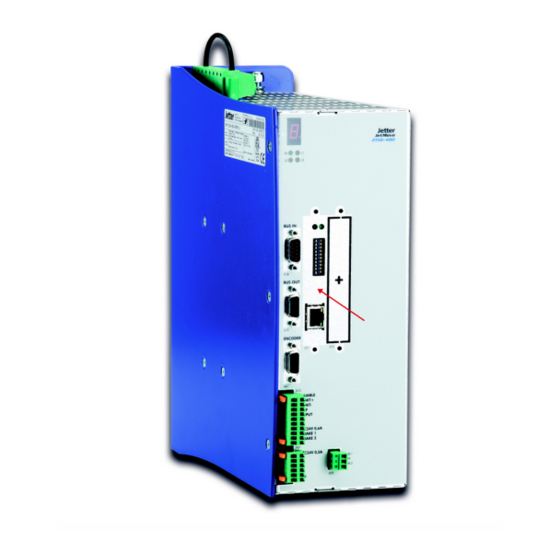
Page 13: Parts And Interfaces
JM-200-ETH Product description and design Parts and interfaces Parts and interfaces The JM-200-ETH features the following parts and interfaces: Number Part Description Ethernet port DIP switch Sliders 1 through 8 IP address Sliders 9 and 10 STOP-LOAD Diagnostic and status LEDs... -
Page 14: List Of Documentation
List of documentation Introduction Various documents and software tools support you in engineering the JM-200-ETH, and updating its OS. You can download these documents and software tools from the Jetter AG homepage http://www.jetter.de. Engineering The following documents and files support you in engineering the controller: Industrial automation catalog ... -
Page 15: Identification
The programming tool JetSym 5.2 or higher is installed on the PC. Information for hotline If you wish to contact the hotline of Jetter AG in case of a problem, please requests have the following information on the JM-200-ETH ready: ... -
Page 16: Electronic Data Sheet Eds
Introduction Each JM-200-ETH features an Electronic Data Sheet (EDS). Numerous production-relevant data are permanently stored in the EDS. The EDS data can be read out via files in the file system of the JM-200-ETH or via special registers. Contents Topic Page EDS file ...................... -
Page 17: Eds File
EDS data can be retrieved from the file eds.ini. Properties You can access this file through the file system on the JM-200-ETH. For an FTP connection, the user needs administrator rights (user admin) or system rights (user system). - Page 18 3 Identification Example This is an example of an EDS file belonging to a JM-200-ETH: ;Jetter AG Electronic Data Sheet [IDENTIFICATION] Version = 2 Code = 54860 Name = JM-200-ETH_01 PcbRev = 02 PcbOpt = 00 OSVersionMin = 0.0.0.0 BLVersionMin = 0.0.0.0...
- Page 19 Internal usage TestRev 01.02.03.04 Internal usage Section [FEATURES] In section [FEATURES] special properties of the JM-200-ETH can be seen. The OS of the JM-200-ETH will ignore properties of missing entries in the file. Name Example Description Version Version of this section...
-
Page 20: Eds Registers
100500 ... 100817 Readable data The following table lists the EDS registers of a JM-200-ETH, as well as their connection to the entries in the EDS file /System/eds.ini. By means of this register array, you can have the EDS of the JM-200-ETH displayed. To this end, select CPU in module register 500. - Page 21 JM-200-ETH Identification Registers Section in the Name in the Description EDS file EDS file MR 800 FEATURES Version Version of this section MR 801 MAC Addr MAC address (manufacturer section) MR 802 MAC Addr MAC address (device section) MR 804...
-
Page 22: Version Registers
The operating system provides several registers which can be used to read out the revision number of the hardware or the version of the operating system and its components. If you wish to contact the hotline of Jetter AG in case of a problem, please have this specifications ready. -
Page 23: Hardware Revisions
JM-200-ETH Identification Hardware revisions Introduction The JM-200-ETH features special registers, the content of which lets you identify the hardware. Registers - Overview The following registers let you read out the hardware revisions: Register Description 108021 Hardware revision - CPU board... -
Page 24: Software Versions
3 Identification Software versions Introduction The JM-200-ETH features special registers, the content of which are unique software version numbers. Format of software The software version number of the JM-200-ETH is a four-figure value. version numbers Element Description Major or main version number... -
Page 25: Mechanical And Electrical Installation
JM-200-ETH Mechanical and electrical installation Mechanical and electrical installation Purpose of this chapter This chapter describes how to install the JM-200-ETH and covers the following topics: Wiring the JM-200-ETH Description of indicators Description of control elements ... -
Page 26: Ports And Interfaces
4.1 Ports and interfaces Port X71 Port X71 is an Ethernet interface and lets you connect the following devices: Hub, switch or router HMI by Jetter AG JX3-BN-ETH or JetControl Any device Contents Topic Page Ethernet interface - Port X71 ................ -
Page 27: Ethernet Interface - Port X71
JM-200-ETH Mechanical and electrical installation Ethernet interface - Port X71 Pin assignment Port X71 is internally connected to an Ethernet switch. Number Description Connector X71 - Ethernet port Technical specifications Parameter Description Type of connector RJ45 Ethernet jack Number of ports... - Page 28 Patch cable 1:1, 1 m gray Hirose, Cat 5e, shielded 60854512 Patch cable 1:1, 2 m gray Hirose, Cat 5e, shielded 60854514 Patch cable 1:1, 5 m gray Hirose, Cat 5e, shielded 60854515 Patch cable 1:1, 10 m gray Hirose, Cat 5e, shielded Jetter AG...
-
Page 29: Dip Switches, Indicators And Leds
JM-200-ETH DIP Switches, Indicators and LEDs DIP Switches, Indicators and LEDs Control elements The JM-200-ETH has got a DIP switch. This DIP switch lets you make the following settings: Sliders 1 through 8 IP address Sliders 9 and 10 STOP-LOAD... -
Page 30: Dip Switches - Jm-200-Eth
5 DIP Switches, Indicators and LEDs DIP switches - JM-200-ETH Loading settings When the device is powered-up, the position of the DIP switch sliders is scanned and the corresponding settings are loaded. Once the boot process is completed, any changes to the DIP switches will not affect the actual configuration. - Page 31 JM-200-ETH DIP Switches, Indicators and LEDs The links given in Related Topics refer you to the chapters where you find a detailed description of DIP switch sliders 1 through 8. Function of DIP switch DIP switch sliders 9 and 10 let you configure how operating system and sliders 9 and 10 application program are launched.
-
Page 32: Leds Of Jm-200-Eth
5 DIP Switches, Indicators and LEDs LEDs of JM-200-ETH LEDs of JM-200-ETH The JM-200-ETH indicates conditions and errors via its LEDs. The LEDs are split into 2 groups: Status messages of the operating system Status of the Ethernet port OS status LEDs The illustration below shows the OS status LEDs. - Page 33 In normal operating condition, the OS status LEDs indicate the following: condition State Normal operating condition Operating system of JM-200-ETH is running. Ethernet interface is working properly No error Indications of OS status The following table shows possible state of the OS status LEDs RUN and...
-
Page 34: Led Indications During Boot Process
5 DIP Switches, Indicators and LEDs LED indications during boot process Normal boot process If the following requirements are met, the JM-200-ETH goes through its normal boot process: DIP switch sliders 9 and 10 are OFF. The OS must be valid. -
Page 35: Status Leds - Ethernet Interface
JM-200-ETH DIP Switches, Indicators and LEDs Status LEDs - Ethernet interface Status LEDs - Ethernet The status LEDs of the Ethernet port are located in the immediate vicinity of interface the RJ45 jack. Color Description X71-1 Green LINK: Network connection has been established... -
Page 36: Ip Configuration
Basic port number for communication via JetIP Required skills of the To carry out the IP configuration of the JM-200-ETH, knowledge of IP network configurator networks is required, such as IP addressing (IP address, port number, subnet masks etc.) ... -
Page 37: Factory Settings
JM-200-ETH DIP Switches, Indicators and LEDs Factory settings Introduction Before the JM-200-ETH is shipped, various parameters are set to a certain value. These parameters can be modified by the user. Factory settings Parameter Value IP address of JM-200-ETH 192.168.10.15 Subnet mask 255.255.255.0... -
Page 38: The Configuration Memory
JM-200-ETH for these changes to become effective. Default values Before data from the configuration memory are used, the JM-200-ETH checks them for plausibility. If entries are invalid or absent, the JM-200-ETH uses the following default values: Parameter Default value IP address of JM-200-ETH 192.168.10.15... -
Page 39: The Configuration File
The configuration file config.ini lets you access the configuration memory on the JM-200-ETH. Properties You can access this file through the file system on the JM-200-ETH. For an FTP connection, the user must have administrator or system rights. ... - Page 40 > 1.0.0.0 < 223.255.255.255 Illegal values Network address Broadcast address In the event of an illegal The JM-200-ETH resets all four values to their defaults. value SubnetMask In the given example 255.255.255.0 Function Subnet mask Allowed values >= 128.0.0.0...
- Page 41 JM-200-ETH DIP Switches, Indicators and LEDs Section [HOSTNAME] In section [HOSTNAME] the name of the JM-200-ETH is specified. If desired, the JM-200-ETH automatically generates an individual name. The JM-200-ETH presently does not use the host name. SuffixType In the given example...
- Page 42 Log in as user with administrator or system rights. Default login information: User: admin; Password: admin Browse to directory /System of the JM-200-ETH. Copy the configuration file config.ini you created to the JM-200-ETH. Clear the FTP connection. Reboot JM-200-ETH. Result: The new configuration is active.
-
Page 43: Configuration Registers
MR 32 Type of the automatically generated suffix that is attached to the name of the JM-200-ETH Name MR 33 Specifies the name of the JM-200-ETH through JetIPBase MR 64 PORTS IP port number for OS update and communication between controllers... -
Page 44: Changing The Ip Address Of Jm-200-Eth
5 DIP Switches, Indicators and LEDs Changing the IP address of JM-200-ETH Introduction To be able to communicate with the JM-200-ETH via Ethernet, you must set an unambiguous IP address on the JM-200-ETH. Configuration options You can configure the IP address in the following ways: Using the default IP address ... -
Page 45: Setting The Default Ip Address 192.168.10.15
Default IP address The default IP address of the JM-200-ETH is 192.168.10.15. You may change the IP address of the JM-200-ETH to its default IP address at any time. DIP switch slider Move sliders 1 through 8 on the DIP switch to OFF to set the default IP settings address 192.168.10.15:... -
Page 46: Setting The Ip Address Via Configuration File
5 DIP Switches, Indicators and LEDs Setting the IP address via configuration file Setting the IP address You can set the IP address of the JM-200-ETH in the config.ini file. [IP] Address = aaa.bbb.ccc.ddd Element Description Address Enter the IP address into this line. -
Page 47: Setting The Ip Address Via Configuration File And Dip Switch
Setting the IP address via configuration file and DIP switch Introduction The JM-200-ETH lets you set its IP address in the config.ini file or through the DIP switch sliders. To this end, set the three upper bytes of the IP address in theconfig.ini file, and the lower byte using the DIP switch sliders. - Page 48 5 DIP Switches, Indicators and LEDs Transferring the Step Action configuration file Establish an FTP connection to the JM-200-ETH. Log in as user with administrator or system rights. Default login information: User: admin; Password: admin User: system; Password: system Open the folder System.
-
Page 49: Setting The Ip Address During Runtime
IP address of default gateway Important note The settings made during runtime do not overwrite the parameters in the configuration memory. At de-energizing the JM-200-ETH, your settings will be lost. Exception: If you save the currently used parameters to the configuration file config.ini by entering password 0x77566152 into R 101299, these settings are then permanently stored. - Page 50 Enter the desired subnet mask into R 104532. Enter the desired IP address of the default gateway into R 104533. Result: The settings are completed. Communication is possible again. Related topics The configuration memory (see page 38) Jetter AG...
-
Page 51: Ip Address In The Gnn Operating Mode
Third byte of IP address Fourth byte of IP address DIP switch slider The following DIP switch settings cause the JM-200-ETH to retrieve the IP settings address from the file config.ini and the GNN out of the lower eight positions of the DIP switch sliders: Valid values for the GNN: 1 ... - Page 52 5 DIP Switches, Indicators and LEDs The DIP switches are binary-coded. DIP switch slider Invalid Invalid Invalid Jetter AG...
-
Page 53: Using Names For Ip Addresses
Using names for IP addresses Introduction The JM-200-ETH lets you use names as IP addresses for target systems. The JM-200-ETH resolves the names into IP addresses. A configuration file or the Domain Name System is used to resolve a name into its corresponding IP address. - Page 54 192.168.1.2 JC350 Domain Name System If a name cannot be found in the file /etc/hosts, the JM-200-ETH tries to (DNS) resolve the IP address by obtaining the corresponding IP address from a DNS server. During boot-up, the JM-200-ETH retrieves the IP address of the DNS server out of the configuration memory.
-
Page 55: File System
JM-200-ETH File system File system Introduction This chapter describes the file system of the JM-200-ETH. The file system lets you access files located on the internal flash disk. File categories The files of the file system are categorized as follows: System directories or system files used by the operating system ... -
Page 56: Properties
Separate directory names by a slash "/", not by a backslash "\". The JM-200-ETH has no battery-backed real-time clock. Therefore, files in the file system are marked with a time stamp indicating the time that has elapsed since the JM-200-ETH has been energized. Each time the JM-200-ETH is energized, the time is reset to 1/1/2000. -
Page 57: Flash Disk - Properties
JM-200-ETH File system Flash disk - Properties Capacity The following disk space is available to the user: Parameter Value Flash disk capacity 4 MB Properties The internal flash disk drive has got the following properties: Up to 7 directory levels and 1 file level are allowed. -
Page 58: User Administration
Please take the following restrictions into account: User administration can only be applied to the internal flash memory. If user administration has been assigned to a file, its contents are readable at once. These settings become active only after a reboot. Jetter AG... - Page 59 JM-200-ETH File system Contents Topic Page Administration of users ................. 60 Factory settings/predefined users and keys ..........62 Assigning locks ..................... 63 Assigning names to keys/locks ..............65 Jetter AG...
-
Page 60: Administration Of Users
The following characters precede a comment line: "!", "#" or ";". Sections The sections are named [USER1] through [USER33]. Here, the user name and the related password, as well as read and write permissions are specified. Example: [USER4] NAME=TestUser3 PW=testpass READKEYS=5,openLock2,10,11 WRITEKEYS=openLock2,10,11 SYSKEYS= Jetter AG... - Page 61 JM-200-ETH File system NAME In the given example TestUser3 Description User's login name Allowed values A maximum of 31 alphanumeric characters In case of illegal value or User administration settings are not made missing entry In the given example testpass...
-
Page 62: Factory Settings/Predefined Users And Keys
All keys except for key 1 are available to user system as well. Predefined keys Two out of the 31 keys have a predefined function. Lock/key Function Ethernet configuration User administration Operating system update of the CPU Operating system update of JX2 and JX3 modules Jetter AG... -
Page 63: Assigning Locks
JM-200-ETH File system Assigning locks Introduction The configuration file /System/flashdisklock.ini is used to assign locks to directories located on the flash disk. Only users with the corresponding key are allowed to read or write (delete) files and subdirectories located in these directories. - Page 64 The valid lock numbers are 0 ... 31. Lock number 0: No lock is assigned to this directory. You can access this directory without any special permissions. You can use numbers or previously defined names. Jetter AG...
-
Page 65: Assigning Names To Keys/Locks
JM-200-ETH File system Assigning names to keys/locks Introduction Keys/locks are consecutively numbered from 1 through 31. To provide ease of handling, a name can be assigned to each key/lock combination. These names are assigned in the configuration file /System/keys.ini. Assigning the names... - Page 66 6 File system Names for locks and For names the following definitions are true: keys A maximum of 15 alphanumeric characters Lock and key must have the same name. Jetter AG...
-
Page 67: Reviewing The Flash Disk Capacity Used
JM-200-ETH File system 6.3 Reviewing the flash disk capacity used Introduction You can view the application scope of the internal flash disk. Details on the allocation of the application scope are given in this chapter. Contents Topic Page Flash disk capacity used ................68... -
Page 68: Flash Disk Capacity Used
(used: 128 / blocked: 0 / free: Track sectors: 128 (used: 128 / blocked: 0 / free: Track sectors: 128 (used: 105 / blocked: 0 / free: Track sectors: 128 (used: 0 / blocked: 0 / free: 128) Jetter AG... - Page 69 JM-200-ETH File system Track sectors: 128 (used: 0 / blocked: 0 / free: 128) Track sectors: 128 (used: 0 / blocked: 0 / free: 128) Track sectors: 128 (used: 0 / blocked: 0 / free: 128) Track sectors: 128 (used:...
- Page 70 State Description Used The sector is occupied by data. Blocked The sector is no longer occupied, but can not yet be used due to administrative reasons. Free The sector is not occupied and can be used. Jetter AG...
-
Page 71: Updating The Operating System
File system 6.4 Updating the operating system Introduction The file system can be used to update the OS of a JM-200-ETH. For a detailed description on this topic refer to the following chapter: Updating the operating system (see page 93) -
Page 72: Formatting And Checking
Depending on the value contained in this register the following functions are carried out: Formatting the flash disk Register number The register number of the control register is dependent on the device: Device Register number JM-200-ETH 202936 Contents Topic Page Formatting the flash disk ................73 Jetter AG... -
Page 73: Formatting The Flash Disk
JM-200-ETH File system Formatting the flash disk Introduction In the following cases, reformatting the flash disk is required: When you upload an OS version that has got another flash disk format When information for flash disk administration has been destroyed ... -
Page 75: Ftp Server
JM-200-ETH FTP server FTP server Introduction The FTP server lets you handle directories and files using an FTP client. The files can be stored to the following storage media: Internal flash disk This chapter covers the login process and describes the commands supported by the FTP server. - Page 76 To be able to use the functions described in this chapter, the user must be skills familiar with the following: File system IP networks FTP commands Contents Topic Page Logon ......................77 Example: Windows FTP client ..............78 Jetter AG...
-
Page 77: Logon
JM-200-ETH FTP server Logon Logon To be able to access the file system via FTP, the FTP client must log on when the connection is established. As Server Name enter the IP address of the device. As User Name enter your user name, e.g. admin. -
Page 78: Example: Windows Ftp Client
Displaying the content of the current directory using dir Transferring the file jetter1.jpg to the JetControl using the command put Displaying the content of the current directory using dir Terminating the session and the FTP client using bye Action Jetter AG... -
Page 79: Http Server
JM-200-ETH HTTP server HTTP server Introduction A standard browser is sufficient for accessing the HTTP server. The browser is for reading and displaying files which have been downloaded to the controller via FTP. Here, it may be necessary to enter the user name and password to have access to certain pages (depending on the file system configuration). -
Page 80: Server Side Includes
The user triggers reloading by entering the controller address and the name of the required page, e.g. http://192.168.10.209/Homepage/SSI/ssiTimeAndDate.htm. Contents Topic Page First entry in the HTML file ................81 Inserting real-time controller values .............. 82 Example of an HTML page ................87 Jetter AG... -
Page 81: First Entry In The Html File
JM-200-ETH HTTP server First entry in the HTML file Configuration The Name Space must be the first entry in the HTML file. It has got the following structure: <NS:DTAG xmlns:NS=http://jetter.de/ssi/jetcontrol/ with NS representing the namespace. The namespace is a character string with a maximum length of 63 characters. -
Page 82: Inserting Real-Time Controller Values
Multiplication is executed prior to adding the offset factor="1.5" Example offset Description Value which is added to the real-time controller value Comments Multiplication by the factor is executed prior to adding the value to the real-time controller value offset="1000" Example Jetter AG... - Page 83 JM-200-ETH HTTP server Format definition You can define the representation of variables by means of their attribute. The number of digits/characters used for representing a variable can be defined by the character "#". Prefix "0" sets the output of leading zeros. This applies to the register types INT, INTX and REAL.
- Page 84 Output = 0 --> Display: 0 Output = 1 --> Display: 1 STRING Output = 0 --> Display: OFF Output = 1 --> Display: ON Example: <JC:DTAG name="O100000308" /> Result: The state of output 100000308 is inserted as "1" or "0". Jetter AG...
- Page 85 JM-200-ETH HTTP server Access via pointer Access via pointer register is realized by inserting the capital letter "P" in front register of the variable name. In each case the value of the variable is displayed whose number corresponds to the content of the register specified in the variable name.
- Page 86 1000300 and the value 100. <JC:DTAG name="PO1000300 + R1000100" /> Result: The state of the output is displayed whose number results from the addition of the content of register 1000300 and the content of register 1000100. Jetter AG...
-
Page 87: Example Of An Html Page
Example of an HTML page Task Insert current real-time controller values into an HTML page. It should then be possible to display the HTML page in a browser using the Server Side Includes feature. <JC:DTAG xmlns:JC="http://jetter.de/ssi/jetcontrol" /> Action <html> <head> <meta http-equiv="Content-Type" content="text/html;... -
Page 89: Programming
Data interchange via various system buses Data interchange via user-programmable interfaces Prerequisites To be able to program the JM-200-ETH the following prerequisites have to be fulfilled: The controller is connected to a PC. The JetSym programming software has been installed on the PC. -
Page 90: Abbreviations, Module Register Properties And Formats
The notation for sample programs used in this document is listed in the table programs below: Notation Description Var, When, Task Keyword BitClear(); Commands 100 0x100 0b100 Constant numerical values // This is a comment Comment // ... Further program processing Jetter AG... -
Page 91: Startup Delay
JM-200-ETH Programming 9.1 Startup delay Introduction The device provides a register to which a delay time can be written. Application The boot process of the device is delayed by the entered delay time. Contents Topic Page Setting the startup delay ................92... -
Page 92: Setting The Startup Delay
Start delay is terminated by leaving the RUN position. Display LED D1 flashing slowly during the first half of the start delay time (approx. 1 Hz). LED D1 flashing fast during the second half of the start delay time (approx. 4 Hz). Jetter AG... -
Page 93: Updating The Operating System
For OS download, please turn to the respective product information page. Transferring the OS file You have got several options to transfer the OS file to the JM-200-ETH: From within the programming tool JetSym Via FTP connection ... -
Page 94: Os Update By Means Of Jetsym
The programming tool JetSym offers an easy way to transfer an OS file to the JM-200-ETH. Prerequisites An OS file for the JM-200-ETH must be available. A UDP/IP and a TCP/IP connection between programming tool and JM-200-ETH is possible. -
Page 95: Operating System Update Via Ftp
JM-200-ETH Updating the operating system Operating system update via FTP Introduction Using an FTP client an OS file can be transferred to the JM-200-ETH. Prerequisites An OS file for the JM-200-ETH must be available. An FTP connection to the JM-200-ETH must be possible. -
Page 97: Quick Reference - Jm-200-Eth
100500 Interface (0 = CPU) Bit 2: Duplex 100501 Module number (0) Bit 3: Crossover If <100500> = 0: The EDS of the JM-200-ETH is displayed. Bit 4: 10 MBit/s [Identification] Bit 5: 100 MBit/s 100600 Internal version number Ethernet... - Page 98 11 Quick reference - JM-200-ETH 104809 Discarded connections Bit 0: Error on flash disk 104810 Repeated transmitted packets Bit 2: Error on JX2 system bus Bit 3: Error on Ethernet system bus 104900 Transmitted packets Bit 7: Error in expanded error register...
- Page 99 JM-200-ETH Quick reference - JM-200-ETH 123: Wait for communication - ON 160: Task switch on I/O access - OFF 161: Task switch on I/O access - ON 170: Continue task time slice - OFF 171: Continue task time slice - ON...
- Page 100 Setting the IP address via config.ini file and DIP switch The following DIP switch settings cause the JM-200-ETH to read out the IP address from the file config.ini and the DIP switches: Function of DIP switches 9 and 10 DIP switches 9 and 10 let you configure how the operating system is launched.
-
Page 101: Appendix
JM-200-ETH Appendix Appendix Introduction This appendix contains electrical and mechanical data, as well as operating data. Contents Topic Page Technical specifications ................102 Index ......................105 Jetter AG... -
Page 102: Technical Specifications
Appendix A: Technical specifications Introduction This chapter contains information on electrical and mechanical data, as well as on operating data of the JM-200-ETH. Table of contents Topic Page Technical specifications ................103 Notes on operating parameters ..............104 Jetter AG... -
Page 103: Technical Specifications
JM-200-ETH Appendix Technical specifications Electrical data - Power The JM-200-ETH is supplied with power by the servo amplifiers of the JM-200 supply series. Technical data - Ethernet Parameter Description port Type of connector RJ45 Ethernet jack Number of ports 1 port... -
Page 104: Notes On Operating Parameters
Appendix Notes on operating parameters Notes on operating The JM-200-ETH is installed in servo amplifiers of the JM-200 series. parameters Therefore, the operating parameters listed in the appendix to the User Manual on the JM-200 series also apply to the JM-200-ETH. -
Page 105: B: Index
Inserting control values in a HTML file • 82 Interfaces - Overview • 13 IP configuration Configuration file • 39 Configuration memory • 38 Configuration registers • 43 Jack X71 - Ethernet • 27 LEDs of JM-200-ETH • 32, 34, 35 Jetter AG... - Page 106 Jetter AG Graeterstrasse 2 71642 Ludwigsburg | Germany Phone +49 7141 2550-0 Fax +49 7141 2550-425 info@jetter.de www.jetter.de We automate your success.
Need help?
Do you have a question about the JM-200-ETH and is the answer not in the manual?
Questions and answers