Clarity C4210 User Manual
Cordless telephone with caller id
Hide thumbs
Also See for C4210:
- Brochure (2 pages) ,
- User manual (152 pages) ,
- Quick start manual (2 pages)

Related Manuals for Clarity C4210


Summary of Contents for Clarity C4210
- Page 1 C4210 User Guide ™ 2.4 GHz Cordless Telephone with Caller ID Featuring Digital Clarity Power Technology Ç...
-
Page 3: Table Of Contents
Battery Life............15 Headset Jack............15 Belt Clip ..............15 Hearing Aid Compatibility.........15 Feature Set Up............16 Handset Features ..........16 Set Up Mode..........16 Digital Clarity Power ........19 Boost Clarity Power On/Off......19 Volume Control..........19 Tone Switch ............19 Handset Ringer ..........20 Pulse/Tone ............20 Flash..............20 Mute ..............20 Redial/Pause ...........20... - Page 4 TABLE OF CONTENTS Telephone Operations ..........24 Placing a Call ............24 Answering a Call..........24 Last Number Redial..........24 Pause Feature............25 Temporary Tone...........25 Lighted Key Pad...........25 Page/Handset Locator........25 Channel Operation..........26 Security Code............26 Memory Storage............26 Review Phonebook Information ......26 Adding a Phonebook Number......27 Dialing a Phonebook Entry .......28 Deleting a Stored Number .......28 Deleting All Stored Numbers......28 Changing a Stored Number......29...
-
Page 5: Safety Instructions
IMPORTANT SAFETY INSTRUCTIONS When using your telephone equipment, basic safety precautions should always be followed to reduce the risk of fire, electric shock and injury to persons including the following: 1. Read and understand all instructions. 2. Follow all warnings and instructions marked on the telephone. - Page 6 IMPORTANT SAFETY INSTRUCTIONS 10. Do not place anything on the power cord. Install the telephone where no one will step or trip on the cord. 11. Do not overload wall outlets or extension cords as this can increase the risk of fire or electrical shock.
- Page 7 IMPORTANT SAFETY INSTRUCTIONS E. If the telephone has been dropped or the case has been damaged. F. If the telephone exhibits a distinct change in performance. 15. Never install telephone wiring during a lightning storm. 16. Never install telephone jacks in wet locations unless the jack is specifically designed for wet locations.
- Page 8 IMPORTANT SAFETY INSTRUCTIONS SAFETY INSTRUCTIONS FOR BATTERIES Caution: Risk of explosion if battery is replaced by an incorrect type. Dispose of used batteries according to the instructions. 1. Use only the approved battery pack in the handset of your cordless phone. For Handset Unit: 3.6V 600mAHr NiMH Rechargeable Battery Sanik Battery Co.
-
Page 9: Features
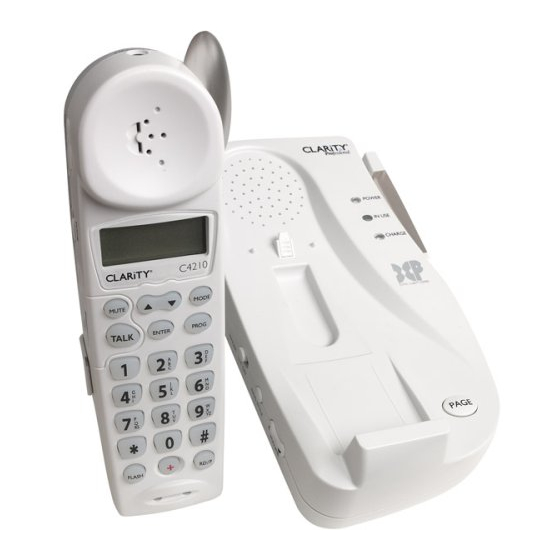
FEATURES Telephone Base 1. Handset Page 2. Ringer Volume 3. Ringer Style 4. Ringer On/Off 5. Antenna/Visual Ringer 6. Pulse/Tone 7. Boost On/Off... - Page 10 FEATURES Handset 11. Program 1. Neckloop Jack 12. Enter 2. Handset Tone 13. Flash 3. Boost 14. Emergency Button 4. Handset Volume 15. Redial/Pause 5. Mute 16. Visual Ringer 6. Talk 17. Handset Ringer Off/Vibe/On 7. Dial Pad 18. Delete/Channel 8.
-
Page 11: Getting Started
GETTING STARTED CHOOSING A LOCATION 1. This phone requires a modular phone jack (RJ11C) and a standard 120V AC wall outlet. 2. Plug the AC Adapter directly into outlet. 3. Do not plug other appliances into the same outlet or have outlet controlled by a wall switch. -
Page 12: Telephone Installation
GETTING STARTED TABLE/DESK TOP INSTALLATION CAUTION: Disconnect the telephone line cord before connecting or disconnecting the battery backup in the wall mount bracket. 1. Plug one end of the supplied modular tele- phone line cord into the jack marked TEL located on the back of the telephone base as shown in the diagram. - Page 13 GETTING STARTED 1. Plug one end of the supplied short modular telephone line cord into the TEL jack located on the back of the base of the phone. 2. Insert the plug of the AC adapter into the jack marked DC 9V 400mA located on the back of the telephone base.
-
Page 14: Battery Installation
GETTING STARTED HANDSET BATTERY INSTALLATION The C4210 uses a 3.6Volt 600mAh NiMH recharge- able 3 cell (AAA Type) battery that is included with your unit. Handset Battery must be connected before beginning initial charging. To Install a New Battery 1. Remove battery cover 2. -
Page 15: Battery Life
Ordering a Headset In the event you wish to purchase a headset for your C4210, please contact Plantronics at 1-800-544-4660 for a location near you.We recommend using the Plantronics M110 or M130 headset. Belt Clip You may choose to use the optional belt clip with your handset. -
Page 16: Feature Set Up
FEATURE SET UP TELEPHONE HANDSET Set-up Mode The C4210 handset goes into setup mode automati- cally when the battery is connected. Or press and hold MODE button for 3 seconds to enter setup mode. If there is no input within 30 seconds, the language will be set to the last selected one and go back to standby mode. - Page 17 FEATURE SET UP 3. Enter the area code number using the numeric keys on the handset. 4. Press the UP ( ) or DOWN ( ) button to go ▲ ▼ to the next menu. Setting Area Code 2 1. After setting Area Code 1, press UP ( ▲...
- Page 18 FEATURE SET UP Setting Voicemail Number 1. After setting Easy Mode, press UP ( ) button ▲ to set VOICEMAIL Number. 2. The LCD display will show VOICEMAIL NO and XXX-XXX-XXXX with the last digit blinking. 3. Enter the voicemail number using the numeric keys on the handset.
-
Page 19: Digital Clarity Power
15 dB of volume before the CLARITY POWER button is activated. Once the CLARITY POWER button is pressed, the C4210 will provide up to 40 dB of amplification. Tone Switch The C4210 has three (3) TONE settings. Adjusting the TONE switch changes the style of amplification... -
Page 20: Handset Ringer
FEATURE SET UP Handset Ringer Set the switch marked Ringer OFF/VIBE/ON located on the side of the handset.When VIBE is selected the handset will ring and vibrate when receiving and incoming call. The ringer switch must be set to ON or VIBE for the handset to ring. -
Page 21: Base Features
ON, the Boost function will be ON every time a call starts, and will default to ON every time the phone hangs up. During a call, the BOOST Clarity Power button can toggle the Clarity Power ON or OFF according to the user’s needs. -
Page 22: Battery Backup
OFF, the Boost function will be OFF every time a call starts, and the user will need to press the BOOST Clarity Power button in order to gain the extra level of amplification. If the phone hangs up, the Clarity Power will reset to OFF. - Page 23 FEATURE SET UP To Replace Battery Backup Batteries 1. Disconnect telephone line cord and remove desk/wall mount bracket from telephone base. 2. Disconnect battery back-up connector from the telephone base. 3. Remove batteries from desk/wall mount bracket. 4. Install four (4) AA Alkaline batteries with negative (-) end of battery touching the spring.
-
Page 24: Telephone Operations
If the handset is in the cradle with AutoConnect mode OFF, lift the handset.The handset will be in standby mode. Press TALK button to receive the call. Refer to BOOST Clarity Power and Volume Control for information on adjusting volume controls on Page 19. Last Number Redial The last number dialed (up to 32 digits) is stored in the redial memory until another number is dialed. -
Page 25: Pause Feature
TELEPHONE OPERATIONS Pause Feature Programming in a pause will cause the phone to wait four (4) seconds before dialing additional numbers. This feature may be used when it is necessary to dial an access code (9, for example) and wait for a sec- ond dial tone before you can dial an outside number. -
Page 26: Channel Operation
TELEPHONE OPERATIONS Channel Operation The C4210 cordless telephone automatically searches and selects the clearest of 40 channels when it is being used. If interference develops on the line, pressing this button will move to another channel. Security Code The security code prevents your cordless phone conversations from being accessed by a phone on a different line. -
Page 27: Adding A Phonebook Number
TELEPHONE OPERATIONS Adding a Phonebook Number 1. Unit must be in standby mode only. 2. Press MODE key twice.The display will show PHONEBOOK for 1 second and then display the first available record. 3. Press PROG key to add new phone record. 4. -
Page 28: Dialing A Phonebook Entry
TELEPHONE OPERATIONS Dialing a Phonebook Entry 1. Locate the phonebook record you wish to call. 2. Press TALK or ENTER button to dial the displayed number. Deleting a Stored Number 1. Unit must be in standby mode and display is showing a phonebook record. 2. -
Page 29: Changing A Stored Number
TELEPHONE OPERATIONS Changing a Stored Number 1. Unit must be in standby mode only. 2. Press MODE key twice.The display will show PHONEBOOK for 1 second and then display the first available record. 3. Press the UP ( ) or DOWN ( ) button to go ▲... -
Page 30: Dialing The Emergency Number
TELEPHONE OPERATIONS 3. Press the UP ( ) or DOWN ( ) button ▲ ▼ to go to the record to be stored to the EMERGENCY key. 4. Press and hold the EMERGENCY key for 2 seconds. 5. The phone number is copied to the EMERGENCY key.The LCD will display MEM STORING for one (1) second and the handset will give a success keynote. -
Page 31: Caller Id Operations
Visual Message Waiting Indicator (VMWI) Note:This is a service that is provided through your local telephone company. If the C4210 finds that there is voice message to be retrieved, it will turn on the Message Waiting Indica- tor (the ENTER key). -
Page 32: Caller Id Review
TELEPHONE OPERATIONS If you access the call waiting call, the Caller ID information will disappear and the Time/Day screen will appear. If you do not access the call waiting call, the Caller ID information will be transferred into the Caller log. This caller information is considered “old”. -
Page 33: Saving Caller Id Information To Phonebook.33
TELEPHONE OPERATIONS If the Caller ID list is empty, the display will show - NO CALLS -. • At anytime, the user can press FLASH button one time to go back to standby mode. • It will go back to standby automatically at 30 seconds time out if there is no action. -
Page 34: Callback From Caller Id Information
TELEPHONE OPERATIONS • At anytime, the user can press FLASH button one time to go back to standby mode. • It will go back to standby automatically at 30 seconds time out if there is no action. Callback from CALLER ID Information To callback from incoming call information, the base T/P switch should be set at T. - Page 35 TELEPHONE OPERATIONS Example 1: Stored Long Distance Service code: 1. Stored area code: 770. Stored incoming call number 770-123-4567. 1. Pressing the ENTER key will show blinking 123-4567. 2. Pressing the TALK or ENTER key again will dial out 1234567. 3.
-
Page 36: Delete Caller Id Information
• It will go back to standby automatically at 30 seconds time out if there is no action. The C4210 has been designed to give you years of dependable service with a minimum of care.To ensure the utmost in performance, follow these guidelines in caring for the unit: 1. -
Page 37: Maintenance And Care
MAINTENANCE AND CARE 3. Do not use detergents and avoid excess moisture. 4. The C4210 is an electrical device.Avoid electric shock by keeping the phone away from water (i.e. bathroom, kitchen sink, etc.). The unit will not operate/no dial tone: •... -
Page 38: Troubleshooting
TROUBLESHOOTING Noise, Static, Interference or Other Calls Heard while Using the Handset: • Try changing channels. • Make sure the base antenna is in an upright position. • Make sure you are in the usable range of the base station. •... - Page 39 TROUBLESHOOTING Difficulty in Placing or Receiving Calls: • Move closer to the base and try again. • If moving closer does not work, you may have lost the security code. • Reset code by placing the handset back on the base for 5-10 seconds. (See Security Code Section) •...
-
Page 40: Regulatory Compliance
REGULATORY COMPLIANCE Part 68 of FCC Rules Information a) This equipment complies with Part 68 of the FCC rules and the requirements adopted by the ACTA. On the bottom of this equipment is a label that contains, among other information, a product identifier in the format US:AAAEQ##TXXXX. - Page 41 If trouble is experienced with this telephone equipment, for repair or warranty information, please contact Clarity, 1-800-552-3368. If the equipment is causing harm to the telephone network, the tele- phone company may request that you disconnect the equipment until the problem is resolved.
- Page 42 REGULATORY COMPLIANCE Customer-Owned Coin/Credit Card Phones: To comply with state tariffs, the telephone company must be given notification prior to connection. In some states, the state public utility commission, pub- lic service commission or corporation commission must give prior approval of connection. Part 15 of FCC Rules Information This device complies with Part 15 of the FCC Rules.
- Page 43 REGULATORY COMPLIANCE 3. Connect the telephone equipment into an outlet on a circuit different from that to which the television, radio, or other receiver is connected. 4. Consult the dealer or an experienced Radio/ TV Technician for help. CAUTION: Changes or modifications not ex- pressly approved by the manufacturer responsible for compliance could void the user’s authority to oper- ate the equipment.
- Page 44 five. (The term “IC:” before the certification/ registration number only signifies that the Industry Canada technical specifications were met.) The party responsible for regulatory compliance: Clarity,A Division of Plantronics, Inc. 4289 Bonny Oaks Drive, Suite 106 Chattanooga,TN 37406 Phone: 1-800-552-3368...
-
Page 45: Warranty And Service
(1) year from the date of original purchase (“Warranty Period”).The obligation of Clarity under this warranty shall be at Clarity‘s option, without charge, of any part or unit that proves to be defective in material or workman- ship during the Warranty Period. - Page 46 Incidental or Consequential Damages Neither Clarity nor your retail dealer or selling distributors has any responsibility for any incidental or consequential damages including without limita- tion, commercial loss or profit, or for any incidental expenses, expenses, loss of time, or inconvenience.
- Page 47 WARRANTY & SERVICE In Canada Plantronics Service Center 8112 Trans-Canada Hwy. Ville St. Laurent. Que. Canada H4S 1M5 Tel: (800) 540-8363 (514) 956-8363 Fax: (514) 956-1825 Please use the original container, or pack the unit(s) in a sturdy carton with sufficient packing material to prevent damage.
Need help?
Do you have a question about the C4210 and is the answer not in the manual?
Questions and answers