Table of Contents
Advertisement
Quick Links
LG
Ventilator
OWNER'S MANUAL
website http://www.lgservice.com
Prior to installation, this ventilation unit
must be submitted for approval by the
utility service which provides electricity
(EN 61000-2, EN 61000-3 Norm).
IMPORTANT
• Please read this owner's manual carefully and thoroughly
before installing and operating your product.
• Please retain this owner's manual for future reference after
reading it thoroughly.
LG
Advertisement
Table of Contents

Subscribe to Our Youtube Channel
Related Manuals for LG LZ-H0106BA0.ENWALEU


Summary of Contents for LG LZ-H0106BA0.ENWALEU
- Page 1 Ventilator OWNER'S MANUAL website http://www.lgservice.com Prior to installation, this ventilation unit must be submitted for approval by the utility service which provides electricity (EN 61000-2, EN 61000-3 Norm). IMPORTANT • Please read this owner's manual carefully and thoroughly before installing and operating your product. •...
-
Page 2: Table Of Contents
Ventilator Owner’s Manual TABLE OF CONTENTS Safety Precautions...3 Prior to Operation ...8 Introduction ...9 Electrical Safety ...11 Characteristics ...12 Operating Instructions...13 Maintenance and Service ...22 Check Item prior to notify a failure ...27 2 Ventilator FOR YOUR RECORDS Write the model and serial numbers here: Model # Serial # You can find them on a label on the side of each unit. -
Page 3: Safety Precautions
Safety Precautions To prevent injury to the user or other people and property damage, the following instructions must be followed. I Incorrect operation due to ignoring instruction will cause harm or damage. The seriousness is classified by the following indications. I Meanings of symbols used in this manual are as shown below. - Page 4 Safety Precautions Do not modify or extend the power cable. • There is risk of fire or electric shock. For installation, always contact the dealer or an Authorized Service Center. • There is risk of fire, electric shock, explosion, or injury. For re-installation of the installed product, always contact the dealer or an...
- Page 5 I Operation Take care to ensure that power cable could not be pulled out or damaged during operation. • There is risk of fire or electric shock. Do not touch(operate) the product with wet hands. • There is risk of fire or electrical shock.
- Page 6 Safety Precautions Stop operation and close the window in storm or hurricane. If possible, remove the product from the window before the hurricane arrives. • There is risk of property damage, failure of product, or electric shock. Turn the breaker off when cleaning or maintaining the product.
- Page 7 I Installation Use two or more people to lift and transport the product. • Avoid personal injury. I Operation Do not expose the skin directly to cool air for long periods of time. (Don't sit in the draft.) • This could harm to your health. Do not step on or put anything on the product.
-
Page 8: Prior To Operation
Prior to Operation Prior to Operation Preparing for operation 1. Contact an installation specialist for installation. 2. Plug in the power plug properly. 3. Use a dedicated circuit. 4. Do not use an extension cord. 5. Do not start/stop operation by plugging/unplugging the power cord. 6. -
Page 9: Introduction
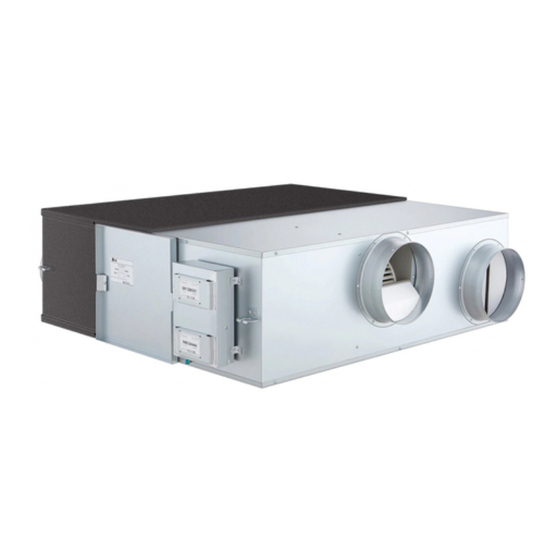
Introduction Symbols used in this Manual This symbol alerts you to the risk of electric shock. This symbol alerts you to hazards that could cause harm to the ventilator. This symbol indicates special notes. NOTICE Features WARNING: This appliance should be installed in accordance with national wiring regulations. - Page 10 Introduction Application tool : 250 CMH(69 L/s) 1. Air Filter Prevents clogging of the Total heat exchanger due to dust. 2. Total Heat Exchanger Exchanges temperature and moisture between air supply air and exhaust air. ❈ The figure of Total heat Exchanger can be different by the Product Model. 10 Ventilator 3.
-
Page 11: Electrical Safety
Electrical Safety WARNING: This appliance must be properly grounded. To minimize the risk of electric shock, you must always plug into a grounded outlet. WARNING: Do not cut or remove the grounding prong from the power wire. WARNING: Attaching the adapter ground terminal to the wall receptacle cover screw does not ground the appliance unless the cover screw is metal and not insulated, and the wall receptacle is grounded through the house wiring. -
Page 12: Characteristics
Characteristics Characteristics Ventilation via Total Heat Exchanger Exhausts indoor air via the Total heat exchanger outdoor. • The outdoor air heat exchanged is supplied to indoor. Operate the ventilator in the [Ventilation via Total heat exchanger] in summer/winter when cool/heat operation is done. Exhaust air Outdoor air Total Heat Exchanger... -
Page 13: Operating Instructions
Operating Instructions Operating Instructions LCD Remote Controller (Ventilation System Remote Controller AZLRAD0) • Every function is not available by a kind of models. 1. Display Window 2. Execute/Cancel of Time Reservation,Weekly Reservation/Weed Day Select/Holiday Select Button 3. Operation/Stop Button 4. Delay Time Button 5. - Page 14 Operating Instructions Method to operate and select air volume • Every function is not available by a kind of models. EXTERNAL VENTILATOR OPERATION SUB FUNCTION Heater Preheat Linked Run Auto Auto Dual Remote Defrost Humidify Central Run Heat XCH Auto Normal Fan Speed Z O N E...
-
Page 15: Ventilation Mode Setting
Ventilation Mode Setting • Every function is not available by a kind of models. SUB FUNCTION EXTERNAL VENTILATOR OPERATION Linked Run Heater Preheat Auto Auto Defrost Humidify Dual Remote Central Run Heat XCH Auto Normal Fan Speed Z O N E Delay Time Filter Time 1 2 3 4... - Page 16 Operating Instructions Rapid Ventilation/Power Saving Ventilation • Every function is not available by a kind of models. EXTERNAL VENTILATOR OPERATION SUB FUNCTION Linked Run Heater Preheat Auto Dual Remote Defrost Humidify Central Run Heat XCH Auto Normal Fan Speed Z O N E 1 2 3 4 PLASMA Delay Time...
-
Page 17: Heating Operation
Optional Function • Every function is not available by a kind of models. EXTERNAL VENTILATOR OPERATION SUB FUNCTION Linked Run Heater Preheat Auto Auto Defrost Humidify Dual Remote Central Run Heat XCH Auto Normal Fan Speed Z O N E Delay Time Filter Time 1 2 3 4... -
Page 18: Additional Function
Operating Instructions Additional function Setting of current time • You can easily set the current time. • Every function is not available by a kind of models. EXTERNAL VENTILATOR OPERATION SUB FUNCTION Linked Run Heater Preheat Auto Auto Defrost Humidify Dual Remote Central Run Heat XCH Auto Normal... - Page 19 Weekly Reservation Setup No reservation operation is done with the current time not setting up. Example) To operate the ventilator at 06:00 ~ 08:00 and 13:00 ~ 22:00 on Monday • Every function is not available by a kind of models. EXTERNAL VENTILATOR OPERATION SUB FUNCTION...
-
Page 20: Remote Controller
Operating Instructions Holiday Setup Example) In the case that it is holiday on Tuesday. • Automatically turn off when the reservation day set up. • Every function is not available by a kind of models. EXTERNAL VENTILATOR OPERATION SUB FUNCTION Heater Preheat Linked Run Auto... - Page 21 On/Off Reservation ‘On’ Reservation • Automatically turn on when the reservation time set up. EXTERNAL VENTILATOR OPERATION SUB FUNCTION Linked Run Heater Preheat Auto Auto Defrost Humidify Dual Remote Central Run Heat XCH Auto Normal Fan Speed Z O N E Delay Time Filter Time 1 2 3 4...
-
Page 22: Maintenance And Service
Maintenance and Service Maintenance and Service Handling and Cleaning To prevent function of the ventilator deteriorating, clean dust adhered to the air filter and total heat exchanger regularly. Cleaning Cycle - Air filter: More than once every 6 months. - Total heat exchanger: More than once every 2 years (Cleaning cycle may increase according to pollution degree.) Method to take each part out Application tools : 100/150 CMH(28/42 L/s) - Page 23 Method to take each part out Application tool : 250 CMH(69 L/s) 1.Open the maintenance cover Loosen the setting knob assembled to the maintenance cover with either hand or a + driver, and open the maintenance cover. 2. Pull out the heat exchanger Pull out the heat exchanger by holding the clamp cord connected to each end of the heat exchanger.
- Page 24 Maintenance and Service Method to Clean and Replace Each Part 1. Cleaning of Air Filter Clean once every 6 months. • Clean dirt from the air filter using a vacuum cleaner or washing with water. (if dirt is conspicuous, wash with a neutral detergent in lukewarm water) •...
- Page 25 Assembly and Check after Maintenance Application tools : 100/150 CMH(28/42 L/s) 1. First assemble one air filter. - Slide in the air filter according to the holder structure of the heat exchanger. - When inserting the air filter, be careful not to damage the surface of the heat exchanger.
-
Page 26: Main Unit
Maintenance and Service Application tool : 250 CMH(69 L/s) 1. Assemble the air filter. - Slide in the air filter according to the holder structure of the heat exchanger. - Dust on the heat exchanger can be the cause of weak airflow. 2. -
Page 27: Check Item Prior To Notify A Failure
Check Item prior to notify a failure Symptom The Product doesn't work The Product doesn't work through you press the 'ON' switch Through you change the Indoor Air Volume, the operation mode doesn't change And it changes to 'Auto' or Low'. Check Item Is power not supplied? Is Air Filter, Total heat... - Page 28 P/No.: 3828A20468D Printed in Korea After reading this manual, keep it in a place easily accessible to the user for future reference.
Need help?
Do you have a question about the LZ-H0106BA0.ENWALEU and is the answer not in the manual?
Questions and answers