Table of Contents
Advertisement
Quick Links
Safety precautions
To prevent injury to the user or other people and property damage, the following instructions
must be followed.
Incorrect operation due to ignoring instruction will cause harm or damage. The seriousness is
classified by the following indications.
!
WARNING
!
CAUTION
Meanings of symbols used in this manual are as shown below.
Installation
• Do not use a defective or underrated circuit breaker. Use this appliance on a
dedicated circuit.
- There is risk of fire or electric shock.
• For electrical work, contact the dealer, seller, a qualified electrician, or an
authorized service center.
- Do not disassemble or repair the product. There is risk of fire or electric shock.
• Always ground the product.
- There is risk of fire or electric shock.
• Install the panel and the cover of control box securely.
- There is risk of fire or electric shock.
• Always install a dedicated circuit and breaker.
- Improper wiring or installation may cause fire or electric shock
• Use the correctly rated breaker or fuse.
- There is risk of fire or electric shock.
• Do not modify or extend the power cable.
- There is risk of fire or electric shock.
• Do not install, remove, or re-install the unit by yourself (customer).
- There is risk of fire, electric shock, explosion, or injury.
This symbol indicates the possibility of death or serious injury.
This symbol indicates the possibility of injury or damage.
Be sure not to do.
Be sure to follow the instruction.
!
WARNING
Safety precautions
Owner's manual 3
Advertisement
Table of Contents

Related Manuals for LG Eco-V Series


Summary of Contents for LG Eco-V Series
- Page 1 Safety precautions Safety precautions To prevent injury to the user or other people and property damage, the following instructions must be followed. Incorrect operation due to ignoring instruction will cause harm or damage. The seriousness is classified by the following indications. WARNING This symbol indicates the possibility of death or serious injury.
-
Page 2: Operation
• Precautions must be taken to avoid the back-flow of gases into the room from the open flue of gas or other fuel-burning appliances. • When installing, servicing, or repairing the UV LED, the modules provided by LG Electronics must be used. If necessary, please contact an LG Electronics Service Center. - Page 3 • Do not remove the parts inside the product with UV risk symbols. UV‑C may be released from the UV LED. - Injury may occur. • If the UV LED is damaged or needs to be replaced, please contact an LG Electronics Service Center. - Injury may occur.
-
Page 4: Installation
- It may cause corrosion on the product. Corrosion, particularly on the condenser and evaporator fins, could cause product malfunction or inefficient operation. • If anyone other than a licensed Professional installs, repairs, or alters LG Electronics Air Conditioning Products, the warranty is voided. - Page 5 Safety precautions • Doors and access panels bearing the ultraviolet radiation hazard symbol which may have UV-C spectral irradiance greater than 1.7 μW/cm are provided with an interlock switch to interrupt the power to the UV-C lamps for your safety. Do not over-ride.
-
Page 6: Smart Functions
• The appliance supports 2.4 GHz Wi-Fi networks only. To check your network frequency, contact your Internet service provider or refer to your wireless router manual. • LG ThinQ is not responsible for any network connection problems or any faults, malfunctions, or errors caused by network connection. - Page 7 Smart Functions Installing LG ThinQ Search for the LG ThinQ application from the Google Play Store or Apple App Store on a smart phone. Follow instructions to download and install the application. Wi-Fi Function • For appliances with the or ThinQ logo Communicate with the appliance from a smart phone using the convenient smart features.
-
Page 8: Prior To Operation
Prior to operation Prior to operation Preparing for operation 1. Contact an installation specialist for installation. 2. Plug in the power plug properly. 3. Use a dedicated circuit. 4. Do not use an extension cord. 5. Do not start/stop operation by plugging/unplugging the power cord. 6. -
Page 9: Symbols Used In This Manual
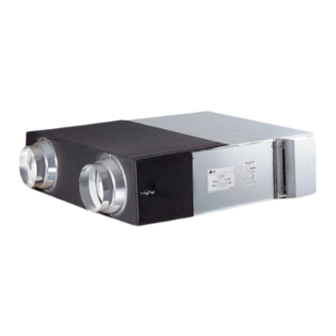
Introduction Introduction Symbols used in this manual This symbol alerts you to the risk of electric shock. This symbol alerts you to hazards that could cause harm to the ventilator. NOTICE This symbol indicates special notes. Features WARNING This appliance should be installed in accordance with national wiring regulations. This guide acts as a guide to help to explain product features. - Page 10 Introduction • 150 / 200 CMH 1. Ventilation blower 7. Fine filter It is a blower for supplying outside air to the The pre-filter prevents the passage of fine indoors. dust that could not be blocked. 2. Control box 8. Bypass It powers the control box product and It changes the flow path when changing the controls the operation.
- Page 11 Introduction • 250 / 350 / 500 CMH 1. Maintenance cover 5. Control box 2. Air filter 6. Blower for supply air It prevents dust from clogging in total heat It is a fan for inhaling exterior air into an exchanger.
- Page 12 Introduction • 1 500 / 2 000 CMH 1. Maintenance cover 5. Control box 2. Air filter 6. Blower for supply air It prevents dust from clogging in total heat It is a fan for inhaling exterior air into an exchanger.
-
Page 13: Name And Function Of Remote Controller
Operating instructions (Accessory) Operating instructions (Accessory) Name and function of remote controller Operation Display Windows Sub function Button Airflow Button Set/Cancel Button Function Setting Button Temperature Control Button Ventilation Button On/Off Button Reservation Button Up/Down/Left/Right Button Operation Mode Selection Button Wireless Remote Controller Room temperature Button Receiver... - Page 14 Operating instructions (Accessory) Operation display window OK Button Back button On/Off Button Up/Down/Left/Right Button Operation display window Operation and Settings status display Back button When you move to the previous stage from the menu’s setting stage Up/down/left/right button When you change the menu’s setting value OK button When you save the menu’s setting value On/Off button...
- Page 15 Operating instructions (Accessory) Method to operate and select air volume – Interlinked operation with ventilation It is used when air conditioner is interlinked with ventilation product. It is a function that cools and refreshes indoor air using the ventilation product at the same time operating the air conditioning function.
- Page 16 Operating instructions (Accessory) Method to operate and select air volume – Ventilation single operation It is a function to cool and refresh the indoor air using general ventilation product. Ventilation single operation Press button on the remote controller. Pressing button will change the ventilation mode.
- Page 17 Operating instructions (Accessory) Fast/energy saving ventilation mode It is a function to operate ventilation function more efficiently through the ventilation additional functions, fast / power saving settings. Fast : ventilates fast Press button in ventilation mode. - It converts in the order of 'fast → power saving' in ventilation mode.
-
Page 18: Using Add-Ons
Operating instructions (Accessory) Using add-ons (Only for 200/150 CMH) Using UVnano Function Check the overall cleanliness • UVnano is a compound word of UV (ultraviolet rays) and nanometer (length unit). • The indoor air quality is displayed so you can •... - Page 19 Characteristics Characteristics Ventilation via total heat exchanger Exhausts indoor air via the total heat exchanger outdoor. • The outdoor air heat exchanged is supplied to indoor. Operate the ventilator in the ventilation via total heat exchanger in summer/winter when cool/heat operation is done. Damper Outdoor air Return air...
-
Page 20: Maintenance And Service
Maintenance and service Maintenance and service Handling and cleaning To prevent function of the ventilator deteriorating, clean dust adhered to the air filter and total heat exchanger regularly. Method to take each part out CAUTION Take care to ensure that you could not damage when taking the air filter out since there is a sharp part on it. - Page 21 Maintenance and service • 250 / 350 / 500 / 800 / 1 000 CMH 1. Remove the maintenance cover. Loosen a screw on the maintenance cover. Put the hands inside of the ceiling from the maintenance cover, and pull the maintenance cover up.
- Page 22 Maintenance and service • 1 500 / 2 000 CMH 1. Remove the maintenance cover. Loosen a screw on the maintenance cover. Put the hands inside of the ceiling from the maintenance cover, and pull the maintenance cover up. (Looser the hinge and detach the maintenance cover.) Maintenance cover 2.
- Page 23 Maintenance and service 2. Cleaning of total heat exchanger Suck dusts adhered to the surface of the total heat exchanger with a cleaner. • Use the cleaner that attached to brush at its nozzle, and use a soft brush. • Do not use a hard nozzle on the cleaner. (Otherwise, surface of the total heat exchanger may be damaged.) •...
- Page 24 Maintenance and service • 250 / 350 / 500 / 800 / 1 000 CMH Total heat exchanger 1. Assembly of total heat exchanger Securely put the corner parts (4 parts) of the total heat exchanger into the holder for assembly and slide them into the inside of the main body.
-
Page 25: Check Item Prior To Notify A Failure
Check item prior to notify a failure Check item prior to notify a failure Symptom Check Item Counter-measure The Product doesn't work Is power not supplied? Supply Power The Product doesn't work Is the Indoor temperature less It's standby mode for protecting through you press the 'ON' than 15 °C or more than 40 °C? Total Heat Exchanger.
Need help?
Do you have a question about the Eco-V Series and is the answer not in the manual?
Questions and answers