
Related Manuals for MPPT M32-10


Summary of Contents for MPPT M32-10
- Page 1 MPPT Solar Charge Controller User Manual Models: M32-10, 10A, 12/24V M32-20, 20A,12/24V M32-30, 30A,12/24V M32-40, 40A,12/24V...
- Page 2 Important Safety Instructions Please keep this manual for future review. This manual contains all instructions of safety, installation and operation for Maximum Power Point Tracking (MPPT) controller ("the controller" as referred to in this manual). General Safety Information Read carefully all the instructions and warnings in the manual before installation.
-
Page 3: Table Of Contents
CONTENTS 1. General Information ................ 1 1.1 Overview ..........1 1.2 Characteristics ......... 2 1.3 Naming Rules of Controller models ....... 2 1.4Product Classification ........3 2. Installation Instructions ..............4 2.1 General Installation Notes ....... 4 2.2 PV Array Requirements ......... 4 2.3 Wire Size .......... -
Page 4: General Information
Maximum DC/DC transfer efficiency is as high as 98.5% , full load efficiency is up ★ to 97.2% Advanced MPPT control algorithm to minimize the MPP lost rate and lost time Accurate recognizing and tracking of multi-peaks maximum power point Wide MPP operating voltage range ... -
Page 5: Characteristics
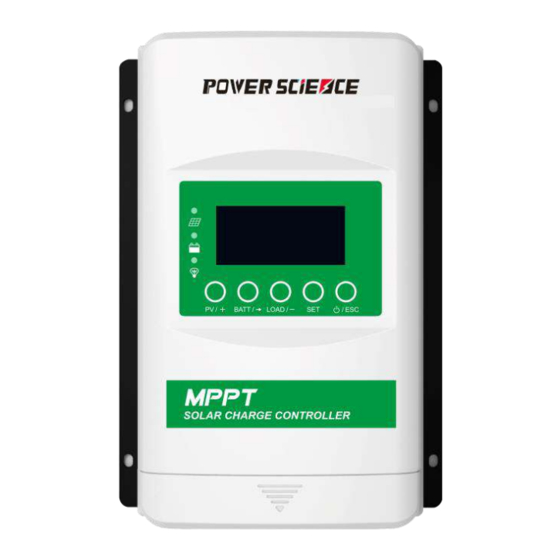
▲ IP33 Ingress protection ▲3-protection against solid objects: protected against solids objects over 2.5mm. 3-protected against sprays to 60°from the vertical. 1.2 Characteristics Figure 1 Product Characteristics ❶ ❺ ★ port RS485 communication port ❷ ❻ PV Terminals Terminal protection cover ❸... -
Page 6: Naming Rules Of Controller Models
M 3 2-40 Charging and discharge current: 40-40A, 30-30A, 20-20A, 10-10A System voltage: 1-12V; Max PV open circuit voltage:1-25V, 2-50V, 3-100V 4-150V 2-12/24V MPPT charging technology 1.4Product Classification Model Picture Display LED Indicators: PV & battery & load working status Buttons:View or set the parameters or clear the error information. -
Page 7: Installation Instructions
PV modules and maximize converting solar energy into electrical energy. According to the open circuit voltage (V ) and the maximum power point voltage (V ) of the MPPT controller, the series number of different types PV modules can be calculated. The below table is for reference only. - Page 8 Air Mass1.5.) (2) Maximum PV array power The MPPT controller has the function of charging current/power-limiting, that is, during the charging process, when the charging current or power exceeds the rated charging current or power, the controller will automatically limit the charging current or...
-
Page 9: Wire Size
PV array for this controller, please refer to the table below: Rated Charge Rated Charge Max. PV Array Max. PV open Model Current Power Power circuit voltage 130W/12V 195W/12V M32-10 260W/24V 390W/24V 260W/12V 390W/12V M32-20 ① 520W/24V 780W/24V ② 390W/12V 580W/12V 100V... -
Page 10: Mounting
M32-10 /12AWG M32-20 /10AWG M32-30 10mm /8AWG M32-40 16mm /6AWG *These are the maximum wire sizes that will fit the controller terminals. CAUTION: When the PV modules are connected in series, the open circuit voltage of the PV array must not exceed 92V (M**10), at 25℃ environment temperature. - Page 11 enclosure. Installation Procedure: Figure2-1 Mounting Step1: Determination of Installation Location and Heat-dissipation Space Determination of installation location: The controller shall be installed in a place with sufficient air flow through the radiators of the controller and a minimum clearance of 150 mm from the upper and lower edges of the controller to ensure natural thermal convection.
- Page 12 Figure 2-2 Schematic of wiring diagram Step 2:Connect the system in the order of ❶battery ❷ load❸PV array in accordance with Figure 2-2,” Schematic Wiring Diagram” and disconnect the system in the reverse order❸❷❶. CAUTION:While wiring the controller do not close the circuit breaker or fuse and make sure that the leads of "+"...
-
Page 13: Display Units
Connect the accessories for RS485 communication Refer to chaper4“Control Parameters Setting”. Step 5:Powered on the controller Closing the battery fuse will switch on the controller. Then check the status of the battery indicator (the controller is operating normally when the indicator is lit in green).Close the fuse and circuit breaker of the load and PV array. - Page 14 On Solid Normal Green Full Slowly Flashing(1Hz) Green Over voltage Fast Flashing(4Hz) Green Under voltage On Solid Orange On Solid Over discharged Battery Overheating Slowly Flashing(1Hz) Lithium battery Low ① temperature Yellow On Solid Load ON Yellow Load OFF Controller Overheating PV&BATTLED fast flashing ②...
- Page 15 Icon Icon Icon Information Information Information discharging charging Discharging Night Charging 1)PV parameters Display:Voltage/Current/Power/Generated Energy 2)Battery parameters Display:Voltage/Current/Temperature/Battery capacitylevel 3)Load parameters...
- Page 16 Display:Voltage/Current/Power/Consumedenergy/Load working mode-Timer1/ Load working mode-Timer2 (4)Setting parameters 1)Battery type Operation: Step 1: Press the button for the setting interface. Sealed(Default) User Flooded Step 2: Press the button and hold 5s for the battery type interface. Step 3: Press the button to choose the battery type.
- Page 17 3)Temperature units Operation: Step 1: Press the button for the setting interface. Step 2: Press the button and hold 5s for the battery type interface. Step 3: Press the button twice for the temperature unit interface. Step 4: Press the button to set the temperature units.
-
Page 18: Control Parameters Setting
5)Local load working mode Operation: Step 1: Press the button for the setting interface. Step 2: Press the button and hold 5s for the load working mode interface. Step 3: Press the button to set the working mode.. Step 4: Press the button to confirm the parameters. - Page 19 The parameters are in 12V system at 25 º C, please double the values in 24V system. Battery type Sealed Flooded User Voltage Over Voltage Disconnect 16.0V 16.0V 16.0V 9~17V Voltage Charging Limit Voltage 15.0V 15.0V 15.0V 9~17V Over Voltage Reconnect 15.0V 15.0V 15.0V...
-
Page 20: Settings
Over Voltage Reconnect 14.7V 12.7V 9~17V Voltage Equalize Charging 14.5V 12.5V 9~17V Voltage Boost Charging Voltage 14.5V 12.5V 9~17V Float Charging Voltage 13.8V 12.2V 9~17V Boost Reconnect 13.2V 12.1V 9~17V Charging Voltage Low Voltage Reconnect 12.8V 10.5V 9~17V Voltage Under Voltage Warning 12.8V 11.0V 9~17V... -
Page 21: Load Working Modes
Download software For detailed setting methods, please refer to the instructions or contact after-sales support. 4.2Load working modes 4.2.1 display and operation When the LCD shows above interface, operate as following: Step1: Press the button for the setting interface. Step2: Press the button and hold 5s for the load working mode interface. -
Page 22: R485 Communication Setting
~ ~ 13hoursafter sunset hours before sunrise Load will be on for 14 hours Load will be on for 14 hours after sunset before sunrise Load will be on for 15 hours Load will be on for 15 hours after sunset before sunrise Test mode Disabled... -
Page 23: Accessories (Optional)
Download software CAUTION: For detailed setting methods, please refer to the instructions or contact after-sales support. 4.3 Accessories (optional) Acquisition of battery temperature for undertaking temperature compensation of control parameters, the standard length of the cable is 3m (length can be customized). The remote temperature sensor connects Remote Temperature Sensor to the port (4... -
Page 24: Protections, Troubleshooting And Maintenance
5. Protections, Troubleshooting and Maintenance 5.1 Protection When the charging current or power of the PV array exceeds the controller’s rated current or power, it will be charge at the rated Over current or power. Current/power NOTE: When the PV modules are in series, ensure that the open-circuit voltage of the PV array does not exceed the "maximum PV open-circuit voltage"... - Page 25 ★When the internal temperature is 81℃, the reduce charging power mode which reduce the charging power of 5%,10%,20%,40% every increase 1 ℃is turned on. If the internal temperature is greater than 85℃, the controller will stop charging.When the temperature declines to be below 75 º C, the controller will resume. For example, 24V system: 5.2 Troubleshooting Possible reasons...
-
Page 26: Troubleshooting
When heat sink of controller exceeds 85℃, the controller Controller will automatically cut off input Overheating and output circuit. When the temperature below 75℃,the controller will resume to work. PV/BATT indicator fast flashing ①Check whether the battery voltage match with the System voltage controller working voltage. - Page 27 WARNING:Risk of electric shock! Make sure that all the power is turned off before above operations, and then follow the corresponding inspections and operations.
-
Page 28: Technical Specifications
6. Technical Specifications Electrical Parameters Item M32-10 M32-20 M32-30 M32-40 2/24VDC Auto System nominal voltage ① Rated charge current Rated discharge current Battery voltage range 8~32V ② Max. PV open circuit 100V ③ voltage MPP voltage range (Battery voltage +2V)~72V... - Page 29 ①When lithium battery is used, the system voltage can’t be identified automatically. ②At minimum operating environment temperature ③At 25℃ environment temperature ④When lithium battery is used, the temperature compensate coefficient must be 0,and can’t be changed. Environmental Parameters Item M32-10 M32-20 M32-30 M32-40 ◆ -25℃~+50℃(LCD)
- Page 30 ★3-protection against solid objects: protected against solids objects over 2.5mm. 3-protected against sprays to 60°from the vertical. Mechanical Parameters Item M32-10 M32-20 M32-30 M32-40 Dimension 175×143×48mm 217×158×56.5mm 230×165×63mm 255×185×67.8mm Mounting dimension 120×134mm 160×149mm 173×156mm 200×176mm Φ5mm Mounting hole size Terminal...
-
Page 31: Annex Iconversion Efficiency Curves
Annex IConversion Efficiency Curves Illumination Intensity: 1000W/m Temp: 25º C Model: M32-10 1. Solar Module MPP Voltage(17V, 34V) / Nominal System Voltage(12V) 2. Solar Module MPP Voltage(34V,51V,68V) / Nominal System Voltage(24V) - Page 32 Model: M32-20 1. Solar Module MPP Voltage(17V, 34V) / Nominal System Voltage(12V) 2. Solar Module MPP Voltage(34V,51V,68V) / Nominal System Voltage(24V)
- Page 33 Model: M32-30 1. Solar Module MPP Voltage(17V, 34V) / Nominal System Voltage(12V) 2. Solar Module MPP Voltage(34V,51V,68V) / Nominal System Voltage(24V)
- Page 34 Model: M32-40 1. Solar Module MPP Voltage(17V, 34V) / Nominal System Voltage(12V) 2. Solar Module MPP Voltage(34V, 51V,68V) / Nominal System Voltage(24V)
-
Page 36: Annex Iimechanicaldimension Diagram
Annex IIMechanicalDimension Diagram M32-10 (Unit: mm) - Page 37 M32-20(Unit: mm)
- Page 38 M32-30(Unit: mm)
- Page 39 M32-40(Unit: mm) Any changes without prior notice! Version number: 3.1...
- Page 40 PowerPlus Australia Group Pty Ltd ATF Caravan Ren Unit Trust Unit 5, 17-25 Kinder Street, Campbellfield VIC 3061 http://www.powerplusgroup.net info@powerplusgroup.net...
Need help?
Do you have a question about the M32-10 and is the answer not in the manual?
Questions and answers