Table of Contents
Advertisement
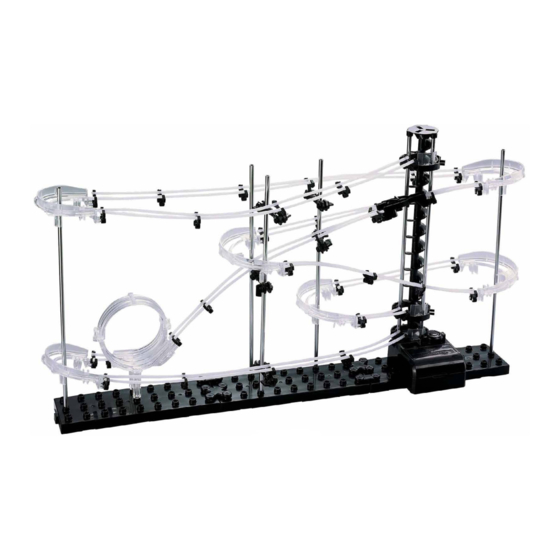
LEVEL 1 - CLASSIC
PRODUCT AND CONSUMER WARNING
CHOCKING HAZARD: This product contains small parts and is not intended for children under 3.
• This product is intended for users over the age of 8.
• To avoid choking, keep small parts away from children.
• Use caution, this product contains parts with sharp edges.
• Only insert the steel marbles into the elevator to avoid damage to the product.
Spacerail ©2021
Advertisement
Table of Contents

Related Manuals for SpaceraiL LEVEL 1 - CLASSIC


Summary of Contents for SpaceraiL LEVEL 1 - CLASSIC
- Page 1 LEVEL 1 - CLASSIC PRODUCT AND CONSUMER WARNING CHOCKING HAZARD: This product contains small parts and is not intended for children under 3. • This product is intended for users over the age of 8. • To avoid choking, keep small parts away from children.
- Page 2 3 PCS 1 PC RAIL COMPONENTS REQUIRED TOOLS & ITEMS (NOT INCLUDED) Wire Cutters or Utility Scissors Pen or Marker 1 battery - size AA Rail Joining Steel Marble Rail 2 PCS 2 PCS 5000 mm Ruler (in centimeters) Spacerail ©2021...
- Page 3 Loop. all 6 Turns. Prepare the Rail Splitter: Find the Rail RAIL SPLITTER Splitter and 3 Rail Clips. Press the Rail Clips on each of the Rail Splitter openings. Set aside for coaster construction. Spacerail ©2021...
- Page 4 Step 5: Place the 3 Elevator Step 6: Place the Elevator Cap onto Step 7: Attach the 3 Elevator Guards Rings onto the Shafts. the top of the elevator assembly. to each of the Elevator Rings. Spacerail ©2021...
- Page 5 Illustration of Shafts are 1:2.3 or (approximately 43%) of scale. BUILD THE COASTER SHAFTS 261 mm 240 mm 238 mm 194 mm 199 mm 264 mm 159 mm 204 mm 129 mm 101 mm 63 mm 47 mm Spacerail ©2021...
- Page 6 Step 1: Attach Loop Stand to the bottom of the Loop. Step 2: Attach Gear Box Stand to Gear Box. LOOP PART SHAFT B SHAFT D PUSH SHAFT E SHAFT A SHAFT C Step 3: Attach the Loop, Gear Box and all the Shafts to the Base. Spacerail ©2021...
- Page 7 This will help you to avoid having to recut and not having enough rail. 79mm NOTE: Illustration of rail lengths is 1:2.84 or (approximately 35%) of scale. 162mm 174mm 275mm 313mm 416mm 420mm 487mm Spacerail ©2021...
- Page 8 Smooth Rails for Efficient Travel: Make sure the Rails exit rails, pull the rails close to the Elevator Helix to ensure connect smoothly and are free of bumps or kinks. the steel marble enters to the roller coaster easily. Spacerail ©2021...
- Page 9 Step 2: Connect both G Rail Sections between the entrance of the loop and the front section of the Split. Step 3: Connect both I Rail sections between the bottom entrance of the elevator and the bottom front corner of Shaft A. Spacerail ©2021...
- Page 10 Step 5: Connect Both H Rail sections between the exit of the Elevator and the front top corner of Shaft A. Step 6: Connect both B Rail sections between the front top corner of Shaft E and the single side of the Split. Spacerail ©2021...
- Page 11 Step 9: Connect both F Rail sections between the front corner of Shaft C and the front bottom corner of Shaft E. Step 10: Connect both C Rail sections between the front corner of Shaft D and the middle entrance of the Elevator. Spacerail ©2021...
- Page 12 Seaich Corporation 1910 West 1040 South Salt Lake City, UT 84104 (833) 732-4242 orders@seaich.com Spacerails LLC Spacerail © 2021 www.spacerails.com Spacerail ©2021...
Need help?
Do you have a question about the LEVEL 1 - CLASSIC and is the answer not in the manual?
Questions and answers