Advertisement
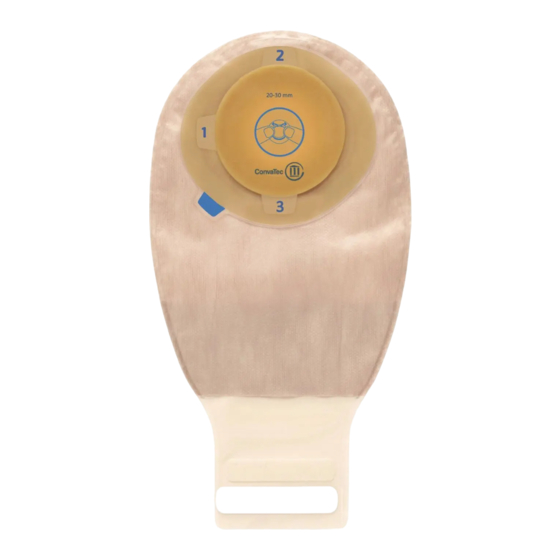
Esteem
ConvaTec Moldable Technology
1
Moldable Disc application
Moldable disc & pouch come attached.
1. In the Box
Roll and mold the disc to the size of the
3. Remove liner 1.
3. Remove liner 1.
h.
ble disk from the pouch.
4. Molding.
4. Check the size of the molding.
stoma. Do not stretch, pull or cut. Pinch
into place once desired size is reached.
2. Remove the moldable disk from the pouch.
2. Remove the moldable disk from the pouch.
7. Place the disk on the body.
7. Place the disk on the body.
Place the disk on the body. Push the roll
9. Make place for the stoma.
8. Remove liner 3.
of adhesive toward the stoma to ensure
a close fit. Skin should be clean and dry.
size of the molding.
2
molding.
6. Remove liner 2.
6. Remove liner 2.
Applying pouch to the Moldable Disc
11. Place the pouch on the body - 1.
11. Place the pouch on the body - 1.
12. Place the pouch on the body - 2.
ce for the stoma.
ma.
Remove pouch release liner.
10. Remove liner 4.
10. Remove liner 4.
Refer to package insert for complete instructions.
+ One-Piece Pouch with
™
1. In the Box
2. Remove the moldable disk from the pouch.
1. In the Box
4. Molding.
4. Check the size of the molding.
6. Remove liner 2.
4. Check the size of the molding.
2. Remove the moldable disk from the pouch.
3. Remove liner 1.
3. Remove liner 1.
8. Remove liner 3.
9. Make place for the stoma.
10. Remove liner 4.
9. Make place for the stoma.
6. Remove liner 2.
7. Place the disk on the body.
7. Place the disk on the body.
12. Place the pouch on the body - 2.
10. Remove liner 4.
11. Place the pouch on the body - 1.
11. Place the pouch on the body - 1.
1. In the Box
Remove moldable disc from the pouch.
3. Remove liner 1.
2. Remove the moldable disk from the pouch.
Check the size of the molding.
4. Molding.
4. Check the size of the molding.
7. Place the disk on the body.
6. Remove liner 2.
3. Remove liner 1.
4. Molding.
8. Remove liner 3.
Remove liner marked #3.
11. Place the pouch on the body - 1.
9. Make place for the stoma.
10. Remove liner 4.
7. Place the disk on the body.
8. Remove liner 3.
12. Place the pouch on the body - 2.
11. Place the pouch on the body - 1.
Place pouch on the moldable disc
12. Place the pouch on the body - 2.
™
1. In the Box
2. Remove the moldable disk from the pouch.
2. Remove the moldable disk from the pouch.
Remove liner marked #1. This is
4. Molding.
3. Remove liner 1.
the molding side.
Remove liner marked #2.
4. Check the size of the molding.
6. Remove liner 2.
6. Remove liner 2.
8. Remove liner 3.
This side will go on the skin.
7. Place the disk on the body.
4. Molding.
4. Molding.
9. Make place for the stoma.
Separate the sides of the
10. Remove liner 4.
12. Place the pouch on the body - 2.
10. Remove liner 4.
pouch to allow some air to
11. Place the pouch on the body - 1.
enter the pouch.
8. Remove liner 3.
8. Remove liner 3.
12. Place the pouch on the body - 2.
12. Place the pouch on the body - 2.
Smooth/hold skin barrier in place
for about 30 seconds.
2. Remov
3. Remove liner 1.
3. Remo
4. Molding
6. Remov
7. Place the disk on the bo
7. Place
8. Remove
10. Remo
11. Place the pouch on th
11. Plac
12. Place
Advertisement
Table of Contents

Related Manuals for ConvaTec Esteem +


Summary of Contents for ConvaTec Esteem +
- Page 1 Esteem + One-Piece Pouch with ™ ConvaTec Moldable Technology ™ Moldable Disc application 1. In the Box 2. Remov 3. Remove liner 1. 1. In the Box 2. Remove the moldable disk from the pouch. 1. In the Box 2. Remove the moldable disk from the pouch.
- Page 2 Notes: Find out More 1-800-422-8811 www.ConvaTec.com Monday – Friday 8:30 am – 7:00 pm TM indicates trademarks of ConvaTec Inc. Esteem is a registered trademark in the U.S. © 2014 ConvaTec Inc. AP-014407-MM...
Need help?
Do you have a question about the Esteem + and is the answer not in the manual?
Questions and answers