Advertisement
Quick Links
DSO 112A Digital Oscilloscope
Quick Guide
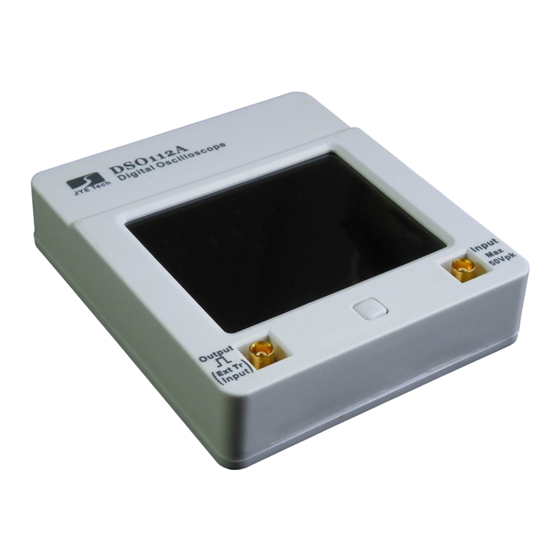
Panel and Connectors
Resistive
touch panel
Test signal output
(Ext. trigger input)
Input for signal
to be measured
(MCX female)
[P] Button
(MCX female)
Fig. 1
Battery switch
Off
On
Fig. 2
USB socket
(micro USB)
Basic Operations
1. Before first-time use
Close the internal battery switch (see Fig.2) by sliding
●
it towards the USB connector with a small stick.
Charge battery for more than 10 hours by connecting
●
the scope to a USB power.
2. Power On/Off
Power-on Short press [P] button will turn DSO112 on.
●
Power-off There are three ways to turn the unit off.
●
1 ) Enter Menu and touch
button.
Pwr Off
2 ) Hold [P] button for about 3 seconds under Running
Pwr Off
or Hold state.
3 ) Hold [P] button for about 15 seconds under any state.
3. Connecting to signal to be viewed
To view a signal first connect the black clip to the reference ponit (ground) of circuit under test.
●
Then connect the red clip to the signal of interest.
Auto Power Off
Oscilloscope will automatically shut down if running on battery and no touch activity for certain
period of time. The factory default setting for this time is 2 min. It can be changed by entering
Menu->More and touching AutoOff button.
JYE Tech
Atte ntion
1. Battery voltage must be within 3.7V - 5V range.
2. Maximum input voltage is 50Vpk.
Rev. 02
3. Do not attempt to measure live power directly.
Packing List
1x DSO112A oscilloscope
●
2x MCX - clip cables
●
1x USB cable
●
1x 3.7V/1200mAh battery (optional)
●
Tip: It is recommended to charge battery for
more than 10 hours before first time use.
Trigger
Horizontal
position
Position
Enter
Menu
Vertical
position
Sensitivity
Timebase Trigger mode
Couple
Fig. 3
②
① Connect to reference (ground)
Connect to signal to be viewed
②
– www.jyetech.com –
4. Use the Scope
Power up
(Pushing [P] button)
Bootloader screen
Batt/USB
Menu
indicator
Scope
state
Trigger
level
Trigger
source
Trigger slope
Select sensitivity and couple
5. Menu
Buttons
①
Fig. 4
Tip:
For resistive panel touching with
finger nail will have better effects
Booting to main program
~ 2 seconds
Dashboard
Touch
Touch
Touch
Select timebase
Functions
Align VPos indicator to 0V trace.
Save captured waveform data to internal EEPROM. The
most recently captured data will be saved no matter this
function is executed in Running state or Hold state.
Recall saved waveform data from EEPROM. The
parameters used for the data will also be recalled.
Send waveform data via serial connection (virtual COM
port on USB). The most recently captured data will be
sent.
Restore factory default settings for various parameters
(except AutoOff time).
Save or load preset scope parameters.
Bring up dashboard for quick preset access.
Turn cursor
Δ
T or
ΔV
On/Off.
Turn voltage read-outs On/Off. The unit of voltage read-
out is the same as unit of vertical sensitivity.
Turn frequency read-out On/Off.
Bring up "Test Signal Frequency" screen where test
signal frequency can be changed.
Bring up "Auto Power-off Time" screen where auto
power-off time can be selected.
Touch Panel Calibration
Hold [P] button
Push [P] button
Push
[P] button
Setup screen
Touch
HOLD state
Touch and scroll vertically within
the right half of panel to change
trigger level.
Touch and scroll vertically within
the left half of panel to change
vertical position.
Touch and scroll horizontally over
Touch
the whole panel to change
horizontal position.
Select trigger mode, slope,
Fig. 5
position, and source.
Remarks
The existing data in EEPROM will be over-written.
Recalled waveform is always displayed in Hold state.
Waveform data are sent in CSV file format. XModem
protocol is used for the transfer. USB driver for CP2102
is required (refer to the section "USB Connection" ).
Press [P] button at Setup screen will also perform the
same function.
Navigate with "<<" and ">>" buttons. Touch a row to
highlight it and use "Save" or "Load" button to execute.
Display Vmax, Vmin, Vpp, Vavr, and Vrms on screen.
Not function when timebase is set to 50ms/div or slower.
Display frequency on screen.
Not function when timebase is set to 50ms/div or slower.
Factory default setting: 1KHz
Factory default setting: 2 minutes
Advertisement

Subscribe to Our Youtube Channel
Related Manuals for JYE Tech DSO 112A


Summary of Contents for JYE Tech DSO 112A
- Page 1 Atte ntion 4. Use the Scope DSO 112A Digital Oscilloscope 1. Battery voltage must be within 3.7V - 5V range. Quick Guide Tip: For resistive panel touching with Power up 2. Maximum input voltage is 50Vpk. Touch Panel Calibration finger nail will have better effects Rev.
- Page 2 Advanced Operations Touch Panel Calibration USB Connection The touch panel has been calibrated before shipping. In case of the In order to use USB function the host which DSO112A is to communicate with is required touch panel doesn’t work properly it can be re-calibrated. Please to install driver supporting the USB-Uart bridge CP2102.
Need help?
Do you have a question about the DSO 112A and is the answer not in the manual?
Questions and answers