
Related Manuals for Progressive Corner Ryzer FLT-05


Summary of Contents for Progressive Corner Ryzer FLT-05
-
Page 1: Table Of Contents
Contents Caution Specifications Components Assembly Table Top Installation 8-10 Dimensional Drawing Reset Procedure Operations 12-14 Troubleshooting Scan for video assembly! Scan for video assembly! Model: Corner Ryzer (FLT-05) Table Lift and Table Top User Manual v3.00... -
Page 2: Caution
This desk has been designed with an adjustable height range, and improper use or mishandling of this feature may result in both property damage and/or bodily harm. Progressive Desk reserves the right not to accept any responsibility or liability should damages or injuries occur through improper use of this product. -
Page 3: Specifications
Specifications Description Specification Input Voltage 120 VAC, 60 Hz Force 330 lbs (110 lbs per Leg) Speed¹ 1.57"/sec Install Size Retracted 23.6" Install Size Extended 49.1" Foot Length 23.6" Duty Cycle 10% (2 Minutes On, 18 Minutes Off) Collision Detection² Remote Functions Program Up to 4 Memory Presets³, USB Charging Port Protection Class... -
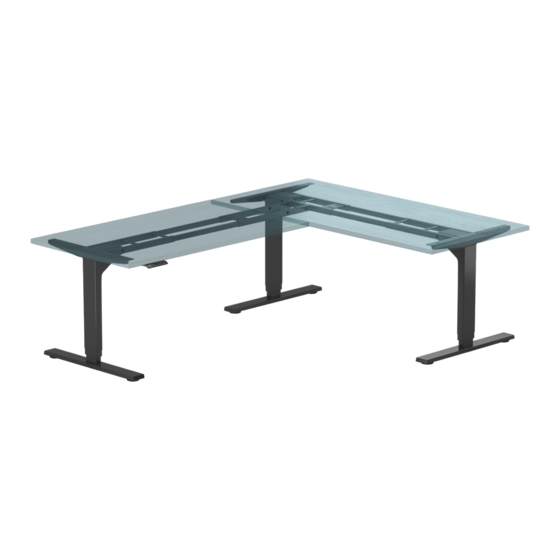
Page 4: Components
Control Box Extension Remote Power Cord Cable (4 ft.) (may vary based on selection) Straight Bracket M5x20 Self Tapping Wood Screw Progressive Desk Table Top Hardware For added convenience, all Progressive Desk table tops are also shipped with compatible mounting hardware. -
Page 5: Assembly
Assembly Contact us for assembly assistance! sales@progressivedesk.com Scan for video assembly! Progressivedesk.com 1-800-828-9414 Important: To avoid damage to your floor and to the products, assemble on a soft and even surface that is free from any obstructions. This can be a carpeted floor, rug or towel. The table top foam panels and cardboard can be used as well. - Page 6 Assembly STEP 3 STEP 5 Use four M6x10 Machine Screws (13) to attach one Install one Control Box (15), by sliding the interlocking Frame End (5) to one Leg (9). slots of the Control Box (15) and Primary Frame (2) together.
- Page 7 Ensure edges of table tops are flush against each other and table top is centered on table lift frame. For Progressive Desk 30" wide table tops, use Holes 2 to 5. For Progressive Desk DT-90 Corner table top, use holes 3 to 6.
- Page 8 Table Top Installation Important: Do not slide the table lift components on the table top as this may damage the Rubber Grommets (1) pre-installed on the Frames. STEP 10 This step is for table tops without pre-drilled holes. Skip this step if it has pre-drilled holes. Move the table lift frame components to desired final position on top of the upside-down table top.
- Page 9 Table Top Installation STEP 16 This step is for two-piece table tops. Skip this step if you have a one-piece table top. Position two Straight Brackets (19) on the bottom side of the table tops as shown in the diagram. Make sure the countersunk holes are facing away from the table top.
- Page 10 Move the completed Corner Ryzer to the desired location and adjust the Foot Levellers (8) to achieve a level table top surface. Thank you for choosing Progressive Desk! If you have any feedback or questions, please contact us - we would love to hear your thoughts.
-
Page 11: Dimensional Drawing
Dimensional Drawing Maximum Width - 72.6" Minimum Width - 42.8" Maximum Length - 73.8" Minimum Length - 42.3" 1.7" 22.6" Extended - 49.1" 3.1" 2.0" Retracted - 23.6" 1.3" 27.6" 2.8"... -
Page 12: Reset Procedure
Operations REMOTE BUTTONS Height Display UP - Hold to move table lift up DOWN - Hold to move table lift down Memory Preset 1 Memory Preset 2 MEMORY PRESET PROGRAMMING Memory Preset 3 1. Use the UP or DOWN button to bring the desk to the desired height. -
Page 13: Operations
Operations REMOTE CONTROL LOCK To Lock Press and hold the M button. The remote height display will show "S-", then it will show the table lift height, and finally it will display "LOC". The remote control buttons are now locked. To Unlock Press and hold the M button until the height display shows the table lift height. - Page 14 Operations MEMORY PRESET ONE-TOUCH and CONSTANT-TOUCH MODE One-Touch mode is the default setting. The memory preset button may be pressed once without holding and the table lift will move to the desired height. Any button may be pressed to stop movement. Constant-Touch mode requires you to hold the memory preset button until the desired height is reached.
-
Page 15: Troubleshooting
Troubleshooting Common Problems Problem Description Solution Disconnect and reconnect all cables (Lifting Column, Control Box, AC Power, Connection issue and Remote), then initiate the Reset Procedure. Table lift is not level Ensure weight on table lift is evenly distributed and does not exceed table Weight issue lift limits, then initiate the Reset Procedure.
Need help?
Do you have a question about the Corner Ryzer FLT-05 and is the answer not in the manual?
Questions and answers