Advertisement
Quick Links
PART LIST
NO
DESCRIPTION
1
TABLE TOP
2
LEG FRAME LEFT
3
LEG FRAME RIGHT
4
TABLE BASE
5
TOP SUPPORT
STEP 1
REMOVE DRAWER FROM TABLE TOP
PLEASE REFER TO ASSEMBLY INSTRUCTION
FOR DRAWER REMOVAL & REINSTALL
STEP 3
5
MADE IN MALAYSIA
ASSEMBLY INSTRUCTION
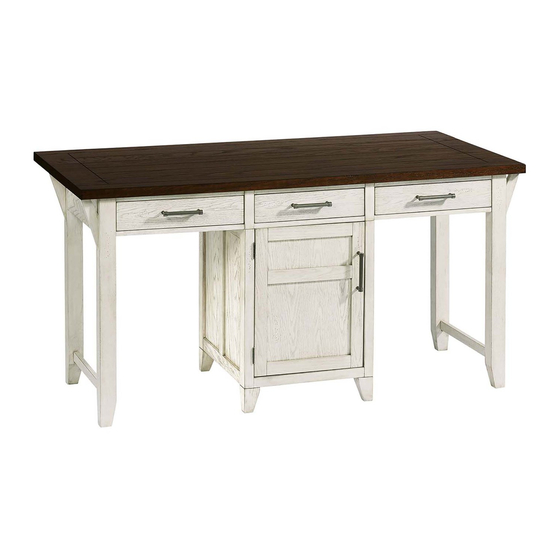
Model No : A592-52 CONSOLE TABLE
I M P O R T A N T
Place all wooden parts on a clean and smooth surface such
as a rug or carpet to avoid the parts from being scratched.
Check to be sure that you have all parts and hardware.
Remove all wrapping materials, including staples & packing
straps before you start to assemble.
Do not tighten all screws / bolts until all completely assembled.
Keep all hardware parts out of reach of children.
QTY/PCS
1 PC
1 PC
1 PC
1 PC
2 PCS
1
D
A
B
C
4x
N O T E :
HARDWARE LIST
NO
DESCRIPTION
A
JCBC BOLT M6 x 35mm
B
SPRING WASHER M6
C
FLAT WASHER M6 x 13mm
D
ALLEN KEY M4 x 60mm
REMARKS : YOU WILL ALSO NEED A PHILIP SCREW DRIVER
(NOT PROVIDED)
STEP 2
A
D
3
STEP 4
REINSTALL DRAWER TO TABLE TOP
PLEASE REFER TO ASSEMBLY INSTRUCTION
FOR DRAWER REMOVAL & REINSTALL.
QTY/PCS
C
B
10x
18 PCS
18 PCS
18 PCS
1 PC
2
1 OF 3
Advertisement

Subscribe to Our Youtube Channel
Related Manuals for Progressive A592-52


Summary of Contents for Progressive A592-52
- Page 1 ASSEMBLY INSTRUCTION Model No : A592-52 CONSOLE TABLE I M P O R T A N T N O T E : Place all wooden parts on a clean and smooth surface such as a rug or carpet to avoid the parts from being scratched.
- Page 2 ASSEMBLY INSTRUCTION Model No : A592-52 CONSOLE TABLE STEP 5 STEP 6 REASSEMBLE HANDLE REASSEMBLE HANDLE FROM FROM INSIDE TO INSIDE TO OUTSIDE POSITION OUTSIDE POSITION STEP 7 STEP 8 STEP 9 COMPLETE ASSEMBLE MADE IN MALAYSIA 2 OF 3...
- Page 3 ASSEMBLY INSTRUCTION Model No : A592-52 CONSOLE TABLE ASSEMBLY INSTRUCTIONS FOR DRAWER REMOVAL AND REINSTALL TO REMOVE DRAWER: STEP 1 : EXTEND THE BOX DRAWER TO ITS FULL EXTENSION. STEP 2 : LOCATE THE DRAWER SLIDE LOCK ON EACH SIDE OF THE DRAWER BOX.
Need help?
Do you have a question about the A592-52 and is the answer not in the manual?
Questions and answers