
Related Manuals for HARVEY S-12S


Summary of Contents for HARVEY S-12S
- Page 1 Shark Universal Overhead Guard Manual Model: S-12S Revision B (2019-02-15) 298000903...
-
Page 2: Table Of Contents
Contents 1. Introduction................................. 3 2. Unpacking................................3 3. Overall Dimensions............................4 4. Installation................................4 5. Using and Adjusting............................6 6. Lubrication& Cleaning............................8 ..................................10 概 述 ..................................10 拆 包 整 体 尺 寸 ................................11 ..................................11 安... - Page 3 English Version...
-
Page 4: Introduction
------ G0690, G0691 ------ W1819, W1820 2. Unpacking S-12S is packaged by a high strength corrugated box, refer to below table for detailed package information. Please check the contents of the shipping box by the inventory list and Fig.1. NOTE: If you can't find an item on this list, check the mounting locations or examine the packaging materials carefully. -
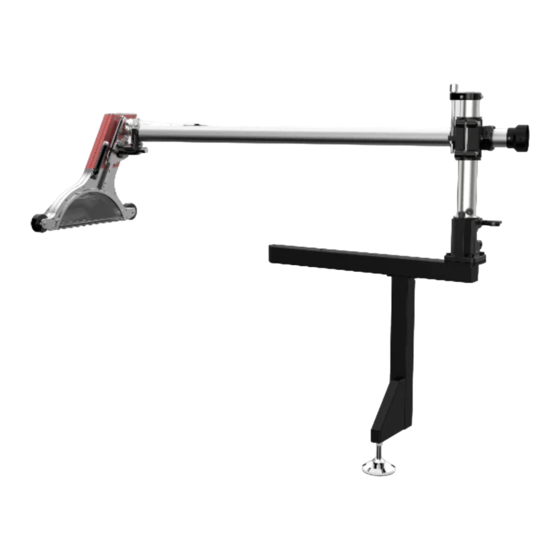
Page 5: Overall Dimensions
3. Overall Dimensions (Fig.2) Fig.2 4. Installation Do not connect the machine to electricity before installation! 4.1 Mounting the Support Arm As shown in Fig.3, mount the support arm (the mounting screws are pre-installed on the support arm). For 50” rear rail (as shown by dotted line in Fig. 3), the support arm is mounted by 3 sets of screws;... - Page 6 4.2 Mounting the Support Leg As shown in Fig.4, mount the support leg (the mounting screws are pre-installed on the support arm and support leg). Then adjust the support foot against the floor and tighten. Remark: Dimension Diagram of Drilling and Tapping Mounting Holes on the Rear Rail.
-
Page 7: Using And Adjusting
Note: This product is equipped with 2 flat transparent shields and 1 spherical transparent shield, you can choose for use as desired. There is no need to remove any screws while replacing the shield. The shield can be removed by being pushed at the position and in the direction as the arrow shows in Fig. - Page 8 Note: You need to adjust the guard position relative to the blade before using it. You must make sure that the limit block shown in Fig. 10 is at the limiting position when the overhead guard is in working state. You must make sure that the guard will not interfere with the riving knife and the blade .
-
Page 9: Lubrication& Cleaning
6. Lubrication & Cleaning Lubrication: You need to lubricate the guide rail monthly. Cleaning: You need to clean the dust accommodated on the guide rail and air spring daily. - Page 10 中文版本...
-
Page 11: 概述
1. 概述 本款 S-12S“鲨鱼”护罩附件主要用于木工圆锯机的锯切防护及集尘的需要,集尘口直 径 4”(100mm),适合最大锯片直径 12”(305mm),满足 52”(1320mm)锯切加工的需 要。该附件安装在圆锯机后导轨上,安装及维护简单,操作便捷,可以适配绝大多数市场主 流产品。 主要适配型号: 110LG (C300), 110S, 110LC-36 ------ G0690, G0691 ------ W1819, W1820 ------ 2. 拆包 该产品采用高强瓦楞纸盒进行包装,包装尺寸信息见下表。参考图 1 和对应的清单,核 对包装信息。 注意: 如果您在清点时发现缺失部件,请检查安装位置或仔细检查包装材料,可能有些部件出 于运输目的,我们会预装在产品上。 类型 净/毛重 (Kg) 纸箱尺寸(mm) 纸 箱 46/54 1732X542X282( 长... -
Page 12: 整 体 尺 寸
3. 整体尺寸(图 2) 图 4. 安装 在进行安装前,必须切断设备电源! 4.1 支撑臂安装 如图 3 所示,进行支撑臂的安装(安装螺钉预固定在支撑臂上),针对 50inch 导轨(如 图 3 中虚线所示),采用 3 组螺钉进行固定,针对 30inch 导轨,采用 2 组螺钉进行固定。 注意: 大部分后导轨无安装孔,可根据图 5 所示,在后导轨上自行加工直径 13mm 的安装孔 (30”导轨配置 2 个安装孔,50”导轨配置 3 个安装孔)。 图 图... - Page 13 4.2 支腿安装 如图 4 所示进行支腿的安装(安装螺钉预固定在支撑臂和支腿上),调整支脚顶住地面 并锁紧。 备注:导轨钻孔尺寸示意图 图 4.3 立柱安装 如图 6,将立柱安装到支撑臂上(安装螺钉预固定在支撑臂上),锁紧。 图 图 4.4 悬臂组件安装 拆下集尘口(集尘口可能预装在悬臂上),将悬臂组件穿过立柱安装孔,锁紧锁紧螺钉, 然后重新安装集尘口。(如图 7) 4.5 护罩组件安装 如图 8,将护罩组件,插入悬臂组件头部固定块的锥孔中,顺时针旋转锁紧螺钉锁紧;将 悬臂组件上安装的波纹软管连接到护罩组件的集尘口上。(波纹管管扣预装在波纹管上) 备注: 本附件随机配置了 2 个平面透明护罩及一个球面透明护罩,可根据需求选用,更换护罩 时,无需拆卸螺钉,只需如图 9 箭头所示位置及方向用力推护罩,即可完成透明护罩的拆卸, 按照拆卸的反方向进行新护罩的安装。...
-
Page 14: 使用与调节
图 8 图 9 5. 使用与调节 护罩安装完的效果如图 10 所示,通过悬臂尾部 4“(100mm)吸尘口连接集尘装置; 通过把手 A 可抬起集尘罩;松开把手 B 可逆时针旋转护罩,让护罩远离锯片。 图 1 0 注意: 在护罩正常使用前,需要调整护罩相对于锯片的位置。 护罩工作状态时,需确保图 10 所示的限位块处于限位状态(可旋转限位块进行调整)。 必须确保锯片、分料刀与护罩无干涉。... -
Page 15: 润滑和清理
5.1 护罩相对于锯片左右及上下位置的调节 如图 11①所示,松开螺钉(C),可向前或者向后移动悬臂,调整锯片护罩与锯片左右相 对位置,确保锯片和护罩的间距小于或等于 15mm,如图 11②所示。 如图 11①所示,松开螺钉(D)和螺母(E),顺时针或逆时针旋转六角螺帽 (F),确保在护 罩移至最高点时,顶端锯齿与护罩的间距小于 5mm,如图 11③所示。完成调节后,锁紧螺 钉(D)和螺母(E) 。 图 1 1 5.2 护罩相对于锯片及台板平行度的调节 如图 12 所示,逆时针松开旋钮(G),可左右摆动护罩,调节护罩与锯片的平行度;逆时 针松开旋钮(H),可翻转护罩,调节护罩与台板台面的平行度。 图 1 2 6. 润滑和清理 清理:清理导轨及气弹簧上的灰尘,每天一次。 润滑:对导轨进行润滑,每月一次。... -
Page 16: Exploded View And Parts List
Exploded View and Parts list... - Page 17 Parts List DESCRIPTION DESCRIPTION DESCRIPTION Support arm Flat washer 6 Dust guide tube Foot Cover Seal Screw cap Top cover Bottom plate Spring pin 5x18 Flat washer 5 Plastic bushing Spring washer 5 Supporting seat Dust port Cap screw M5-0.8x30 Cap screw M6-1x12 Cap screw M5-0.8x12 Spherical cover...
Need help?
Do you have a question about the S-12S and is the answer not in the manual?
Questions and answers