Table of Contents
Advertisement
Advertisement
Table of Contents

Related Manuals for Nytech ND-4000


Summary of Contents for Nytech ND-4000
- Page 1 Nytech ND-4000 - 1 -...
- Page 2 TRADEMARK INFORMATION Microsoft and Windows are U.S. registered trademarks of Microsoft Corporation. Pentium is a registered trademark of Intel Corporation. Macintosh is a trademark of Apple Computer, Inc. SD is a trademark. Other names and products may be trademarks or registered trademarks of their respective owners. - 2 -...
- Page 3 READ THIS FIRST Notice: Product design and specifications are subject to change without notice. This includes primary product specifications, software, software drivers, and user’s manual. This User Manual is a general reference guide for the product. The product and accessories that come with your camera may be different from those described in this manual. This is due to the fact that different retailers often specify slightly different product inclusions and accessories to suit their market requirements, customer demographics, and geographical preferences.
- Page 4 WARNINGS Do not use this camera if it is emitting smoke (or an unusual odor), if it becomes unusually hot to the touch, produces a peculiar noise, or exhibits any other abnormal conditions. Operating the camera in any of these circumstances may cause a fire or an electrical shock.
- Page 5 CA UTIONS UTIONS UTIONS UTIONS UTIONS Do not place this camera in a location affected by oil fumes or steam, such as near a cooking stove or humidifier. This may cause a fire or an electrical shock. Do not leave this camera in a location subject to extremely high temperatures, such as in a sealed vehicle or in direct sunlight.
- Page 6 - 6 -...
-
Page 7: Table Of Contents
Contents Using the Self-timer ........... 26 Introduction Using the Flash ............27 Taking Photographs in a Variety of Modes ([SCENE] Overview ..............9 Mode) ................. 28 Package Contents ............10 Changing the Focus ........... 29 Taking Pictures Manually ........... 30 Getting to Know the Camera Manual Settings ............ - Page 8 Formatting an SD Memory Card ........ 49 Reducing the Image Size (Resize) ......50 Compressing Images ..........51 Print Information (DPOF) ........... 52 Protecting Images ............54 DISP Button and LCD Monitor Display 55 In Photography Mode ..........55 In Playback Mode ............55 Menu Options Recording Menu ............
-
Page 9: Overview
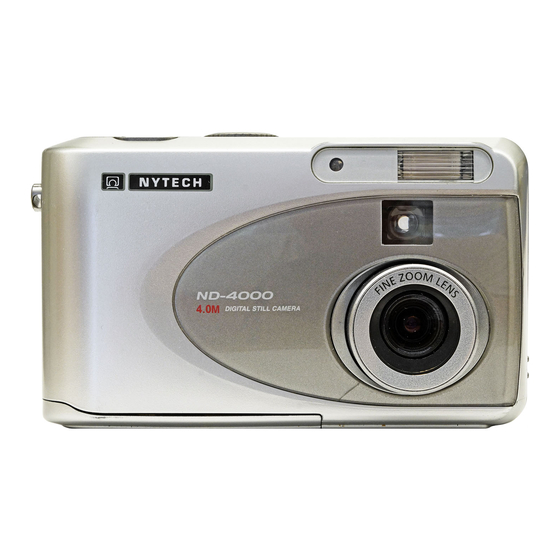
Introduction Overview Your new digital camera delivers high quality, 2400 x 1600 resolution images using a 4.0 Megapixels CCD imager. Using either the optical viewfinder or the 1.6” TFT color image LCD monitor, you can compose images and then examine them in detail. An auto-flash sensor automatically detects the shooting (lighting) conditions and determines whether the flash should be used. -
Page 10: Package Contents
Package Contents Carefully unpack your camera and ensure that you have the following items: Common Product Components: Common (Optional) Accessories: Digital Camera Memory card USB cable Camera pouch Video cable AC power adapter Software CD-ROM Batteries User’s Manual Camera Strap Note: Accessories and components vary by retailer. -
Page 11: Getting To Know The Camera
Getting to Know the Camera Front View (POWER) Power switch Mode dial Shutter button Lens cover switch Self-timer LED Flash Viewfinder Lens/Lens cover - 11 -... -
Page 12: Rear View
Rear View Menu controller (MENU) Menu button ( ) Erase button ) Self-timer button Ready LED Viewfinder LED ( ) Flash button Optical viewfinder Optical viewfinder MENU controller ENTER button Zoom key Zoom key (DISP) Display button LCD button LCD monitor LCD monitor Strap eyelet Strap attachment... -
Page 13: Mode Dial
Mode Dial Setup mode PC mode Playback mode Record mode Manual record mode Movie mode Mode Description Use this mode to choose your preferences on the Setup mode camera’s settings. Use this mode to transfer images to a computer. PC mode Use this mode to view your images/video clips. -
Page 14: Lcd Monitor Icons
LCD Monitor Icons Record mode: Zoom state Possible number of shots Mode dial setting Flash state Size Photograph mode Quality Focus mode Self-timer Auto focus area Date Battery condition Time Slow shutter speed warning AE (automatic exposure setting) Manual record mode: Bulb Possible number of shots Mode dial setting... - Page 15 Movie mode: Possible photographic time Mode dial setting Zoom state Focus mode Size Quality Self-timer Date Battery condition Time Playback mode: Mode dial setting Photography number Date Battery condition Time - 15 -...
-
Page 16: Getting Started
Getting Started You can use either 4 AA size batteries (Alkaline, Ni-MH) or an AC power adapter (optional accessory) to power the camera. Battery power is convenient for capturing images or video clips while an AC adapter power is useful when transferring images to your computer. -
Page 17: Using An Ac Power Adapter (Optional Accessory)
Note: * If the “CARD COVER LOCK IS RELEASED” message appears on the LCD monitor, please check the battery cover lock. Make sure it is locked in the direction of the Lock arrow. * If you will not be using the batteries for an extended period of time, remove them from the camera to prevent leakage or corrosion. -
Page 18: Inserting An Sd Memory Card (Optional Accessory)
Inserting an SD Memory Card (optional accessory) SD memory card is a storage medium for saving images that you have photographed. Even if the camera’s power is turned off, the images saved on the SD memory card are not erased. SD memory card can be repeated read and written. -
Page 19: Attaching The Hand Strap
Attaching the Hand Strap To prevent accidental dropping of the camera, always use the strap. Attach the hand strap as follows: Thread the small loop of the hand strap through the strap eyelet on the camera. Pull the large loop through the small loop until the strap is firmly secured. - 19 -... -
Page 20: Setting The Image Resolution And Quality
Setting the Image Resolution and Quality The resolution and quality settings determine the size and the compression ratio of your images and how many images can be stored on the SD memory card. The higher resolution and quality produce the large size and less compressed image but take up more space in memory. - Page 21 In the mode: Press the button until the QUALITY is highlighted, and press the button. LCD monitor displays the QUALITY menu. Press the button to select STILL/MOVIE, and press the button. The size item is highlighted. Press the button to select the size setting users desired to set, and press the ENTER button.
- Page 22 The table shows the approximate shots that you can take at each setting based on a 8MB ~128MB SD memory card. <Still Image Mode> FULL HALF SMALL FULL size: Memory 2400 x 1600 pixels Card HALF size: 1200 x 800 pixels 16MB SMALL size: 32MB...
-
Page 23: Photography Mode
Photography Mode Taking Pictures Your camera is equipped with both an optical viewfinder and a 1.6” LCD monitor to compose images. Taking images using the optical viewfinder will conserve battery power. If your batteries are low, it is recommended that you only compose images by using the viewfinder. -
Page 24: Using The Lcd Monitor
Using the LCD Monitor Make sure that the SD memory card is correctly loaded. Slide the lens cover switch to position. Turn on the camera on by sliding the POWER switch. Set the mode dial to the or the mode. Turn on the LCD monitor by pressing the DISP button. -
Page 25: Using The Digital Zoom
Using the Digital Zoom Using digital zoom, images appear closer. Whereas digital zoom is a compelling feature, the more an image is enlarged (zoomed), the more pixilated (grainier) the image will appear. Set the mode dial to the or the mode. -
Page 26: Using The Self-Timer
Using the Self-timer When the self-timer is used, the camera automatically takes a picture after the preset time (2 or 10 seconds). This allows you to get into the scene when taking group images. Secure the camera to a tripod or place it on a stable surface. Set the mode dial to the mode. -
Page 27: Using The Flash
Using the Flash The flash is designed to function automatically when lighting conditions warrant the use of flash. You can take an image using a flash mode suitable to your circumstances. Set the mode dial to the mode. Press the button repeatedly until your desired flash mode appears. -
Page 28: Taking Photographs In A Variety Of Modes ([Scene] Mode)
Taking Photographs in a Variety of Modes ([SCENE] Mode) Set the appropriate scene mode from: Set the mode dial to the mode. Press the ENTER button. SCENE is displayed on the LCD monitor. Press the button to display option menu, press the button to select the desired option and press the ENTER button. -
Page 29: Changing The Focus
The table below will help choose the appropriate scene mode: Scene mode Description Automatically adjust focus and The camera automatically adjusts the focus and exposure settings to take photographs. exposure settings Select this option to make people stand out with the background out- Portrait of-focus. -
Page 30: Taking Pictures Manually
Taking Pictures Manually You can manually adjust settings such as exposure control, white balance, metering system, continuous photography mode, and take photographs at these settings. Set the mode dial to the mode. Press the ENTER button. The manual setting items are displayed. Press the button to select the setting item. -
Page 31: Manual Settings
Manual Settings Exposure Control (EXP.) There are 4 available options: PRG: Program mode (default) Av: Aperture-priority mode Tv: Shutter speed-priority mode M : Full manual mode White Balance (W.B.) The camera determines the white balance by averaging the various kinds of lights that actually enters the lens. A user can set in advance the white balance when taking photographs under specific lighting conditions. - Page 32 Metering System (A.E.) The camera calculates the exposure level before a photograph is taken. : Multi metering mode The exposure is measured and calculated for the entire area of the screen. By dividing the entire area of the screen, the exposure level for each unit is calculated. A well balanced exposure can be obtained. : Spot metering mode The exposure is measured in a very small area at the center of the screen.
-
Page 33: Photography In The Program Mode
Photography in the Program Mode The camera automatically adjusts the shutter speed and the aperture value according to the brightness of an object. It is possible to change the white balance and the metering system in program mode. Set the mode dial to the mode. -
Page 34: Photography In The Aperture-Priority Mode
Photography in the Aperture-priority Mode In this mode, photographs are taken with the priority given to aperture. The camera automatically sets the shutter speed according to the aperture. A small aperture value produces a portrait photo with an out-of-focus background. The smaller the aperture value, the more out-of-focus the background becomes. -
Page 35: Photography In The Shutter Speed-Priority Mode
Photography in the Shutter Speed-priority Mode In this mode, photographs are taken with the priority given to shutter speed. The camera automatically sets the aperture value according to the shutter speed. A fast shutter speed produces a photograph that looks as if a moving subject is still. A slow shutter speed produces as photograph that makes you feel that it is flowing. -
Page 36: Photography In The Full Manual Mode
Photography in the Full Manual Mode Set the aperture and shutter speed values separately before taking a photograph. Set the mode dial to the mode. Press the ENTER button. The manual setting items are displayed. Press the button to select EXP.. Press the button to display option menu, press the button to select M and press the ENTER button. -
Page 37: Bulb Photography
Bulb Photography This mode is used for taking subjects that require several seconds to photograph such as firework displays at night. When using this mode, be sure to use a tripod to keep the camera stable and prevent distortion of images. Set the mode dial to the mode. -
Page 38: Taking Shots With The Automatic Exposure Bracketing (Aeb Photography)
Taking Shots with the Automatic Exposure Bracketing (AEB Photography) When it is difficult to determine the necessary exposure compensation, this mode will automatically set the camera to photograph three consecutive pictures in -0.5, 0 and +0.5 compensation. Set the mode dial to the mode. -
Page 39: Taking Photographs Continuously (Burst Photography)
Taking Photographs Continuously (Burst Photography) In this mode, photographs are taken continuously at a maximum speed of 0.8 second intervals. The maximum number of photographs that can be taken continuously is three photographs. Images are not recorded directly to SD Memory Card but are stored temporarily within the buffer memory. After photography is finished, check the images and record the selected ones to SD Memory Card. - Page 40 : This setting is for saving all images. Press the ENTER button. All images are selected, and all images with turns into a red This item cannot be selected if there is not enough space on the SD memory card. : This setting is for erasing all images.
-
Page 41: Making Movies
Making Movies The movie mode allows you to record video clips without voice recording. The camera shows the preview image on the LCD monitor. Set the mode dial to the mode. Compose the picture. Press the shutter button to start recording a video clip. To stop recording, press the shutter button again. -
Page 42: Playback Mode
Playback Mode Playing Back Photographed Images Playback photograph still images one image at a time. Set the mode dial to the mode. Press the button to move forward and reverse. button to advance to next frame, and the button to go back one frame. Press the ENTER button, nine images are displayed simultaneously. -
Page 43: Playing Back Video Clips
Playing Back Video Clips Playback video clips that you have recorded. The movies made in FULL size are displayed on the entire LCD monitor, and those made in HALF size are displayed in the center of the screen. Set the mode dial to the mode. -
Page 44: Thumbnail Display
Thumbnail Display This function allows you to view 9 thumbnail images on the LCD monitor at the same time, which can quickly search for the image that you want. Set the mode dial to the mode. Press the ENTER button. Nine images are displayed simultaneously. -
Page 45: Zoom Playback
Zoom Playback This mode allows you to enlarge your image on the selected portion of the image to check for small details. Movies and images photographed in the multi mode cannot be displayed using the zoom playback feature. Set the mode dial to the mode. -
Page 46: Slideshow Display
Slideshow Display Slideshow function enables you to play your images back in order automatically, which is very useful and convenient for checking recorded images and for presentations. Set the mode dial to the mode. Press the MENU button. The playback menu is displayed. Press the button to select SLIDE SHOW and press the button. -
Page 47: Playback Of Multi Image Pictures
Playback of Multi Image Pictures Automatically playback the 16 images photographed in the multi photography mode. Set the mode dial to the mode. Press the button to select the images photographed in the multi photography mode. You can also select the images by the same operation as for thumbnail display. Press the zoom key (on the T button) to begin playback. -
Page 48: Erasing Folders (All Images In A Folder/All Folders)
Erasing Folders (All Images in a Folder/All Folders) Erase selected folders and all contents currently recorded to the SD memory card loaded on the your camera. There are two ways of erasing images, by individual folders or by the all folders. The folder to be erased differs according to the position of the mode dial. -
Page 49: Formatting An Sd Memory Card
Formatting an SD Memory Card This function erases all images card and reformats the SD memory card loaded in your camera. Protected images are also erased. SD memory card cannot be formatted if it write-protected. Set the mode dial to the mode. -
Page 50: Reducing The Image Size (Resize)
Reducing the Image Size (Resize) Change FULL size (2400 x 1600 pixels) images to HALF size (1200 x 800 pixels), and further to SMALL size (720 x 480 pixels). Resizing a previously saved image when the SD memory card has run out of the storage space during photography increases space on the memory card so that you can continue taking photographs. -
Page 51: Compressing Images
Compressing Images Compress images down to half of their size or more, overwrites an old size image with a newly compressed image. Compressing a previously saved image when the SD memory card has run out of the storage space during photography increases space on the memory card so that you can continue taking photographs. -
Page 52: Print Information (Dpof)
Print Information (DPOF) DPOF is the abbreviation for Digital Print Order Format, which allows you to embed printing information on your memory card. You can select the pictures to be printed and how many prints to make by using the DPOF menu in the camera and insert the memory card to the card compatible printer. - Page 53 The DATE screen is displayed. c. Press the button to select YES or NO , and press the ENTER button. If you want to print the date, select YES and press the ENTER button. The message “CREATE DPOF FILE?” is displayed. Press the button to select EXECUTE and press the ENTER button.
-
Page 54: Protecting Images
Protecting Images This feature prevents images from being erased. Set the mode dial to the mode. Press the MENU button. Press the button to select PROTECT, and press the button. The PROTECT menu is displayed. Press the button to select the desired image to protect and press the ENTER button. This fixes the image to be protected, and icon is displayed under the image. -
Page 55: Disp Button And Lcd Monitor Display
DISP Button and LCD Monitor Display In Photography Mode ( Each press of the DISP button switches the display format as follows: <OSD full display> <OSD display off> <LCD monitor off> Note: In the movie mode and the macro photography mode, the LCD monitor cannot be turned off. In Playback Mode ( Press the button to select image. -
Page 56: Menu Options
Menu Options Recording Menu This menu is for the basic settings to be used in the photography modes. To do this, press the MENU button and then scroll through the options by using the button, and press the button. PREVIEW By enabling preview, you can temporarily view the image on the LCD monitor as soon as you take a picture. - Page 57 Set the color mode and photographic sensitivity at which the image is to be recorded. NORMAL: Equivalent to color ISO 100 2X: High-sensitivity photography equivalent to color ISO 200 4X: High-sensitivity photography equivalent to color ISO 400 Choose the desired selection by using the button, and press the ENTER button.
- Page 58 DIGITAL ZOOM You can take digital zoom shots by activating the digital zoom. ON: Enable digital zoom OFF: Disable digital zoom Choose the desired selection by using the button, and press the ENTER button. Adjust the brightness of the LCD monitor. [-5]~[+5] Choose the desired selection by using the button, and press the ENTER button.
-
Page 59: Playback Menu
Playback Menu In the mode, you can use the playback menu to automatically display your images one by one or resizing the captured images, etc. To do this, press the MENU button and then scroll through the options by using the button, and press the button. -
Page 60: Setup Menu
Setup Menu You can select your preferences on the camera settings in the mode. To do this, scroll through the options by using button, and press the button. AUTO POWER OFF This setting allows you to set the time when the camera turns off automatically. To return to the normal state after the Auto Power Off has been executed, slide the POWER switch to turn on the camera’s power. - Page 61 SOUND Camera sounds each time you press the camera button if this function is enabled. ON: Sound the beep tone according to the operating state or operation OFF: Does not sound the beep tone in any state Choose the desired selection by using the button, and press the ENTER button.
- Page 62 VIDEO OUT Set the video output system according to the country in which your camera used. NTSC: NTSC system PAL: PAL system Choose the desired selection by using the button, and press the ENTER button. QUALITY Set the size (number of pixels) and quality (compression ratio) of the image to be photographed. Refer to section in this manual titled Setting the Image Resolution and Quality (in the mode) for further detail.
-
Page 63: Transferring Recorded Images/Video Clips To Your Computer
Transferring Recorded Images/Video Clips to Your Computer To transfer images/video clips from the camera to your computer, follow these steps: Step 1: Installing the USB driver Step 2: Connecting the camera to your computer Step 3: Downloading images/video clips System Requirements (Windows) System Requirements (Macintosh) Pentium 166 MHz or higher PowerPC G3/G4... -
Page 64: Step 1: Installing The Usb Driver
Step 1: Installing the USB Driver The USB driver on the CD-ROM is exclusively for Windows 98 and Mac OS 8.6 computers. Insert the CD-ROM that came with the camera into your CD-ROM drive. Follow the on-screen instructions to complete the installation. After the USB driver has been installed, restart your computer. -
Page 65: Step 3: Downloading Images/Video Clips
Step 3: Downloading Images/Video Clips When the camera is turned on and connected to your computer, it is considered to be a disk drive, just like a floppy disk or CD. You can download (transfer) images by copying them from the “removable disk” (“untitled” disk on a Macintosh) to your computer hard drive. -
Page 66: Camera Specifications
CAMERA SPECIFICATIONS Item Description Sensor 1/1.8” CCD sensor Total pixels: 4.2 megapixels Effective pixels: 4.0 megapixels Image Resolution <Still Image> <Movie> 2400 x 1600 pixels 320 x 240 pixels 1200 x 800 pixels 160 x 120 pixels 720 x 480 pixels 1.6"...
Need help?
Do you have a question about the ND-4000 and is the answer not in the manual?
Questions and answers