Advertisement
Quick Links
Operating Warnings
THE UNIT MUST BE INSTALLED BY A COMPETENT ELECTRICIAN OR ELECTRICAL
ENGINEER. FAILURE TO COMPLY WITH THESE INSTRUCTIONS COULD INVALIDATE
THE CONTROLLER WARRANTY.
ALWAYS DISCONNECT THE MAINS SUPPLY BEFORE OPENING UNIT.
ALWAYS DISCONNECT THE MAINS SUPPLY BEFORE CONNECTED THE PUMP.
Set up the system carefully. Follow these instructions very closely, paying close
attention to all warnings and diagrams.
The S3 is fused at 5A. Always fit the correct 5A quick blow mains fuse. The S3 can
control pumps up to 1000VA (1000W). DO NOT USE THE S3 WITH PUMPS GREATER
THAN 1000VA.
The S3 and pump mains socket are supplied in a waterproof enclosure. The mains
plug is NOT WATERPROOF. Do not plug the mains plug into a socket that could
become wet during operation, failure to do so will result in damage to the unit.
Ensure the 230Vac pump mains socket enclosure is closed tightly before turning the
controller on. This will prevent the connection getting splashed or wet during use,
failure to do so will result in damage to the unit.
Specification
Mains Supply Voltage
Pump Voltage
Fuse Rating
Maximum Pump Power
Enclosure Material
Water Resistance
Dimensions
Working Temperature
DISCLAIMER
THE MANUFACTURER RESERVES THE RIGHT TO MAKE CHANGES TO ANY PRODUCT HEREIN TO IMPROVE
RELIABILITY, FUNCTION OR DESIGN. THE MANUFACTURER DOES NOT ASSUME ANY LIABILITY ARISING
OUT OF THE APPLICATION OR USE OF ANY PRODUCT OR CIRCUIT DESCRIBED HEREIN.
For more information and videos on how to use Spring controllers please visit: www.springltd.co/videos
Value
90 - 260 Vac
90 - 260 Vac
5A Quick Blow
1000VA
ABS
IP65
240 x 160 x 90 (mm)
0 to 40 Deg C
Overview
Filling & Fitting
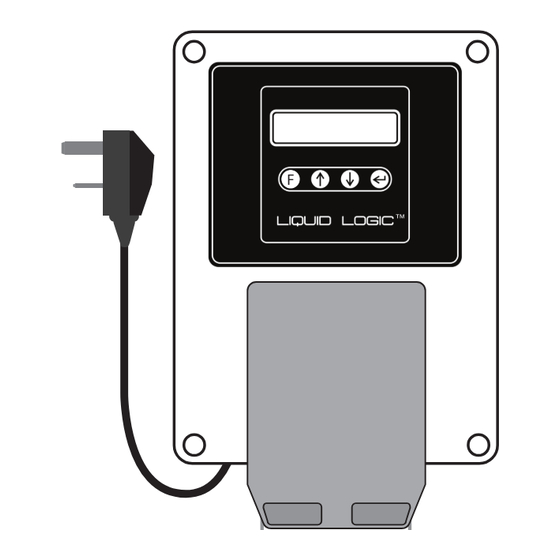
S3
Thank you for buying an S3 Static RO Controller. This is an advanced pump controller
solution for your system and should give you complete control over water production.
Follow this manual carefully. It explains in detail how to connect and operate the pump
controller. Most connections are shown on the system diagram, however further details
are provided throughout the rest of the manual. Complete ALL wiring connections
BEFORE connecting the unit to the mains supply. Ensure the controller, sensors and
cables are firmly fixed in place before using your controller.
The S3 controls the filling side of your water tank (inlet and pure water production). The
controller has a number of other advanced features to increase ease of use and report
on the operational status of the system.
Filling
The controller opens the solenoid valve to fill the water tank until the high level float
switch activates. This is a one time operation and will stop once the tank is full. The
controller will automatically flush your RO membrane on a regular basis to keep it at
optimum performance and to increase its service life.
The controller can be configured to stop filling if the TDS is too high. This can be set to
either after the RO membrane (due to an RO failure) or after the DI vessel (if resin is
spent). It will also shutdown the fill if mains water pressure is too low.
The controller has a flowmeter to measure the amount of water used, this can also
indicate the filter life.
The controller also incorporates a pressure sensor which allows the controller to report
on the state of the carbon and sediment filters. The addition of a pressure sensor also
allows the controller to shut down the pump in the event of mains water failure.
Fitting
The S3 is supplied already wired. There is no need to disconnect any wires. Follow these
instructions carefully and refer to the system diagram.
IT IS RECOMMENDED THAT THE S3 IS FITTED AGAINST A WALL OR SIMILAR VERTICAL
SURFACE.
1. Ensure the S3 is NOT PLUGGED INTO THE MAINS SUPLLY.
2. Remove the top cover by loosening the four corner screws. Remove top cover by
folding to the right.
3. Screw unit to the wall or vertical surface through the four ready drilled holes in the
back box corners.
5. Carefully replace the top cover and tighten the four corner screw.
S3 Pump Controller
Advertisement

Related Manuals for Spring S3


Summary of Contents for Spring S3
- Page 1 The S3 is fused at 5A. Always fit the correct 5A quick blow mains fuse. The S3 can Filling control pumps up to 1000VA (1000W). DO NOT USE THE S3 WITH PUMPS GREATER THAN 1000VA.
- Page 2 S3 Pump Controller Overview S3 Controller 230Vac 230Vac PUMP PUMP MAINS MAINS SOCKET SOCKET FILL RO INLET WATER PRESSURE FLOW SOLENOID SENSOR METER VALVE HIGH LEVEL SWITCH CARBON + 230Vac SEDIMENT BOOSTER FILTERS PUMP TDS RO TDS DI FILTER WATER TANK...
- Page 3 Filling - Wiring TDS Wiring Quick Start Guide 230Vac 230Vac 230Vac PUMP PUMP PUMP MAINS MAINS MAINS SOCKET SOCKET SOCKET DI TDS RO TDS Grey White Probe Probe Install on Install on RO Inlet (Fill) Valve High Level Switch Autoflush Valve DI outlet RO outlet Connect the pump controller following this diagram.
- Page 4 Controller Settings Controller Settings S3 Pump Controller Set Up Set Up Pressure Thresh Pressure Thresh TDS DI Limit TDS DI Limit Enter to set 30 PSI Enter to set Press the down and enter buttons to access Use up or down button to change. ‘Off’...
-
Page 5: Operation
Operation Warning Messages TDS RO Total 12.3kl The S3 has a number of warning messages for when something goes wrong in the TDS DI Overall 200.5kl system, these are designed to help with trouble shotting. Press enter to display current TDS values...
Need help?
Do you have a question about the S3 and is the answer not in the manual?
Questions and answers