Advertisement
Quick Links
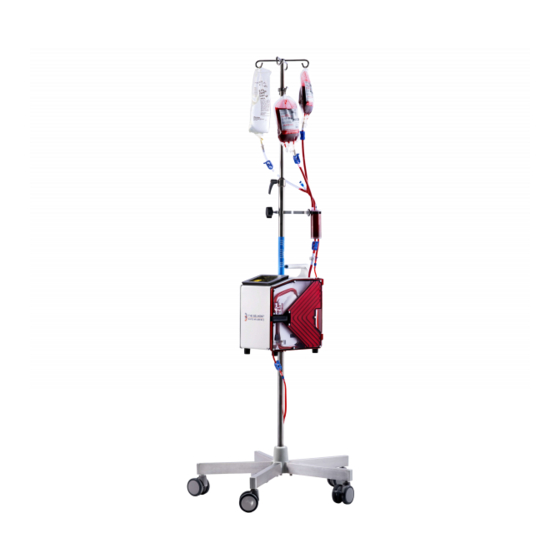
SETUP:
MOUNT ON THE IV POLE:
Pole Clamp
Release Handle
30 in (76 cm)
Step-By-Step Quick Set-Up
•
Inspect the system
Power cord: 14/3 SJT cable with Hospital plug
(
IV pole: 5 wheel IV pole (max. diameter 1 1/4")
Pole mount support assembly (Support Clamp & Plastic washer)
Reservoir support
Disposable set
3L Reservoir and reservoir holder, if needed
Mount The Belmont
Rapid Infuser RI-2,
•
®
app. 30" from the ground
•
Tighten the "Pole Clamp Release Handle"
onto the IV pole
Install the Pole Mount Support Assembly
•
(support clamp and plastic washer) under
the RI-2
•
Clamp the Reservoir Support above the
RI-2
SETUP / MOUNT ON IV POLE
USE ONLY SUPPLIED POWER CORD
SUPPORT
CLAMP
)
RESERVOIR SUPPORT
IV POLE
PLASTIC
WASHER
RI-2 UNIT
Advertisement

Related Manuals for Belmont Medical Technologies RAPID INFUSER RI-2


Summary of Contents for Belmont Medical Technologies RAPID INFUSER RI-2
- Page 1 3L Reservoir and reservoir holder, if needed MOUNT ON THE IV POLE: RESERVOIR SUPPORT IV POLE Mount The Belmont Rapid Infuser RI-2, Pole Clamp • ® Release Handle app. 30” from the ground • Tighten the “Pole Clamp Release Handle”...
- Page 2 Snap reservoir chamber into the reservoir support INSTALL DISPOSABLE SET: • clamp. Open the door. Insert heat exchanger with red • arrow pointing up (Red tinted tubing to red stripe on unit). Firmly position the interlock block into the fluid out •...
- Page 3 ALARM/MESSAGE POSSIBLE CAUSE SOLUTION OPERATIONAL ALARMS UNIT DOES NOT POWER Power switch not completely depressed Depress power switch completely • • AIR DETECTION • Air in the line • Open door, squeeze tubing directly below air detector sensor to clear air. Recirculate to remove air in line •...
- Page 4 HEATING ALARMS IR probes are wet, dirty, or blocked Clean IR probes with moistened Q-tip and dry • • SYSTEM ERROR #101 • Disposable set windows are wet, dirty, or • Clean window and dry. Replace disposable set, CHECK TEMPERATURE blocked if clogged PROBES FOR...
- Page 5 TROUBLESHOOTING OTHER DIFFICULTIES DIFFICULTY POSSIBLE CAUSE SOLUTION BATTERY NO HEAT Power cord not plugged in AC outlet Plug into AC outlet • • Power cord is loosened from back of the unit Check power cord connection • • DIM DISPLAY •...
-
Page 6: System Parameters Setting
SYSTEM PARAMETERS SETTING The CALIBRATION/SET-UP screen is accessed by pressing SERVICE key during power-up This key appears on the BELMONT logo screen and remains active for 4.5 seconds before system enters the PRIME screen. DATE/TIME DISPLAY BRIGHTNESS • Press DISPLAY BRIGHT key •... - Page 7 REPLACING RESERVOIR CHAMBER / INSTALL 3 LITER RESERVOIR REPLACE FILTER / RESERVOIR CHAMBER (FLUID SUPPLY) INSTALL 3 LITER RESERVOIR Connect 3 Liter Reservoir to the 3-Spike Disposable Set REPLACING RESERVOIR CHAMBER INSTALL 3 LITER RESERVOIR 1. Assemble the 3L Reservoir using aseptic techniques by CAUTION attaching the three fluid supply tails onto the top of the Replace filter, reservoir chamber and/or disposable set if...
- Page 8 CONVERSIONS & HEATING Heats to 39 Heats to 37.5 ml/min ml/hr ml/min ml/hr 3,600 Reservoir 4,200 Chamber 4,800 Display Probe Heat 1,200 5,400 Exchanger Fluid Out Detector 1,800 6,000 Pressure Interlock Chamber Block 2,400 12,000 3,000 18,000 Detector Power 24,000 Switch Pump 30,000...
- Page 9 THE BELMONT ® RAPID INFUSER RI-2 QUICK REFERENCE GUIDE TECHNICAL SUPPORT USA: 855.397.4547 WORLDWIDE: +1.978.663.0212 TECHSUPPORT@BELMONTMEDTECH.COM WWW.BELMONTMEDTECH.COM ’ IT IS ESSENTIAL THAT YOU READ AND UNDERSTAND THE PERATOR ANUAL BEFORE USING THIS DEVICE Registered in Accordance with ISO 13485...
Need help?
Do you have a question about the RAPID INFUSER RI-2 and is the answer not in the manual?
Questions and answers