Advertisement
Quick Links
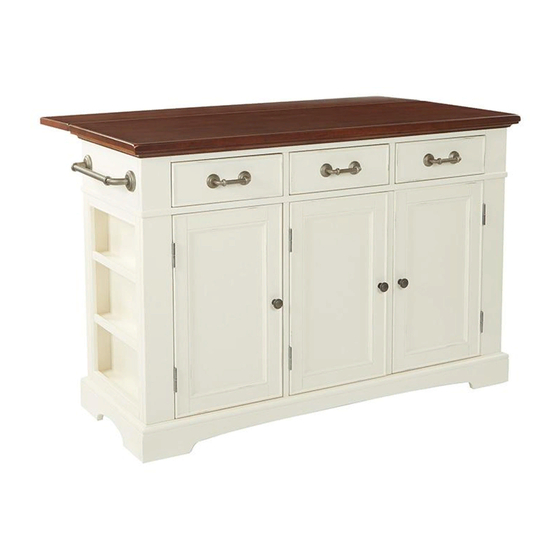
BP-4202-942DLT / BP-4202-942C / BP-4202-942B
BP-4202-943DLT / BP-4202-943C / BP-4202-943B
BP-4202-947DLT / BP-4202-947C / BP-4202-947B
LARGE ISLAND WITH DROP LEAF WOOD TOP
GRAND ÎLOT AVEC PLATEAU ABATTANT EN BOIS
ASSEMBLY INSTRUCTIONS / INSTRUCTIONS DE MONTAGE
IF PARTS ARE MISSING OR DAMAGED, DO NOT RETURN TO STORE
To order missing or replacement parts, contact us via e-mail parts@officestar.net, by Fax 1-909-930-5629, or toll free parts
number 1-800-950-7262, Monday through Friday 8:00 a.m. - 5:00 p.m. Pacific Time.
EN CAS DE PIÈCES MANQUANTES OU ENDOMMAGÉES, NE PAS RETOURNER AU MAGASIN
Pour commander des pièces de rechange ou manquantes, contactez-nous par courriel à parts@officestar.net, par télécopieur
au 1-909-930-5629 ou au numéro sans frais 1-800-950-7262 dédié aux pièces, du lundi au vendredi de 8 h à
17 h, heure du Pacifique.
Advertisement

Related Manuals for Bassett INSPIRED BP-4202-942DLT


Summary of Contents for Bassett INSPIRED BP-4202-942DLT
- Page 1 BP-4202-942DLT / BP-4202-942C / BP-4202-942B BP-4202-943DLT / BP-4202-943C / BP-4202-943B BP-4202-947DLT / BP-4202-947C / BP-4202-947B LARGE ISLAND WITH DROP LEAF WOOD TOP GRAND ÎLOT AVEC PLATEAU ABATTANT EN BOIS ASSEMBLY INSTRUCTIONS / INSTRUCTIONS DE MONTAGE IF PARTS ARE MISSING OR DAMAGED, DO NOT RETURN TO STORE To order missing or replacement parts, contact us via e-mail parts@officestar.net, by Fax 1-909-930-5629, or toll free parts number 1-800-950-7262, Monday through Friday 8:00 a.m.
-
Page 2: Limited Warranty
To make a warranty claim, contact Customer Service, provide model number, sales receipt and description of the problem. It is the customer’s responsibility to prepay freight on any components returned to the factory. INSPIRED by Bassett will pay return ®... -
Page 3: Parts List / Liste Des Pièces
PARTS LIST / LISTE DES PIÈCES (2) Table Leaf / abattant de table (1 PC) (1) Top / plateau (1 PC) (4) Middle Drawer / tiroir moyen (1 PC) (3) Drawer / tiroir (2 PCS) (5) Base (1 PC) (6) Back Panel / panneau arrière (1 PC) Left / gauche Left / gauche Right / droit... - Page 4 PARTS LIST / LISTE DES PIÈCES (10) Hardware Pack / trousse de quincaillerie (1 PC) (9) Divider / séparateur (2 PCS) (12) Right Side Panel / panneau latéral droit (1 PC) (11) Left Side Panel / panneau latéral gauche (1 PC) (13) Partition (1 PC) THANK YOU for purchasing this quality product.
- Page 5 HARDWARE LIST / LISTE DU MATÉRIEL NO / ÉTQ. DRAWING / DESSIN DESCRIPTION SIZE / TAILLE QTY. / QTÉ. Screw M6 x 35mm 10 PCS Cam Lock Screw 24mm 4 PCS vis de verrouillage à came Hinge Screw F#6 x 3/4” 12 PCS vis à...
- Page 6 FULLY TIGHTEN ALL CAM LOCK SCREWS (B). STEP 1: Screw two Cam Lock Screws (B) into each Side Panel (11 & 12). ÉTAPE 1: Vissez deux vis de verrouillage à came (B) dans chaque panneau latéral (11 & 12). SERREZ TOUTES LES VIS DE VERROUILLAGE À CAME (B). (11) (12) STEP 2: Attach Left Side Panel (11) and Right Side Panel (12) to Back Panel (6), secure Side Panels (11 &...
- Page 7 STEP 3: Attach Base (5) to Side Panels (11 & 12) using four Flat Washers (G) and four Screws (A). DO NOT FULLY TIGHTEN FULLY TIGHTEN ALL SCREWS. SCREWS. Attach Partition (13) to Base (5) using two Flat Washers (G) and two Screws (A). ÉTAPE 3: Fixez la base (5) aux panneaux latéraux (11 &...
- Page 8 STEP 5: Carefully attach assembled top to Side Panels (11 & 12) and secure using four Flat Washers (G) and four Screws (A). FULLY TIGHTEN ALL SCREWS. ÉTAPE 5: Fixez soigneusement le plateau assemblé aux panneaux latéraux (11 & 12) et fixez-les à l’aide de quatre rondelles plates (G) et de quatre vis (A).
- Page 9 STEP 7: Slide two Dividers (9) into Island. ÉTAPE 7: Faites glisser deux séparateurs (9) dans l’îlot. STEP 8: Insert Shelf Pins (J) into desired shelf positions. Place Shelves (7) onto Shelf Pins (J). ÉTAPE 8: Insérez les supports de tablette (J) dans les positions souhaitées. Placez les tablettes (7) sur supports de tablette (J).
- Page 10 STEP 9: Insert Drawers (3 & 4) into Island. ÉTAPE 9: Insérez les tiroirs (3 & 4) dans l’îlot. STEP 10: Attach three Doors (8) to Kitchen Island. NOTE: Align hinge dowel to hinge and slide down to secure door. ÉTAPE 10: Fixez les trois portes (8) dans l’îlot.
- Page 11 NOTE: If needed, adjust levelers to level Island. REMARQUE: Si nécessaire, ajustez les niveleurs au niveau de l’îlot.
- Page 12 FURNITURE CARE: - Dust with a soft cloth following the grain pattern of the wood. - Dust often to remove the everyday abrasive particles from the wood surfaces. - Before dusting, moisten cloth lightly with a spray product. - Wood finishes also benefit from an occasional polishing. SOIN DU MOBILIER : - Épousseter avec un chiffon doux en suivant le grain du bois.
Need help?
Do you have a question about the INSPIRED BP-4202-942DLT and is the answer not in the manual?
Questions and answers