Table of Contents
Advertisement
Quick Links
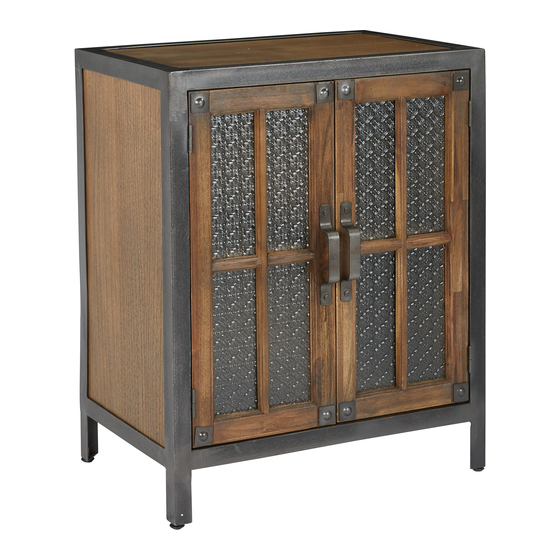
Item# BP-BARCSL2
BARCELONA 2 DOOR CONSOLE
ASSEMBLY INSTRUCTIONS
IF PARTS ARE MISSING OR DAMAGED, DO NOT RETURN TO STORE
To order missing or replacement parts, contact us via e-mail parts@officestar.net, by Fax 1-909-930-5629, or toll free parts
number 1-800-950-7262, Monday through Friday 8:00 a.m. - 5:00 p.m. Pacific Time.
Advertisement
Table of Contents

Related Manuals for Bassett INSPIRED BARCELONA BP-BARCSL2


Summary of Contents for Bassett INSPIRED BARCELONA BP-BARCSL2
- Page 1 Item# BP-BARCSL2 BARCELONA 2 DOOR CONSOLE ASSEMBLY INSTRUCTIONS IF PARTS ARE MISSING OR DAMAGED, DO NOT RETURN TO STORE To order missing or replacement parts, contact us via e-mail parts@officestar.net, by Fax 1-909-930-5629, or toll free parts number 1-800-950-7262, Monday through Friday 8:00 a.m. - 5:00 p.m. Pacific Time.
- Page 2 To make a warranty claim, contact Customer Service, provide model number, sales receipt and description of the problem. It is the customer’s responsibility to prepay freight on any components returned to the factory. INSPIRED by Bassett will pay return freight on ®...
- Page 3 PARTS LIST (2) Bottom Frame (1 PC) (1) Top Frame (1 PC) (4) Right Side Frame (1 PC) (3) Left Side Frame (1 PC) (5) Back Panel (1 PC) (6) Left Door (1 PC) (7) Right Door (1 PC) (8) Shelf (1 PC)
- Page 4 HARDWARE LIST DRAWING DESCRIPTION SIZE QTY. Small Bolt 1/4” x 1/2” 1 PC Long Bolt 1/4” x 2” 8 PCS Connector Bolt 1/4” x 2/5” 1 PC Small Screw 1/8” 5/8” 4 PCS Large Screw 1/8” x 1” 2 PCS Small Flat Washer 1/4”...
- Page 5 STEP 1: Attach Top Frame (1) and Bottom Frame (2) to Left Side Frame (3) using two Long Bolts (B), two Lock Washers (I) and two DO NOT FULLY TIGHTEN BOLTS. Flat Washers (G) for each frame. STEP 2: Attach Back Lid (N) to Back Panel (5) using one Small Bolt (A), one Flat Washer (H) and one Connector Bolt (C). FULLY TIGHTEN ALL BOLTS.
- Page 6 STEP 3: Slide Back Panel (5) into groove of Top Frame (1) and Bottom Frame (2). STEP 4: Secure Right Side Frame (4) to console using four Long Bolts (B), four Lock Washers (I) and four Flat Washers (G). Line up Back Panel (5) using Triangle (Q).Secure Back Panel (5) to assembled console using two Large Screws (E) and four Small Screws (D).
- Page 7 STEP 5: FULLY TIGHTEN ALL NUTS. Attach Handles (L) to Doors (6 & 7) using two Flat Washers (F) and two Nuts (J) for each handle. STEP 6: Attach Doors (6 & 7) to assembled console.
- Page 8 STEP 7: Insert Shelf Pins (K) into assembled console. Slide Shelf (8) into assembled console. STEP 8: Place Console (1) in desired location. Attach two brackets to back of Console (1) using two short screws for each bracket. FULLY TIGHTEN SCREWS. Attach the remaining brackets to wall using two long screws for each bracket. FULLY TIGHTEN SCREWS. Loop one safety strap between each set of brackets and fasten safety straps.
Need help?
Do you have a question about the INSPIRED BARCELONA BP-BARCSL2 and is the answer not in the manual?
Questions and answers