Table of Contents
Advertisement
Quick Links
Advertisement
Table of Contents
Troubleshooting

Subscribe to Our Youtube Channel
Related Manuals for JDE L'OR Supreme


Summary of Contents for JDE L'OR Supreme
- Page 1 L’OR Suprême User manual Version 1.0 June 2021...
-
Page 2: Table Of Contents
Table of contents Table of contents ............................. 2 1. Safety precautions ..........................3 1.1 Electrical safety..........................3 1.2 General safety ..........................4 1.3 Operational safety ......................... 4 1.4 Environment ..........................5 2. Description of parts ..........................6 3. Placement and operation ........................7 3.1 First use ............................ -
Page 3: Safety Precautions
Read this instruction manual before you start using the machine. It gives you important safety information and will ensure you get the most out of your JDE product. Keep this manual in a safe place for reference THIS IS AN ATTENDED APPLIANCE. Do not leave it unattended during usage, or in case of any malfunctions or damage. -
Page 4: General Safety
• Turn the appliance off, and unplug when not in use over longer periods. • To prevent damage to the appliance, use JDE approved descaling agent for cleaning/descale program. Use a soft cloth and mild detergent to clean external parts. -
Page 5: Environment
1.4 Environment Do not dispose of this product in the usual household garbage at the end of its life cycle. Please hand it over to a collection point for the recycling of electrical and electronic appliances. The symbol on the product, the instruction of use, or the packaging will inform you about the methods of disposal. -
Page 6: Description Of Parts
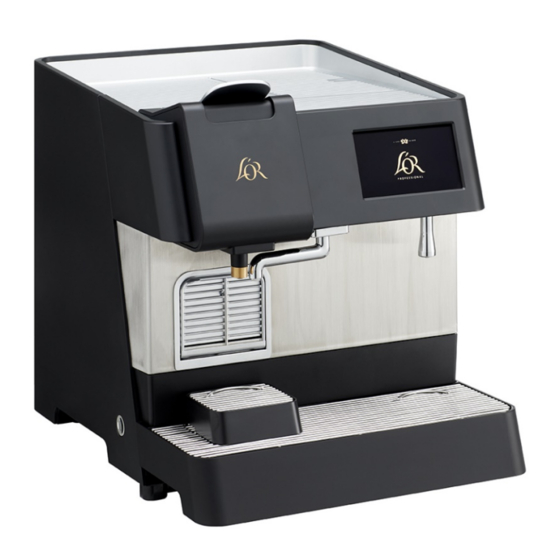
2. Description of parts A. Lever Tank lid Q. R232 port B. Disc insertion opening Air adjustment valve R. Power inlet port C. Brewing unit K. Touch screen Water supply inlet D. Coffee outlet Hot water pipe Used Disc container Milk outlet M. -
Page 7: Placement And Operation
3. Placement and operation ⚠ THE APPLIANCE MUST BE FLUSHED WITH FRESH DRINKING WATER BEFORE THE FIRST USE. 3.1 First use Open the water tank cover, Fill up with fresh drinking water. The machine can be connected to remove the water tank lid. Ensure that the water tank is the water mains. - Page 8 Enter water hardness, and Select the machine version. Press confirm for the [black softener details. (first use only) coffee machine] in the next screen. Check the website of your local water supplier for details. Press [confirm] for the milk Install the chrome milk outlet, and version [white and black coffee] in press [OK] the next screen.
-
Page 9: Drink Preparation
3.2 Drink preparation Place a cup under the coffee Open the lever. Click on the globe [����] icon to outlet. select the language of your choice. Insert a coffee disc. Close the lever. Press a drink selection button. Press the red stop button in the Your drink is now being prepared. -
Page 10: Cleaning
4. Cleaning 4.1 Automatic rinsing The machine executes a short The machine will also execute a rinsing cycle 30 minutes after the rinsing cycle to clean the tubes last milk drink to ensure that the and outlets when the machine is tubes and outlet are clean. - Page 11 Empty and clean the waste bin, Remove the milk pack from the Remove the milk tube and replace re-install when done. refrigerator. Check the best with a clean tube. before date and replace if necessary. Press the release button Place the container with cleaning Place an empty 3 litre behind the chrome milk outlet, solution in the fridge and place...
-
Page 12: Descaling Procedure
5. Descaling procedure NOTES • The descaling procedure (22 minutes) cannot be cancelled or interrupted after you have started it. • The water hardness entered during the initial set-up determines the descaling interval. If not entered by the user, the machine is set to the highest water hardness by default. Press the start button, and follow Fill the water tank to Max. -
Page 13: Programming Mode
6. Programming mode In the programming mode you can change stand-by timings, advanced settings (drink- and machine settings), and manually start the cleaning or descaling programs. Click on the programming mode You will see all the menu items in Stand-by time can be set between the display. - Page 14 Factory reset Descaling settings Connectivity settings Press OK to confirm [Restore The water hardness entered Enter machine details for factory settings] determines the necessary connection to a connectivity When the factory settings are descaling frequency for optimal device. reloaded the display shows “Reset operation.
-
Page 15: Troubleshooting
7. Troubleshooting Various icons can be shown in the lower right corner of the display to inform you about the machine status or errors. 7.1 Icons and display information The service icon indicates that an error has been detected. When pressed additional details and actions are shown. -
Page 16: Troubleshooting Actions
7.2 Troubleshooting actions Problem Problem resolution Appliance is not working Check if the power plug is well inserted in the machine, press the power ON at all, no display. button at the left side of the machine once, and wait for the machine to power Lack of steam power/ no The machine requires descaling. - Page 17 The drink tastes Has a new undamaged disc been used to brew the product? Open the lever and insufficiently strong enter a new disc at every brew. Always ensure the flanges / edges / rims of the disc are flat before inserting the disc into the chute.
-
Page 18: Specifications
8. Specifications Dimensions (W) 350 x (D) 490 x (H) 400 mm Operational pressure 20 bar Weight 15 kg Sound < 40dB A (peak during brewing process <70 dB) Temperature range 5-25 °C Max attitude < 2000m (< 1500m recommended) Storage conditions 5-30 °C / RH 30%-60%.
Need help?
Do you have a question about the L'OR Supreme and is the answer not in the manual?
Questions and answers