Advertisement
Quick Links
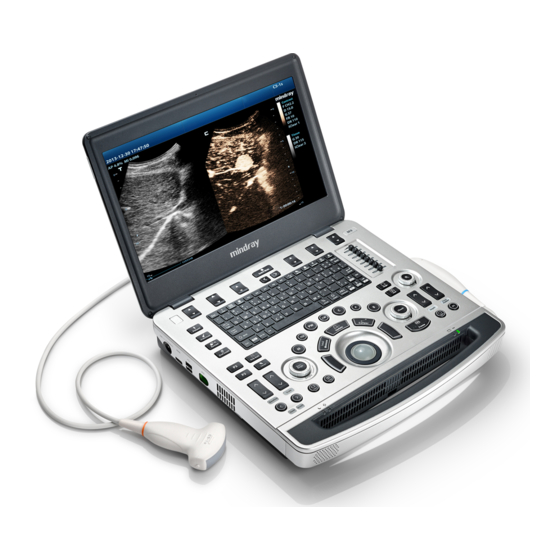
M9Vet Quick Guide
1 1 1 1
B mode
30
Steer/Invert
2
Power mode
31
Cine
3
Color mode
32
Clear
4
CW mode
33
Patient information
5
PW mode
34
Probe/Exam switch
6
TDI
35
Review
7
M mode
36
End Exam
8
Update
37
Soft key1
9
Caliper
38
Soft key2
10
Measure
39
Soft key3
11
40
Set
Soft key4
12
Set
41
Soft key5
13
Single Window
42
Soft key6
14
Zoom
43
Menu page turning
15
Dual Window
44
Mode switching
16
Focus Position
45
Menu page turning
17
Depth
46
Numerical keyboard
18
Gain/iTouch
47
Power switch
19
User-defined key1
48
TGC slider
20
Save
49
Standby indicator
21
Freeze
50
HDD indicator
22
Body Mark
51
AC power indicator
23
User-defined key 3
52
Battery indicator
24
User-defined key 2
53
Trackball
25
Cursor
54
iStation
26
Baseline
55
Report
27
Scale
56
Stress Echo
28
Angle/Quick Angle
57
Setup
29
Steer/Invert
58
Text comment
(backward)
(forward)
Advertisement

Related Manuals for Mindray M9Vet


Summary of Contents for Mindray M9Vet
- Page 1 1 1 1 1 B mode Steer/Invert Power mode Cine M9Vet Quick Guide Color mode Clear CW mode Patient information PW mode Probe/Exam switch Review M mode End Exam Update Soft key1 Caliper Soft key2 Measure Soft key3 Soft key4...
- Page 2 Contrast Imaging [Option] 1. Getting Started 1. Select probe C5-1s, and perform 2D imaging to obtain the target image, and then fix the probe. 2. Click [Contrast Imaging] on the menu in the top-left corner of the screen to enter the mode, inject New Patient the contrast agent and set timer.
Need help?
Do you have a question about the M9Vet and is the answer not in the manual?
Questions and answers