Table of Contents
Advertisement
Quick Links
22
4
2
12
5
6
9
18
7
10
8
11
19
20
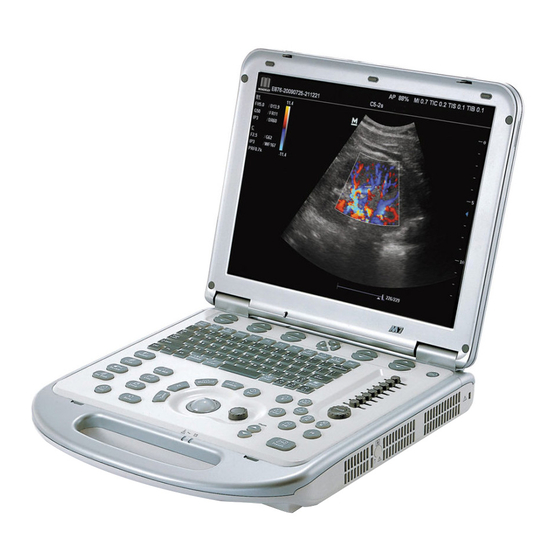
<1>
Power
<2>
iStation (Patient management)
<3>
Setup
<4>
Report
<5>
Patient(Input patient information)
<6>
Exam(Choose probe and exam)
<7>
Review
<8>
End Exam
<9>
Body Mark
<10>Cine
<11>Zoom
1
3
13
17
21
14
15
16
<12>
Arrow & Comment
<13>
Gain & iTouch
<14>
Image Mode & 2B/ B Mode Select
<15>
Multi-function Knob
<16>
Depth
<17>
Update (Shift exam status)
<18>
Measure
<19>
Cursor
<20>
Save (Frame or cine)
<21>
Set
<22>
Function Key
Advertisement
Table of Contents

Related Manuals for Mindray M7


Summary of Contents for Mindray M7
- Page 1 <1> <12> Power Arrow & Comment <2> <13> iStation (Patient management) Gain & iTouch <3> <14> Setup Image Mode & 2B/ B Mode Select <4> <15> Report Multi-function Knob <5> <16> Patient(Input patient information) Depth <6> <17> Exam(Choose probe and exam) Update (Shift exam status) <7>...
-
Page 2: Getting Started
1. Under B mode, click [Free Xros M] on the screen to enter. 1. Getting Started 2. Use [Trackball] to set the position of the sample line, and rotate [Multi-functional Knob] to change the angle of the sample line. New Patient Tissue Doppler Imaging 1.
Need help?
Do you have a question about the M7 and is the answer not in the manual?
Questions and answers