Advertisement
Quick Links
M6Vet Quick Guide
22
22
22
22
4
2
12
5
6
9
18
18
18
18
7
10
10
10
10
8
1 1 1 1 1 1 1 1
19
19
19
19
20
20
20
20
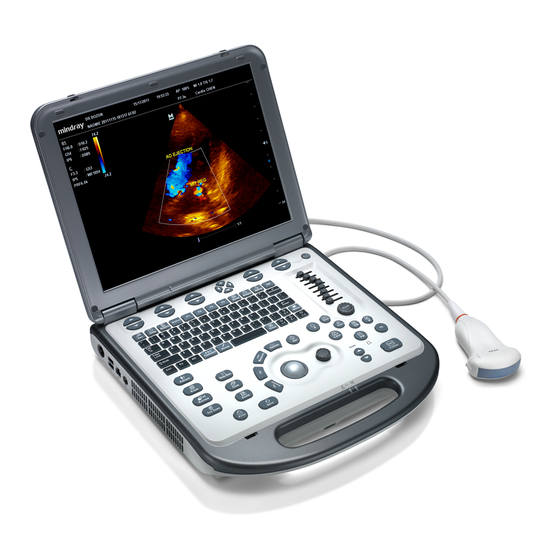
<1>
Power
<2>
iStation (Patient management)
<3>
Setup
<4>
Report
<5>
Patient (Input patient information)
<6>
Exam (Choose probe and exam)
<7>
Review
<8>
End Exam
<9>
Body Mark
<10>Cine
<11>Zoom
1
3
13
13
13
13
17
17
21
21
17
17
21
21
14
14
14
14
15
15
15
15
16
16
16
16
<12>
<12>
<12>
<12>
Arrow & Comment
<13>
<13>
<13>
<13>
Gain & iTouch
<14>
<14>
<14>
<14>
Image Mode & 2B/ B Mode Select
<15>
<15>
<15>
<15>
Multifunctional Knob
<16>
<16>
<16>
<16>
Depth
<17>
<17>
<17>
<17>
Update (Shift exam status)
< < < < 18>
18>
18>
18>
Measure
<19>
<19>
<19>
<19>
Cursor
<20>
<20>
<20>
<20>
Save (Frame or cine)
<21>
<21>
<21>
<21>
Set
<22>
<22>
<22>
<22>
Function Key
Advertisement

Related Manuals for Mindray M6Vet


Summary of Contents for Mindray M6Vet
- Page 1 < < < < 18> 18> 18> 18> Measure Review <8> <19> <19> <19> <19> End Exam Cursor <9> <20> <20> <20> <20> Body Mark Save (Frame or cine) M6Vet Quick Guide <10>Cine <21> <21> <21> <21> <11>Zoom <22> <22> <22> <22> Function Key...
- Page 2 1. Under B mode with linear probe, press <Elasto> user-defined key to enter Elasto imaging mode. 1. Getting Started 2. Adjust ROI according to the actual situation. 3. Adjust the image parameters to obtain optimized image and necessary information. New Patient Contrast Imaging 1.
Need help?
Do you have a question about the M6Vet and is the answer not in the manual?
Questions and answers