Sign In
Upload
Download
Table of Contents
Contents
Add to my manuals
Delete from my manuals
Share
URL of this page:
HTML Link:
Bookmark this page
Add
Manual will be automatically added to "My Manuals"
Print this page
×
Bookmark added
×
Added to my manuals
Manuals
Brands
sorin Manuals
Medical Equipment
XTRA
Operator's manual
sorin XTRA Operator's Manual
Hide thumbs
Also See for XTRA
:
Instructions for use manual
(88 pages)
1
2
Table Of Contents
3
4
5
6
7
8
9
10
11
12
13
14
15
16
17
18
19
20
21
22
23
24
25
26
27
28
29
30
31
32
33
34
35
36
37
38
39
40
41
42
43
44
45
46
47
48
49
50
51
52
53
54
55
56
57
58
59
60
61
62
63
64
65
66
67
68
69
70
71
72
73
74
75
76
77
78
79
80
81
82
83
84
85
86
87
88
89
90
91
92
93
94
95
96
97
98
99
100
101
102
103
104
105
106
107
108
109
110
111
112
113
114
115
116
117
118
119
120
121
122
123
124
125
126
127
128
129
130
131
132
133
134
135
136
137
138
139
140
141
142
143
144
145
146
147
148
149
150
151
152
153
154
155
156
157
158
159
160
161
162
163
164
165
166
167
168
169
170
171
172
173
174
175
176
177
178
179
180
181
182
183
184
185
186
187
188
189
190
191
192
193
194
195
196
197
198
199
200
201
202
203
204
205
206
207
208
209
210
211
212
213
214
215
216
217
218
219
220
221
222
223
224
225
226
227
228
229
230
231
232
233
234
235
236
237
238
239
240
241
242
243
244
245
246
247
248
249
250
251
252
253
254
255
256
257
258
259
260
261
262
263
264
265
266
267
268
269
270
271
272
273
274
275
276
277
278
279
280
281
282
283
284
285
286
287
288
289
290
291
292
293
294
295
296
297
298
299
300
301
302
303
304
page
of
304
Go
/
304
Contents
Table of Contents
Troubleshooting
Bookmarks
Table of Contents
Table of Contents
Chapter 1: Introduction and Safety
About the Operating Instructions
Introducing the X
TRA System
Chapter 2: Overview
Chapter 3: System Description
Indications for Use
Contraindication for Use
General Warnings
Storage and Transporting Warnings
Electrical Warnings
General Precautions
Operating Conditions
Warning
Cautions
Adverse Effects
Installation of the Unit
Installation
Unpacking and Inspection
Storage and Transport Conditions
Electrical Requirements
Addresses
Service Information
Return of Used Product
For North American Customers
For International Customers
Disposal in Accordance with Environmental Regulations
Chapter 2: Overview
Advantages of Intra- and Postoperative Red Cell Recovery
Clinical Applications
Description of the X
TRA System
How the XTRA System Works
Collection and Anticoagulation
Processing
Figure 2-1 Position of Separated Whole Blood Components in Centrifuge Bowl
Reinfusion
The Basic XTRA
Options Available with XTRA
Programmability Option
Emergency Option
Vacuum System
Vac )
Preoperative Sequestration Option (PPP and PRP)
Data Management Options (USB, Printer, RS232)
Quality Control Options
Chapter 3: System Description
Machine Components
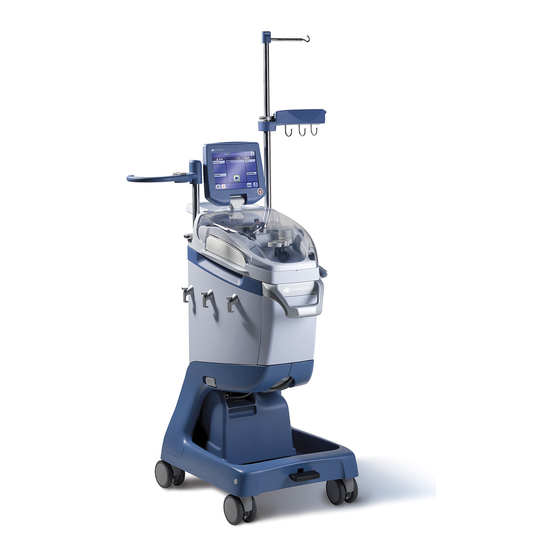
Figure 3-1 XTRA Front View
Figure
XTRA Rear View
Handles
Hooks and Tray Holders
Figure 3-3 Front Handle (Left), Rear Handle (Center), and Rear Transport Handle (Right)
Figure 3-4 Hooks on Left Side of
Cart
Figure 3-5 Left: Disposable Tray on Tray Holders; Right: Waste Bag on Right-Side Hooks
Figure 3-6 Cart
Figure 3-7 Spring Lever Releases Cart
Figure 3-8 Lifting Body from Cart
Figure
IV Pole and Reservoir Pole
Figure 3-9 XTRA Body and Cart
Figure 3-10 Reservoir and IV Pole
Reservoir Holder
Touch Screen Display Panel
Figure 3-11 Reservoir Holder
Centrifuge Assembly
Figure 3-13 Centrifuge Assembly
Figure 3-14 Centrifuge Well Fluid Container
Clamps
Left: Clamps with Clamp Lid Open | Right: Clamp Lid Closed and Latched
Figure
Processing Pump
Air Detector
Visible Parts of the X
TRA Processing Pump
Figure
Location of the Air Detector
Quality Control Indicators
Xvac
Figure 3-18 Location of the Hematocrit and Waste Line Color Indicators
Figure 3-19 Left: Vacuum Module | Right: Integrated Vacuum Module
Essential Performance
Order Guide
XVAC Release Screw
Figure
XVAC Control Panel
Xtra
Disposable Description
Figure
Figure
Collection Set
Figure 3-24 XTRA Collection Kit (CARDIO TOP)
Xtra
Figure
Collection Reservoir Lid Ports
Figure 3-27 Left: Reservoir with TOP Outlet | Right: Reservoir with BOTTOM Outlet
Aspiration Line
Figure
Vacuum Line
Bowl Set
Figure 3-30 Cardio Kit
Cross-Section of Latham Centrifuge Bowl
Figure 3-34 Red Blood Cells (RBC) Bag
Procedure Set
Figure 3-31 Bowl Set
Selecting the Disposable
Selecting the Bowl
Order Guide
Figure 3-35 Procedure Set
Anticoagulant Solution
Wash Solution
Accessories and Optional Devices
Cables
Figure 3-33 Waste Bag
Chapter 4: Installing the Disposables
Setup for Standby Collection
Supplies Required
Setup for Whole Blood Separation Program
Setup for Intraoperative Red Cell Recovery and Reinfusion
Power Requirements
Supplies Required
Step-By-Step Procedures for Installing Disposables
Step 1: Installing the Blood Collection Reservoir
Figure 4-1 Raising the Reservoir Holder
Figure
Step 2: Connecting the Suction Line
Figure 4-2 Positioning the Blood Collection Reservoir on the Reservoir Holder
Figure 4-3 Positioning the Blood Collection Reservoir on the Reservoir Holder
Step 3: Setup of the Vacuum Line
Figure 4-4 Positioning the Blood Collection Reservoir on the Reservoir Holder
Step 4: Installing the Bowl Set
Figure 4-5 Machine Top
Inserting the Centrifuge Bowl
Figure
Inserting the Bowl in Order to Avoid Wobbling
Figure 4-8 Seating the Pump Loop Cartridge (Left); Latching the Clamp Lid (Right)
Figure 4-9 Connecting the Bowl Set to the Top of the Blood Collection Reservoir
Figure 4-10 Connecting the Bowl Set to the Bottom of the Blood Collection Reservoir
Step 5: Connecting Wash Lines to the Saline Solution Containers
Step 6: Hanging the Waste Bag
Connecting the Wash Lines (Yellow) to the Washing Solution
Other Setups
Blood Collection
Figure 4-12 Connecting the Waste Bag
Procedure for Removing Disposables
Chapter 5: Processing
Operating the Touch Screen
Figure 5-1 Example of an Enabled Button
Figure
Example of in Inactive (Left) and Active (Right) Toggle Button
Figure 5-3 Example of a Disabled Button
Screen Structure
Typical Autotransfusion Processing Screen Structure
Figure
The Displets
Reservoir Displet (Open and Closed)
Figure
Vacuum Displet
Rbc's Displet
Figure
Waste Bag Displet
PPP/PRP Displet
Processing Displet
Modification of Parameters
Running a Case with the XTRA System
Before You Begin
Figure 5-11 a Text Box before and after Being Selected for Editing
Loading the Pump Segment for a New Case
Figure 5-12 Rear Panel of the
Figure
Processing a Cycle in Automatic or 1 Touch Mode
Setup Screen
Figure
Figure 5-14 Ready Screen
Fill Phase of the Processing Screen
Figure
Wash Phase of the Processing Screen
Figure
Pausing and Resuming the Cycle
Empty Phase of the Processing Screen
Figure
Figure 5-18 Fill Phase Paused
Figure 5-19 Wash Phase Paused
Figure 5-20 Wash Phase Paused with Pfat Protocol
Figure 5-21 Empty Phase Paused
Ending the Current Case
Unloading the Pump Loop
Figure 5-22 End of Case Screen
Emptying the RBC Line Without Ending the Case
Closing the End of Case Screen Without Ending the Case
Retaining Case Data between Power Cycles
Dealing with Expected Warnings During a Cycle
Reservoir Empty
Figure 5-23 Reservoir Empty Warning
Wash Bag Empty
Figure 5-24 Wash Bag Empty Warning
RBC Bag Full
Figure 5-25 RBC Bag Full Warning
Waste Bag Full
Figure 5-26 Waste Bag Full Warning
Factory Protocols
The Autotransfusion Protocols
Figure 5-27 Disposable Setup for ATS Protocols
Popt
Pstd
Pfat
Emergency
Figure 5-28 Emergency Activation Screen
Post-Op
Protocol Parameters (ATS)
The Operating Modes
Automatic
Touch
Manual
Figure 5-29 Ready Screen in Manual Mode
Figure 5-30 Fill Phase in Manual Mode
Figure 5-31 Wash Phase in Manual Mode
Figure 5-32 Empty Phase in Manual Mode
Selecting the Active Protocol and Operating Mode
Figure 5-33 Protocol/Mode Tab
Set the Active Protocol
Set the Active Operating Mode
Touch Screen User Interface
Alarms Disabled Confirmation Screen
Figure 5-34 Example Alarms Disabled Confirmation Screen
Setup Screen
Figure
Ready Screen
Figure
Processing Screen
Figure 5-37 Fill Phase of the Processing Screen
Figure 5-38 Wash Phase of the Processing Screen
Fat Removal Screens
Figure 5-39 Empty Phase of the Processing Screen
Fat Removal - Wash Processing Screen
Figure
Fat Removal - Empty Processing Screen
Fat Removal - Conc Processing Screen
Figure
Menu Screen
Tally Tab of the Menu Screen
Figure
Figure 5-44 ID Tab of the Menu Screen
Protocol/Mode Tab of the Menu Screen
Figure
Figure 5-46 Settings Tab of the Menu Screen
Figure 5-47 Reset Confirmation Screen
End of Case Screen
Figure
Help Screen
Figure
Past Cases Screen
Figure 5-50 Past Cases Screen
Automatic Reseparation Screen
Stop Button
Power Loss
Chapter 6: Special Cycles
Description
Enabling Purge and Prime IV Special Cycles
The Special Cycles Screen
Figure
Special Cycles Screen
Returning Fluid to the Reservoir: the Return Cycle
Figure 6-2 Return Screen
Adding Fluid to a Partially Filled Bowl: the Concentrate Cycle
Figure 6-3 Concentrate Screen
Priming the Reinfusion Line: Prime IV
Figure 6-4 Prime IV Screen (Paused)
Removing Air from the RBC Bag: the Purge Cycle
Figure
Purge Screen
Reinfusion
Description
Connecting the Blood Administration Set to the X
TRA RBC Bags
Figure
Top: "Y"-Type Blood Administration Set with Integral Filter Bottom: Filter with "Y"-Type Blood Administration Set
Chapter 7: Automated Functions
Description
Enabling Optional Automated Functions
Autostart Function
Figure 7-1 Autostart Activation Screen
Continue Function
Last Bowl
Figure 7-2 Last Bowl Activation Screen
Double Volume Wash Function
Better Quality Wash (BQW) Function
Better Empty
Chapter 8: Configuring X
Description
The Settings Tab of the Menu Screen
Configuration Mode
How to Enter the Configuration Mode
Figure
Settings Tab of the Menu Screen
Exit from the Configuration Mode
Predefined Feature Sets
Figure
Configuration Mode Password Screen
Configuration Mode Screen Tabs
Figure
Features Tab of the Configuration Mode
Figure 8-4 Protocol Set Tab of the Configuration Mode
Figure 8-5 Wakeup Tab of the Configuration Mode
Figure
Display Tab of the Configuration Mode
Figure
Warnings Tab of the Configuration Mode
Figure 8-8 ID Tab of the Configuration Mode Screen
Figure 8-9 Edit Field List Screen
Figure 8-10 Language Tab of the Configuration Mode
Advertisement
Quick Links
Download this manual
Operator's Manual
S
V
2.00
OFTWARE
ERSION
FOR US MARKET ONLY
20077/021 US
Table of
Contents
Previous
Page
Next
Page
1
2
3
4
5
Advertisement
Table of Contents
Need help?
Do you have a question about the XTRA and is the answer not in the manual?
Ask a question
Questions and answers
Related Manuals for sorin XTRA
Medical Equipment sorin XTRA Instructions For Use Manual
Xres blood collection reservoir and collection set (88 pages)
Medical Equipment sorin Xtra Bowl Set X/55 Instructions For Use Manual
(32 pages)
Medical Equipment sorin 75220 Operator's Manual
(304 pages)
Medical Equipment sorin SMARTVIEW KA960 Manual
Remote monitoring system (24 pages)
Medical Equipment sorin Platinum VR 1210 Implant Manual
Implantable cardioverter defibrillator (62 pages)
Medical Equipment sorin Paradym VR 8250 Implant Manual
Implantable cardioverter defibrillator (13 pages)
Medical Equipment sorin TILDA T 53 Technical Manual
Bipolar, steroid-eluting endocardial lead with passive fixation (32 pages)
Medical Equipment SORIN dideco KIDS D130 Instructions For Use Manual
Neonatal and infant arterial filter (60 pages)
Medical Equipment sorin ORCHESTRA PLUS LINK KA 351 User Manual
Cardiac rhythm management solution (24 pages)
Medical Equipment sorin REPLY DR Implant Manual
Rate responsive dual-chamber pacemaker (252 pages)
Medical Equipment sorin PARADYM RF DR 9550 Implant Manual
Implantable cardioverter defibrillator (596 pages)
Medical Equipment sorin PLATINIUM SonR CRT-D 1811 Implant Manual
Implantable cardioverter defibrillator with cardiac resynchronization therapy (73 pages)
Medical Equipment sorin Synthesis R Instructions For Use Manual
(116 pages)
Medical Equipment sorin PARADYM RF SonR CRT-D 9770 Manual
Implantable cardioverter defibrillator (642 pages)
Medical Equipment sorin Intensia VR 124 Implant Manual
Implantable cardioverter defibrillator (60 pages)
Medical Equipment sorin SMARTVIEW KA961 User Manual
Wireless mode (30 pages)
This manual is also suitable for:
75220
75221
Table of Contents
Save PDF
Print
Rename the bookmark
Delete bookmark?
Delete from my manuals?
Login
Sign In
OR
Sign in with Facebook
Sign in with Google
Upload manual
Upload from disk
Upload from URL


Need help?
Do you have a question about the XTRA and is the answer not in the manual?
Questions and answers