
Related Manuals for Climax Mobile Mates R8 Slim


Summary of Contents for Climax Mobile Mates R8 Slim
- Page 1 Mobile Mates Smart Care System & 4G/LTE PERS Locator Installer’s Guide Dec. 14, 2020...
-
Page 2: Table Of Contents
Table of Contents INTRODUCTION ........................1 ........................1 1.1. OBILE ATES ’ 1.2....................... 2 S IN THE SYSTEM OVERVIEW ......................3 ....................... 3 2.1. DENTIFYING THE ARTS 2.2........................6 OWER UPPLY GETTING STARTED – SETTING UP MOBILE LITE ............7 .................. - Page 3 4.2.7. Miscellaneous ......................55 Firmware ........................56 4.2.8. 15) ..........57 4.3. SMS R & B EMOTE ROGRAMMING OBILE LOCAL RF DEVICE MANAGEMENT ................58 5.1. (R8, R18) ....................58 OBILE 15 ........................59 5.2. OPERATION ......................... 60 6.1......................... 60 OBILE Answering Incoming Calls ..................
-
Page 4: Introduction
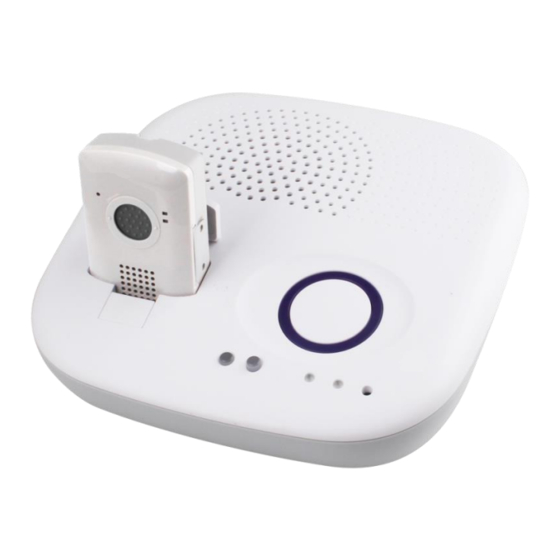
1. Introduction 1.1. Mobile Mates The Mobile Mates- R8/R15/R18 Slim -Base 15 includes two main components. Mobile Lite Base Mobile Lite (R8/R15/R18 Slim): Mobile Lite Slim is a light, portable and richly featured cellular medical alarm with GPS positioning, Wi-Fi positioning, GeoFencing and mobile network that protect you wherever you go. -
Page 5: What's In The Box
1.2. What’s in the Box Your Mobile Mates package includes the following items: Items Mobile Lite Slim Lanyard Belt Clip Base 15 Base Adaptor... -
Page 6: System Overview
2. System Overview 2.1. Identifying the Parts Mobile Lite R8/R15/R18 Slim Button/LED/Compon Behavior Function/Indication 1. Microphone 2. Top LED (Green) Charging 1 flash every 5 seconds Normal Operation Top LED (Red) 1 Flash every 3 seconds Low Battery When Mobile Lite is charging, the Red LED will not indicate the battery status. - Page 7 Press and hold for 5 seconds during Terminate the call a call Press and hold for 8 seconds in Enter RF device learning mode normal mode Press twice in learning mode Remove all learnt device Press once in learning mode Exit learning mode 5.
- Page 8 powered down 30 seconds after the button is pressed for 5 seconds. Press once Activate alarm Press and hold for 5 seconds Cancel alarm during a Guard Time Press once when Base is Pick up incoming call of Base ringing Press and hold for 5 seconds Terminate the call during a call...
-
Page 9: Power Supply
2.2. Power Supply Mobile Lite R8/R15/R18 Slim Mobile Lite R8/R15/R18 slim is powered by rechargeable battery. The typical charging time is 4 hours. As the battery may not be 100% charged when you get your Mobile Lite, make sure to charge your Mobile Lite before the first use. To carge Mobile Lite, please refer to 3.5. -
Page 10: Getting Started - Setting Up Mobile Lite
3. Getting Started – Setting up Mobile Lite 3.1. Mobile Lite SIM Card Insertion Step 1. Loosen the Cover Fixing Screws using a Philips screwdriver and remove the SIM Card Protective Cover. Step 2. Insert SIM Card into Mobile Lite, the chip side of the SIM card should face the back side of Mobile Lite as you insert the card. -
Page 11: Mobile Lite Belt Clip And Attachment
Put the lanyard around the neck of the user. Removal Press the button to release the hook and remove the lanyard. 3.3. Mobile Lite Belt Clip and Attachment Attachment Hook the the belt clip onto the Mobile Lite unit. ... - Page 12 Use the clip to attach the Mobile Lite to the user’s waistband or belt. Removal Press the button to release the hook and remove the belt clip. < > < > When the fall detection function is enabled for Mobile Lite (R15, 18), please use the lanyard to wear Mobile Lite unit on the neck and let it hang in front of the chest, so that Fall Sensor can be effectively triggered.
-
Page 13: Base 15 Installation
3.4. Base 15 Installation Step 1. Choose a suitable location for the Base. The Base requires the mains power and good cellular coverage, and should be easily accessible. It should not be placed in a damp location such as a bathroom or close to a heat source like a microwave oven, which could reduce signal strength. -
Page 14: Hardware Installation (For Pc Programming)
3.6. Hardware Installation (For PC Programming) 3.6.1. Programming Mobile Lite Slim CT-6 Cradle and Programming Micro-USB Cable (Optional Mobile Lite Slim can be programmed via USB port connection of a computer using the PC Programming Tool software. Put Mobile Lite on CT-6 Cradle and use the Programming Micro-USB Cable to connect to PC USB port. -
Page 15: Programming Base 15
Step 2. Insert the device/cradle end of the Programming Micro-USB Cable into the Micro-USB jack as shown in the picture: Step 3. Insert the programming end of the Programming Micro-USB Cable into a computer USB port as shown in the picture below: 3.6.2. - Page 16 Programming USB Regular USB Type Type C Cable C Cable...
-
Page 17: Software Installation (For Pc Programming)
3.7. Software Installation (For PC Programming) 3.7.1. Installing USB Driver Mobile Lite Slim and Base 15 can be programmed via USB port connection of a computer using the PC Programming Tool software (using the Programming Cable). If the computer cannot recognize the USB connection, please try installing the USB driver as instructed below. -
Page 18: Programming
4. Programming Mobile Lite Slim and Base 15 can be programmed by sending SMS commands to the device or using a PC Programming Tool. 4.1. PC Programming Tool (Programming Mobile Lite) For system setting programming with PC Programming Tool software via USB port, follow instruction below. - Page 19 Step 2. Select the following settings in the top section of the configuration screen and click “Open.” Port: Select the COM port generated for Mobile Lite after installing the USB Driver (the USB port connected to Mobile Lite). Baud rate: 115200 ...
-
Page 20: Profile
4.1.1. Profile The Profile function allows you to create and edit different setting profiles which can be easily accessed in the future for quick programming. Current Setting After reading the configuration of Mobile Lite, the Profile scroll down bar will now display “Current Setting”... - Page 21 Apply profile If you wish to apply all the configuration of a profile into Mobile Lite, go to each individual page and click on all the “Write” buttons to make sure all settings are programmed into Mobile Lite. Profile Manager Click on “Profile Manager”...
-
Page 22: Sms Program
4.1.2. SMS Program This tab allows the user to program SMS Keyword (15 characters max.) and Access Code 1 (4-8 digits) which are used for SMS Programming feature. Enter the information and click “Write” to complete programming. Please note that SMS Keyword is case-sensitive. For detail information, please refer to 4.2. SMS Programming. -
Page 23: Report Setting
4.1.4. Report Setting The “Report” tab allows the user to configure report settings. Mobile Lite reports over 3 media: IP (Mobile Network), Speech channel, and SMS message. 5 Report Indexes are available for setting: 4 programmable settings are available per Report Index: 1. - Page 24 AccountNumber: Enter 4 to 23 alphanumeric account number assigned by CMS. Server: Enter either the IP address or the domain name of receiver. Port: Separate from Server with a colon “:”, then enter the port number Example : 0001@59.124.123.66:50123 For XML Report Format, you can also enter http://AccountNumber@server url or https://AccountNumber@server url AccountNumber: Enter 4 to 23 alphanumeric account number assigned by...
- Page 25 3 options: “All”, “Emergency” and “Status”. When an event is triggered, it will be reported to the reporting destination according to the setting. If set to All, the panel will report all events regardless of event type. For example: Mobile Lite being low on battery is a “status” event. If report index 3 and 5 ...
- Page 26 Group The Reporting Group determines the sequence of reporting. One Report Index can only be assigned to one Group. Reporting within a Group: If there are multiple Report Indexes programmed within a Group: Mobile Lite will report according to the numeric order (e.g. 1 > 2 > 3, etc.) ...
- Page 27 If reporting to Group 3 is successful, Mobile Lite will terminate reporting. If reporting to Group 3 is unsuccessful (going through all the Report Indexes within the group for 3 times), Mobile Lite will also terminate reporting. When reporting to the first group failed (going through all the Report Indexes within the group for 3 times), Mobile Lite will start reporting to the next group.
- Page 28 SMS text table: Mobile Lite Condition SMS Text format Low battery status Mobile Lite Low Battery Battery voltage restored Mobile Lite Battery Restored Wakes up time Mobile Lite Periodic Test GPS signal lost Mobile Lite GPS Signal Failure Carrier leaves GeoFence area Mobile Lite has exit GeoFence Area Carrier enters GeoFence area Mobile Lite has entered GeoFence...
-
Page 29: Geo-Fence
- Mobile Lite Medical Help maps.google.com/maps?q=12.12312,121.123123 By:WiFi (Display Mobile Lite exact location where help is sent through WiFi positioning). - Mobile Lite Medical Help maps.google.com/maps?q=12.12312,121.123123 Last Know Loc. 1 Min Ago (Display Mobile Lite exact location where help is sent through GPS signal with the last time the location spotted). - Page 30 Latitude: Enter the location latitude of the center of the operational area (-90 to 90). Longitude: Enter the location longitude of the center of the operational area (-180 to 180). Both Latitude and Longitude accept coordinates of up to 6 decimal points. Due to the mechanics of GPS positioning, the 6 decimal point may deviate slightly from the entered value.
- Page 31 Step 4: The latitude and longtitude will be shown respectively: Polygon Operational Area Select “Polygon Range” to set a Polygon shaped GeoFence area. Up to 3 polygon operational areas can be set up.
- Page 32 Polygon Vertex Number: Select the number of vertices the polygon will have (3 or 4). If 3 is selected, Latitude4 and Longitude4 will dim to prevent selection. Latitude 1-4: Enter the location latitude of 1-4 vertices of the operational area (-90 to 90).
-
Page 34: Setting
4.1.6. Setting The Setting tab allows you to program general configuration for Mobile Lite. Click “Write” when you have completed all settings to confirm. Help Event (Selecting an event code): You can select the event code to be sent to the CMS when the Active ... - Page 35 Sensor has expired. This function is only used when a fall is detected, if the Active Button on Mobile Lite or the Active Button of the learnt-in Fall Sensor is pressed to activate alarm, normal guard time is used instead. Speech Report Ack: ...
- Page 36 When set as “Enable”, Mobile Lite auto answer an incoming call (after the first ring) within the callback timer, and wait for the correct Access Code (default: 1111) and # key entry within 15 seconds before it opens a full-duplex Two-way communication. If the correct Access Code (and the # key) are not entered within 15 seconds, the system will disconnect the call automatically.
- Page 37 When this function is set to “Off”, silent mode is turned off. When Mobile Silent is enabled, a Listen-in only communication will be established initially for Speech Reporting. The call recipient can enter DTMF keys to change communication types (please refer to 6.5.
- Page 38 Select to enable or disable the fall detection function of Mobile Lite. AGPS Select to enable or disable APGS (Assisted GPS) for Mobile Lite. When APGS is enabled (Factory Default), data connection will be used to contact the assistance server for AGPS information to improve the performance of GPS.
-
Page 39: Device (R8, R18 Only)
from 0-60 minutes. When set as 0, Mobile Lite will not update or report GPS location, continuous GPS Report function is disabled For example, if Report Period is selected as “1 hour” and Report Interval set as “3 minutes”, Mobile Lite will keep checking and reporting GPS location every 3 minutes during the 1 hour-period after Geofence Alarm. -
Page 40: Miscellaneous
sensors into the Mobile Lite. Click on the “Add Sensor” button: Enter the Sensor ID (the barcode on the back of the sensor). A sensor ID is a combination of digits 1-9 and characters A-F and can contain 10 or 14 characters (can be uppercase or lowercase characters). -
Page 41: Firmware
Location Clicking on this button to send current location information to the reporting destinations. Reboot Device Click “Reboot Device” to reboot Mobile Lite. This will not remove any programmed parameters on Mobile Lite. Reboot GSM Click “Reboot GSM”... - Page 42 Step 3. When updating process is completed, a message “Firmware update success!” will be displayed in a pop-up window. Step 4. Click on “OK” and the programming tool will read the settings of Mobile Lite again. < > < > ...
-
Page 43: Pc Programming Tool (Programming Base 15)
4.2. PC Programming Tool (Programming Base 15) For system setting programming with PC Programming Tool software via USB port, follow instruction below. Step 1. Execute the programming tool: The following configuration screen will be opened. Step 2. Select the following settings in the top section of the configuration screen and click “Open.”... -
Page 44: Profile
Step 3. Read Configuration To start configuring Base 15 settings, click on “Open”. A Read configuration success message will pop up, click “OK” to proceed: The current Base 15 setting will be displayed. Click on different tabs to see and edit Mobile Lite functions. - Page 45 display “Current Setting” indicating PC Programming Tool is now displaying the current Base 15 configurations. Selecting different tabs will show the current values of each setting. If you select a different profile from the drop down menu, the “Current Setting” profile will disappear to indicate the PC Programming Tool is no longer displaying Base 15’s current configuration.
- Page 46 Delete Profile Select a profile and click on “Delete Profile”. A pop-up window will ask you to confirm the selection: Select “Yes” to delete the profile, or “No” to return to the previous page.
-
Page 47: Sms Program
4.2.2. SMS Program This tab allows the user to program SMS Keyword (15 characters max.) and Access Code 1 (4-8 digits) which are used for SMS Programming feature. Enter the information and click “Write” to complete programming. Please note that SMS Keyword is case-sensitive. For detail information, please refer to 4.3. SMS Programming. -
Page 48: Report Setting
4.2.4. Report Setting The “Report” tab allows the user to configure report settings. Base 15 reports over 3 media: Speech channel, Cellular Network, and SMS message. 5 Report Indexes are available for setting: 4 programmable settings are available per Report Index: 1. - Page 49 IP Reporting: When activated, Base 15 will send event code via mobile network. AccountNumber: Enter 4 to 8 alphanumeric account number assigned by CMS. Server: Enter either the IP address or the domain name of receiver. Port: Separate from Server with a colon “:”, then enter the port number Example : 0001@59.124.123.66:50123 Speech reporting and SMS Text Report Format: PhoneNumber ...
- Page 50 SIA over IP: Base 15 reports digital SIA event codes over mobile network TCP Protocol. SIA2 over IP: Base 15 reports digital SIA2 event codes over mobile network TCP Protocol. SIA_CID over UDP: Base 15 reports digital CID event codes over mobile ...
- Page 51 Reporting Case. Reporting Cycle If multiple groups are assigned to the same event type (emergency or status), Base 15 will report according the group numeric order from the first programmed Group to the last programmed group. This report sequence is one reporting cycle. Reporting behavior depends on the event type: ...
- Page 52 For example, if Groups 1 and 3 are programmed for “Status” reports: Group 1 > Group 3 > Stops reporting whether Groups 1 and 3 succeeded or not SMS Report text format Below are the SMS Text messages sent to user according to the condition ...
-
Page 53: Setting
4.2.5. Setting The Setting tab allows you to program general configuration for Base 15. Click “Write” when you have completed all settings to confirm. Help Event (Selecting an event code): You can select the event code to be sent to the CMS when the Help ... - Page 54 When the Base makes Speech Report or answer an incoming call. The duration of Two-way communication is conditioned by the Two-Way Timer setting. Pressing any DTMF key during Two-way communication (except DTMF 9) will reset the communication time to the preset duration. Callback Timer: ...
- Page 55 start counting down the time for the first Auto check-in report. The Base will send the first check-in report according to the setting of Auto Check-In Offset time. Afterwards, the Base will send reports according to the setting of Auto Check-in Interval Guard Time Sound: ...
- Page 56 and open a full-duplex Two-way communication without checking the Access Code (default: 1111). When set as “Enable”, the Base auto answer an incoming call (after the first ring), and wait for the correct Access Code (default: 1111) and # key entry within 15 seconds before it opens a full-duplex Two-way communication.
-
Page 57: Device
4.2.6. Device Click on the “Device” tab for Device settings where you can view device zone, type, add or remove devices. For learning new device(s), please use local learning mode or use the PC Programming Tool. Add Sensor: Depends on the supplier, a Sensor ID of the device may be labeled (usually on the back of the device). -
Page 58: Miscellaneous
4.2.7. Miscellaneous Click on the “Misc.” tab to program miscellaneous options: Signal Strength Click on the Signal Strength button to obtain GSM signal strength. The IMEI number of GSM module will be displayed on the right side of GSM signal strength. -
Page 59: Firmware
4.2.8. Firmware To update the firmware of the Base: Step 1. Click “Firmware”. Step 2. Select the firmware update speed from the drop down menu. The shorter the time, the faster the update speed; however some computer may not be able to support high update speed and doing so may crash the computer. -
Page 60: Sms Remote Programming (Mobile Lite & Base 15)
4.3. SMS Remote Programming (Mobile Lite & Base 15) Step 1. Enter the SMS screen on your mobile phone or smartphone. Step 2. Enter the programming command (see the SMS remote programming commands tables below). Step 3. Enter a colon (:). Step 4. -
Page 61: Local Rf Device Management
5. Local RF Device Management 5.1. For Mobile Lite (R8, R18) Mobile Lite (R8, R18 only) can learn up to 20 RF devices which can be used to activate Mobile Lite to make emergency report. Entering Learning Mode Press the Active Button of Mobile Lite for 8 seconds. Mobile Lite will emit one beep at 5 and 8 second. -
Page 62: For Base
5.2. For Base 15 Base 15 can learn up to 15 RF devices which can be used to activate the Base to make emergency report. Entering Learning Mode Press the Help Button of the Base for 8 seconds. The Base will emit one beep at 5 and 8 second. -
Page 63: Operation
6. Operation 6.1. Mobile Lite 6.1.1 Answering Incoming Calls Mobile Lite will ring when there is an incoming call. The user can press Mobile Lite’s Active Button or the learnt-in RF device (WTR, Fall Sensor or PB) button to pick up the call. If “Answer Incoming Calls”... -
Page 64: Current Operation Condition
6.1.2 Current Operation Condition Mobile Lite uses its LED to remind the user of its Current Operation Condition. LED indicators: Case B Behavior Indication Green LED (Top LED) Mobile Lite is being charged. 1 flash every 5 seconds Mobile Lite operating normally Red LED (Top LED) 1 Flash every 3 seconds... -
Page 65: Geofencing
Map. Click the link to display the location. For Speech reporting, the location info will be updated every minute, but it cannot be sent via Speech reporting format. You will need to program at least one IP report before Speech report. Mobile Lite location updates during two-way communication will be reported through last successful IP channel. -
Page 66: Alarm Activation
6.1.5 Alarm Activation When the user presses the Active Button of Mobile Lite or the learnt-in RF device (WTR, Fall Sensor or PB) for help, Mobile Lite will emit a voice prompt “Emergency Call was pressed” as it enters guard time. When a fall is detected from the learnt-in Fall Sensor or the Mobile Lite ... - Page 67 After guard time expires, Mobile Lite will summon help based on the programmed reporting methods. When Mobile Lite is reporting, it will emit confirmation beeps (1 beep every second). For Speech Reporting, if the call recipient picks up the call, Mobile Lite will ...
-
Page 68: Alarm Report Procedure
6.1.5.1 Alarm Report Procedure Mobile Lite alarm and location reporting sequence is determined by Use Last Position setting. Use Last Position Disabled When Mobile Lite button is pressed and alarm is activated, it will begin to acquire new Location (through Wi-Fi and GPS positioning) and count down Guard Time. - Page 69 Wi-Fi hotspots, other wireless access points and store the data according set time interval. If Wi-Fi data cannot be obtained, Mobile Lite will check GPS location instead. When Mobile Lite button is pressed and alarm is activated, it will begin to check last position while acquiring new Location and count down Guard Time.
- Page 70 When new position is acquired, Mobile Lite makes follow up report (CID 645) immediately with Location coordinates. If new position is acquired under two-way communication following a successful IP report, Mobile Lite makes report (CID 100/101/120) via the successful IP channel with location coordinates. During the two-way communication, Mobile Lite will keep updating location and making report (CID 100/101/120) every minute.
-
Page 71: Callback Mode
6.1.5.2 Callback Mode After reporting an alarm successfully to the CMS, Mobile Lite will enter callback mode by default. User can choose to turn on/off the Callback feature and set call back mode time length (Please refer to 4.1.6. Setting). -
Page 72: Speech Reporting Method
6.1.5.3 Speech Reporting Method If speech reporting method is selected, Mobile Lite will dial the programmed number for reporting. It will establish a two-way voice communication between the call recipient and Mobile Lite user. If Mobile Silent is enabled on Mobile Lite, a Listen-In only communication ... -
Page 73: Report Sequence
6.1.5.4 Report Sequence The Reporting Group determines the sequence of reporting. One Report Index can only be assigned to one Group. Reporting within a Group: If there are multiple Report Indexes programmed within a Group: Mobile Lite will report according to the numeric order (e.g. 1 > 2 > 3, etc.) ... - Page 74 If reporting to Group 3 is successful, Mobile Lite will terminate reporting. If reporting to Group 3 is unsuccessful (going through all the Report Indexes within the group for 3 times), Mobile Lite will also terminate reporting. When reporting to the first group failed (going through all the Report Indexes within the group for 3 times), Mobile Lite will start reporting to the next group.
-
Page 75: Sleep Mode
6.1.6 Sleep Mode Mobile Lite can enter Sleep Mode to conserve power. While under normal operation mode, press the Active Button for 5 seconds to enter / exit Sleep Mode. When Mobile Lite enters Sleep Mode, all functions, including the LED ... -
Page 76: Usage Recommendation For Fall Detection (R15, R18 Only)
6.1.7 Usage Recommendation for Fall Detection (R15, R18 only) When the fall detection function is enabled for Mobile Lite, please wear the unit on the neck and let it hang in fornt of the chest, so that Fall Sensor can be effectively triggered. Please do not place the Mobile Lite in your bag, or hide it inside coat pocket, which may lead to difficult trigger or non-detection. -
Page 77: Voice Prompts
6.1.8 Voice Prompts Mobile Lite will play voice prompts according to different conditions. Voice prompts can be turned on/off using SMS remote programming or PC programming tool. Below is a quick reference chart of all the voice prompts of Mobile Lite and the conditions under which they are played. -
Page 78: Base 15
6.2. Base 15 6.2.1 Answering Incoming Calls The Base 15 will ring when there is an incoming call. The user can press the Base 15’s Help Button or the learnt-in RF device (WTR, Fall Sensor or PB) button to pick up the call. If “Answer Incoming Calls”... -
Page 79: Callback Mode
If there are no report destinations programmed, the Base will not report upon alarm activation and will emit 1 beep as a reminder. Guard Time After the Base is activated, it will begin counting down the Guard Time and ... -
Page 80: Speech Reporting Method
Enter (2) for two-way voice communication. Enter (3) for listen-in only mode. Enter (9) to hang up. Put the handset back to the base cradle to end the call. Press and hold the Help Button of the Base 15 for 5 seconds, or press Active Button of RF device (WTR, Fall Sensor or PB) once to end the call. -
Page 81: Report Sequence
At 20 and 10 seconds before the communication time expires, Base 15 will emit 1 beep via the telephone handset to alert the user. If the call recipient needs more talk time, he can press any key except for ... -
Page 82: Special Reporting Case: Ip + Speech Report
For example, Groups 1 and 3 are assigned to Emergency Events: If Group 1 is successful, Base 15 will still report to Group 3. If reporting to Group 3 is successful, Base 15 will terminate reporting. If reporting to Group 3 is unsuccessful (going through all the Report Index within the group for 5 times), Base 15 will also terminate reporting. -
Page 83: Factory Reset
Successful report: Base 15 will consider the report successful only if Speech report is successful. If Speech Report fails, the Base 15 will retry report, 6.2.3 Factory Reset Factory Resetting Base 15 will clear all programmed parameters. Step 1. Press and hold the + and – keys while supplying power to Base 15. All LEDs will turn on. -
Page 84: Voice Prompts
6.2.5 Voice Prompts Base 15 will play voice prompts according to different conditions. Voice prompts can be turned on/off using SMS remote programming or PC programming tool. Below is a quick reference chart of all the voice prompts of Base 15 and the conditions under which they are played. -
Page 85: Appendix
Appendix SMS Remote Programming Commands Table Item Command Example & Usage Default Make Unit SCREAM SCREAM:PROG,1111,60 Scream To set the length of Mobile Lite’s beeping period (5-60 seconds) to help the (Mobile Lite search for Mobile Lite when the device is lost only) This command will also request for location information. - Page 86 Item Command Example & Usage Default Callback time CBTI CBTI:PROG,1111,5,5,1 To set Callback time & Two-way time, and enable/disable callback check access code Parameter 1: Duration, 0 = disable, 1-30 = 1-30 min Parameter 2: Two-way time, 1-30 = 1-30 min Parameter 3: callback check access code, 0 = Disable, 1= Enable Factory reset FTSET...
- Page 87 Item Command Example & Usage Default Set Caller ID CALID CALID:PROG,1111,1,0227942014 Parameter 1: Select Caller ID: 1 = ID #1, 2 = ID #2 Parameter 2: Caller ID number: Enter a number up to 15 digit long Enable / VOIEN VOIEN:PROG,1111,1 Disable Voice Enable/disable mobile voice prompts...
-
Page 88: Contact Id Communications Protocol And Format
Item Command Example & Usage Default Remove RF DEVRM DEVRM:PROG,1111,1 Device Remove RF Device in Mobile Lite (R8/R18/Base5 Parameter 1: Zone number to be removed (1~5) Only) CUTV:PROG,1111,1 enable/disable Enable/disable pressing sensor button to end call. pressing sensor Disable = 0, Enable = 1 button to end CUTV call... - Page 89 message to the receiver. It may be transmitted as either 18 (preferred) or 98 (optional). New receiver implementations shall accept either an 18 or a 98. Note that some older receivers may not accept 98. Q = Event qualifier, which gives specific event information: 1 = New Event or Opening 3 = New Restore or Closing 6 = Previously reported condition still present (Status report)
- Page 90 The category to which each event belongs is shown in the brackets following every event description. The event filter (please refer to 4. Programming Mobile Lite – SMS Remote Programming for details about the event filter) will process events according to the categories to which events are assigned. For example, in the case of “100 –...
-
Page 91: Sia Digital Communication Standard
temperature level. 301 – AC Fail/Restore (status) (For Base 15 only) When AC is disconnected (fail). When AC is re-connected (restored). 302 – Mobile Lite/Base Low on Battery (status) When Mobile Lite/Base is low on battery. ... - Page 92 <LF>16680081"ADM-CID"0009L0#41770744318[#41770744318|1101 00 200][X006E33.66754530][Y46N31.02882385][P0,b:100%,d:0,g:4,t:201908151 00017,la:1,c:0,by:G]<CR> Where: “ADM-CID” means that the content of this message is in the CID format. 0009 for <seq> L0 for <Lpref> #41770744318[#41770744318|1101 00 200] 41770744318 = account number 1101 00 200 = CID data (QXYZ GG CCC) [X...] and [Y...] are location data.
Need help?
Do you have a question about the Mobile Mates R8 Slim and is the answer not in the manual?
Questions and answers