Advertisement
Quick Links
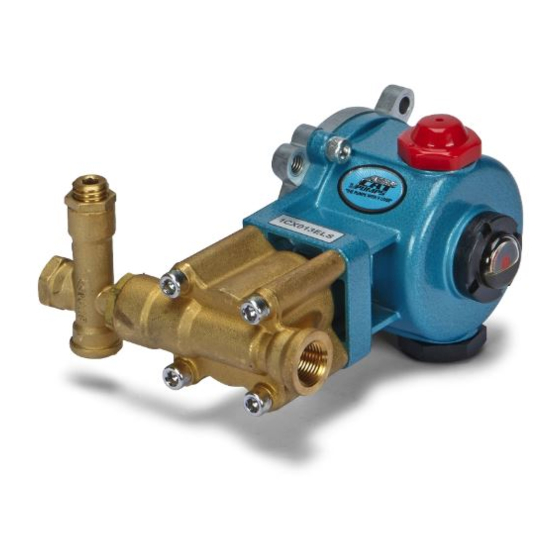
SERVICE MANUAL
1CX PLUNGER PUMP SERIES
FLOW
PUMP MODEL
GPM (L/M)
1CX013ELS.MIST
0.13 (0.492)
1CX025ELS.MIST
0.25 (0.946)
1CX05ELS.MIST
0.5 (1.892)
IMPORTANT SAFETY INSTRUCTIONS
It is the responsibility of the user to read and understand all instructions, important safeguards, and safety precautions before
operating or servicing any pump. Failure to do so may result in property damage, personal injury or death.
General Safety Information and Symbols
Pay special attention to the following signal words, safety alert symbols and statements:
DANGER
indicates a hazardous situation which, if not avoided, will result in death or serious injury.
WARNING
indicates a hazardous situation which, if not avoided, could result in death or serious injury.
CAUTION
indicates a hazardous situation which, if not avoided, could result in minor or moderate injury or property damage.
NOTICE
indicates a hazardous situation which, if not avoided, could result in property damage.
Indicates a potential personal injury hazard. Obey all safety messages that follow this symbol to avoid possible injury or death.
SERVICING THE 1CX SERIES PLUNGER PUMP
WARNING
Do not service pump or electrical equipment while energized.
Electricity can cause personal injury, death or property damage.
1.
Adhere to "Lock Out" and "Tag Out" procedures for electrical equipment.
2.
Before commencing pump service, turn power supply off.
3.
Keep water away from electrical outlets and electrical devices.
4.
Electrical components must be installed by a qualified
electrician to avoid risk of electrocution.
SERVICING THE VALVES
Disassembly
NOTE: All pump models require one (1) stacked valve kit to repair pump. Discharge
and inlet valve assemblies may stay together or separate during removal.
1.
Disconnect discharge and by-pass lines from pressure regulator.
2.
Using a M22 wrench, loosen hex valve plug and remove
pressure regulator from manifold head.
NOTE: There is no need to separate pressure regulator from hex valve plug.
3.
Use reverse pliers to remove stacked valve assembly from the valve chamber.
4.
If the discharge valve assembly separates from the inlet valve
assembly, use reverse pliers to remove it from the valve chamber.
PRESSURE
PUMP
MOTOR
PSI (BAR)
RPM
1000 (70)
1725
1000 (70)
1725
1000 70)
1725
TEMPERATURE
RPM
Far. (Cent)
1725
140º (60º)
1725
140º (60º)
1725
140º (60º)
SHAFT DIA.
OIL CAP
INCH (MM)
Oz. (l)
.500 (12.7)
2.03 (0.06)
.500 (12.7)
2.03 (0.06)
.500 (12.7)
2.03 (0.06)
Advertisement

Related Manuals for CAT Pumps 1CX Series


Summary of Contents for CAT Pumps 1CX Series
- Page 1 Indicates a potential personal injury hazard. Obey all safety messages that follow this symbol to avoid possible injury or death. SERVICING THE 1CX SERIES PLUNGER PUMP WARNING Do not service pump or electrical equipment while energized.
- Page 2 NOTICE Exercise caution as the reverse pliers may damage the threads in valve chamber or spring retainer. If the inlet spring retainer separates from the inlet seat, remove the spring and valve from the valve chamber. Thread an M8 screw into the inlet seat and remove from valve chamber. To separate valve assemblies use the same M8 screw and thread into bottom of seat until screw contacts bottom of valve.
-
Page 3: Torque Sequence
NOTICE Exercise caution as the screwdriver may score o-ring sealing surface. Remove Hi-Pressure seal either by hand or with a reverse pliers from seal chamber. Reassembly Examine manifold chamber walls for scale buildup or damage. Examine Hi-Pressure seal for frayed edges or uneven wear and replace as needed. Examine seal case o-ring for cuts or deterioration and replace as needed. - Page 4 See PREVENTATIVE MAINTENANCE CHECK-LIST. Examine crankshaft oil seal externally for drying, cracking or leaking. Contact Cat Pumps or local distributor if crankcase service is required. SERVICING THE REGULATOR NOTE: All pump models require one (1) o-ring kit to repair regulator.
- Page 5 INSTALLATION OF REPLACEMENT PUMP TO MOTOR NOTE: All pump models are shipped with Cat Pumps special custom-blend ISO 68 hydraulic oil. NOTE: All pumps models come with one (1) bolt kit. NOTE: DO NOT remove three (3) HSH screws (M6 x 14) that fasten pump crankcase to bearing cover – Leakage of crankcase oil will result.
- Page 6 B. ROTATING PARTS HAZARD Do not service pump while energized. Moving, rotating or reciprocating parts can crush and cut, causing personal injury, death or property damage. 1. Adhere to “Lock Out” and “Tag Out” procedures for electrical equipment. 2. Before commencing pump service, turn power supply off, turn water supply off, squeeze trigger on gun to relieve system pressure. 3.
- Page 7 1. Cat Pumps custom-blend oil is available worldwide in 21 oz. bottles,cases, or 5-gallon twin packs. Use of other oils may void the warranty. 2. Fill pump crankcase to specific capacity indicated on data sheet or service manual prior to startup.
-
Page 8: Diagnosis And Maintenance
Cat Pumps are very easy pumps to service and require far less frequent service than most pumps. Typically, only common tools are required, making in-field service convenient, however, there are a few custom tools, special to certain models, that do simplify the process. This service manual is designed to assist you with the disassembly and reassembly of your pump.
Need help?
Do you have a question about the 1CX Series and is the answer not in the manual?
Questions and answers