Table of Contents
Advertisement
Quick Links
Advertisement
Table of Contents

Related Manuals for Harman Martin ELP WW IP


Summary of Contents for Harman Martin ELP WW IP
- Page 1 ELP WW IP LED Profile User Manual...
-
Page 2: Dimensions
Martin®, HARMAN and all other trademarks in this document pertaining to services or products by Martin Professional or its affiliates and subsidiaries are registered as the property of HARMAN Professional Denmark. -
Page 3: Table Of Contents
Table of contents Dimensions ................... 2 Safety information ................. 5 Introduction ................... 9 Before using the product for the first time ........9 Fixture overview .................. 10 Physical installation ................11 Fixture location ................. 11 Mounting the fixture ..............11 Fastening the fixture to a flat surface ........ - Page 4 Pressure relief valves ............... 26 Uploading new firmware ............27 Service and repairs ..............27 DMX protocol ..................28 Control menus ..................29 Troubleshooting .................. 32 Specifications ..................33...
-
Page 5: Safety Information
Martin website at http://www.martin.com Technical Support If you have questions about how to install, service or operate the fixture safely, please contact Harman Professional Technical support: For technical support in North America, please contact HProTechSupportUSA@harman.com / phone: (844) 776-4899 ... - Page 6 Protection from electric shock Ensure that the fixture is electrically connected to ground (earth). Disconnect the fixture from AC power when not in use. Do not open the fixture or remove any cover. Refer any service operation not described in this manual to an authorized Martin Service partner. Shut down power to the entire installation at the main power distribution board and lock out power before carrying out any installation or maintenance work.
- Page 7 Protection from burns and fire Do not operate the fixture if the ambient temperature (Ta) exceeds 40° C (104° F). The surface of the fixture can reach up to 55° C (131° F) if the fixture is operated at the maximum permitted ambient temperature. Allow the fixture to cool for at least 5 minutes before handling.
- Page 8 If the safety cable attachment point becomes deformed, do not suspend the fixture. Have the fixture repaired by an authorized Martin service partner. Ensure that any accessories such as gel frames, gobo holders are securely fastened. Block access below the work area and work from a stable platform whenever installing, setting, adjusting, or cleaning the fixture.
-
Page 9: Introduction
The Martin ELP WW IP can be controlled using any DMX-compliant controller and can be remotely configured by RDM. It also features stand-alone operation with capacity for up to 20 scenes. -
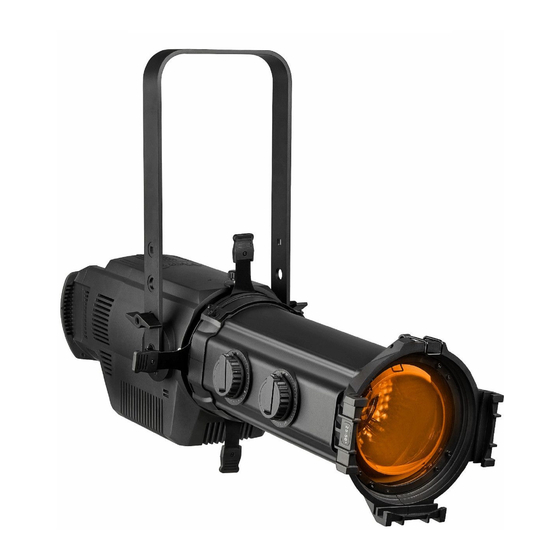
Page 10: Fixture Overview
Fixture overview 1 – Filter retaining clip 10 – Heatsink vent 2 – Filter frame 11 – Safety cable attachment point 3 – Interchangeable optical lens tube 12 – Rear handles for positioning 4 – Lens tube housing 13 – Control panel 5 –... -
Page 11: Physical Installation
Physical installation Warning! Read ‘Safety information’ on page 5 before installing the fixture. Warning! The safety and suitability of lifting equipment, installation location, anchoring method, mounting hardware and electrical installation are the responsibility of the installer. All local safety regulations and legal requirements must be observed when installing and connecting the fixture. -
Page 12: Mounting The Fixture On A Truss
Mounting the fixture on a truss The fixture can be clamped to a truss or similar rigging structure in any orientation. Use a suitable rigging clamp such as a G-clamp or a half-coupler clamp (see illustration on right) fastened to the mounting yoke. To clamp the fixture to a truss: 1. -
Page 13: Changing The Lens Tube
Changing the lens tube Four different lens tubes with fixed beam angles of 19°, 26°, 36° or 50° are available for the fixture. Two zoom lens tubes with either 15°-30° or 25°-50° zoom ranges are also available. All lens tubes are available in black or white finish. -
Page 14: Ac Power
AC power Warning! Read ‘Safety information’ on page 5 before installing the fixture. For protection from electric shock, the fixture must be grounded (earthed). The power distribution circuit must be equipped with a fuse or circuit breaker and ground-fault (earth-fault) protection. If you want to connect fixtures to power in a daisy-chain, use correctly dimensioned cables (see ‘Linking fixtures to power in a chain’... - Page 15 If you install a power plug on a 12 AWG / 2.5 mm power input cable, install a grounding type (earthed) plug with integral cable grip that is rated minimum 16 A, 250 V. Power relay cables If you connect fixtures to power in a daisy-chain, we recommend that you use the 16 amp rated power relay cables available from Martin (see ‘Accessories’...
-
Page 16: Control Data
Control data Warning! Read ‘Safety information’ on page 5 before installing the fixture. Keep all connectors sealed with their rubber caps when not in use. Use only IP65-rated connectors when making data connections to the fixture. A DMX 512 data link is required in order to control the fixture via DMX. The fixture has 5-pin XLR connectors for DMX data input and output. -
Page 17: Fixture Setup
Fixture Setup This section explains the fixture characteristics you can set that determine how it can be controlled and will behave. You choose the settings using the menus available from the control panel, and they are retained even when the fixture is powered off. Options can also be set over the DMX line using RDM from a suitable controller, see “Setting options by RDM”... -
Page 18: Fast Focus Mode
Fast focus mode If you need to focus the fixture but there is nobody to operate the lighting console, you can quickly turn the fixture on in “Fast Focus mode” using the control panel. Hold down the ENTER button for 5 seconds and the fixture will come on at full brightness in open white for 60 seconds, allowing you to set the focus. - Page 19 Dimming curves Four dimming modes are available: LINEAR The increase in light intensity appears to be linear as DMX value is increased. SQUARE LAW light intensity control is finer at low levels and coarser at high levels. INV SQ LAW (Inverse square law) light intensity control is coarser at low levels and finer at high levels.
-
Page 20: Display
Display This option allows you to set some parameters for the display screen. Select DISPLAY from the PERSONALITY menu and press ENTER to confirm. Use the UP and DOWN buttons to select: DISPLAY SLEEP – Use the UP and DOWN buttons to select display sleep time, settings are ON (Display permanently on), 2 MINUTES, 5 MINUTES or 10 MINUTES ... - Page 21 Calibration From the SERVICE menu you can select CALIBRATION. This menu allows you to adjust the overall brightness of the fixture to match with other fixtures. The fixture is calibrated in the factory but over time the brightness of the LED emitters will gradually reduce, so this function can be useful if you need to match a new fixture with older ones.
-
Page 22: Setting Options By Rdm
Setting options by RDM You can remotely configure the fixture over the DMX line using a suitable RDM-compatible controller that is connected to the installation via a DMX data link. A full list of the RDM functions that the ELP fixture supports is given at the end of this chapter. These functions are generally referred to using the more specific term ‘PIDs’... - Page 23 DMX_START_ADDRESS DEVICE_HOURS IDENTIFY_DEVICE LAST_STATE DIMMER_CURVE Martin® ELP WW IP User Manual...
-
Page 24: Effects
Effects This section describes the effects provided by the ELP WW IP fixture. See ‘DMX protocol’ on page 28 for a full list of the DMX channels and values required to control the different effects. Dimming Overall intensity can be precisely adjusted from 0 to 100% using 16-bit coarse and fine control. In 1Ch or 2Ch mode the control is 8-bit. -
Page 25: Use Of Gobos And Irises
Use of gobos and irises The fixture will accept an A-size or B-size goboholder or an iris (items not included with the fixture) in the gobo/accessory gate. There is a sliding cover over the gate to prevent light spill and retain the gobo holder in the fixture. -
Page 26: Service And Maintenance
Service and maintenance Warning! Read ‘Safety information’ on page 6 before servicing the fixture. Refer any service operation not described in this user manual to a qualified service technician. Excessive dust, smoke fluid, and particle buildup degrades performance, causes overheating and will damage the fixture. Damage caused by inadequate cleaning or maintenance is not covered by the product warranty. -
Page 27: Uploading New Firmware
interval. If heavy dust or dirt is present and the fixture is powered on and off frequently you should monitor a potential need for valve replacement carefully. If any valve shows signs of contamination or is not in perfect condition, replace it immediately. New pressure relief valves are available from Martin (see “Spare parts”... -
Page 28: Dmx Protocol
DMX protocol Channel DMX range Function 0-255 Dimmer 0-100% 0-255 Dimmer Fine Shutter 000-031 Blackout 032-063 Open 064-095 Strobe (Slow-Fast) 096-127 Open 128-159 Pulse effect in sequences 160-191 Open 192-223 Random strobe effect (Slow-Fast) 224-255 Open 0-255 Dimmer fade time Martin®... -
Page 29: Control Menus
Control menus To access the control menus, press the MENU button. Use the UP and DOWN buttons to navigate the menus. Select any required menu option using the ENTER button. For more information, see ‘Using the control menus’ on page 17. Default fixture settings are shown in bold. - Page 30 Cool Mode Reg fan Personality Fan optimized for light (continued) intensity (temperature is controlled by regulating fan speed, light output is unaffected) Full Fans set to full/low constant speed (temperature is controlled by regulating light output). Display Sleep Display remains permanently on 2 min Display goes into sleep...
- Page 31 Information Fixture ID 0 - 9999 User-settable fixture ID (continued) number Displays fixture’s unique RDM UID XXXXXXXXXX RDM ID Temperature LED / CPU Displays temperature in °C Temp of all PCBs and LED DMX Live Dimmer, 0 - 255 Scroll to see values being …...
-
Page 32: Troubleshooting
Troubleshooting This section describes a few common problems that may occur during operation and provides some suggestions for easy troubleshooting: Symptom Potential cause Remedies No light from fixture. Shutters are all pushed Pull out the 4 shutter blades. in, blocking the light. Power supply issue, Ensure that the mains supply is connected such as blown fuse,... -
Page 33: Specifications
Specifications Physical Length ...................... 644 mm (25.4 in.) Width ......................255 mm (10.1 in.) Height ....................... 255 mm (10.1 in.) Height (with bracket) ................527 mm (20.1 in.) Weight ......................11 kg (24.3 lb.) Dynamic Effects Electronic dimming ....................0 - 100% Strobe and pulse effects ........ - Page 34 Minimum distance to illuminated surfaces ............0.5 m (1.6 ft.) Connections AC power in/thru ..........IP65-rated Neutrik PowerCON TRUE1 TOP DMX & RDM data in/thru ..............IP65-rated 5-pin XLR Electrical AC power ................100-240 V nominal, 50/60 Hz Power supply unit ............Auto-ranging electronic switch-mode Idle power (zero intensity) ....................
- Page 35 Ordering Information Fixtures without lens tubes Martin ELP WW IP (fixture body only) ............P/N 9045122813 Martin ELP WW IP (fixture body only), White ........... P/N 9045122815 Lens tube options* Martin ELP Lens Tube 19° ................ P/N 9045107782 Martin ELP Lens Tube 26° ................ P/N 9045107783 Martin ELP Lens Tube 36°...
- Page 36 Supplier’s declaration of conformity Harman Professional, Inc. have issued an FCC Supplier’s Declaration of Conformity for this product. The Declaration of Conformity is available for download from the product’s pages on the Martin website at www.martin.com. Disposing of the product...
- Page 39 www.martin.com...
Need help?
Do you have a question about the Martin ELP WW IP and is the answer not in the manual?
Questions and answers