Armacost Lighting RibbonFlex PRO Manual
Led tape light kit
Hide thumbs
Also See for RibbonFlex PRO:
- User manual ,
- Quick start manual (8 pages) ,
- Quick start manual (2 pages)
Table of Contents
Advertisement
Quick Links
SAFETY INFORMATION
DANGER: Risk of eye damage. Do not stare directly at the LED chips
■
of this LED strip.
CAUTION: Do not power LED tape while coiled on reel.
■
IMPORTANT: Always observe polarity for 12-volt connections, positive
■
(+) to positive and negative (–) to negative.
IMPORTANT: Do not install Class 2 low voltage wiring in the same runs
■
as AC main power. If AC and low voltage wires cross, keep them at
90-degree angles. Use only insulated staples, plastic ties, or wire
support clips to secure cords and wires.
NOTICE: LED fl exible tape lighting rating: 12VDC 3A.
■
Only use the 12-volt LED lighting power supply which has been
■
provided with this kit.
Do not bend, crush or pull the cable. Protect from sharp edges,
■
oil and heat.
For indoor/dry location use only.
■
Ensure the connectors are securely fastened before operating the tape.
■
Electrical waste should not be disposed of with household waste.
■
Please recycle where facilities exist.
Three-year limited warranty
WHAT IS COVERED
The manufacturer warrants this fi xture to be free from defects in materials
and workmanship for a period of three (3) years from date of purchase.
This warranty applies only to the original consumer purchaser and only
to products used in normal use and service. If this product is found to be
defective, the manufacturer's only obligation, and your exclusive remedy, is
the repair or replacement of the product at the manufacturer's discretion,
provided that the product has not been damaged through misuse, abuse,
accident, modifi cations, alteration, neglect, or mishandling. This warranty
shall not apply to any product that is found to have been improperly
installed, set-up, or used in any way not in accordance with the instructions
supplied with the product. This warranty shall not apply to a failure of the
product as a result of an accident, misuse, abuse, negligence, alteration,
faulty installation, or any other failure not relating to faulty material or
workmanship. This warranty shall not apply to the fi nish on any portion of
the product, such as surface and/or weathering, as this is considered normal
wear and tear.
WHAT IS NOT COVERED
The manufacturer does not warrant and specifi cally disclaims any warranty,
whether expressed or implied, of fi tness for a particular purpose, other than
the warranty contained herein. The manufacturer specifi cally disclaims any
liability and shall not be liable for any consequential or incidental loss or
damage, including but not limited to any labor/ expense costs involved in
the replacement or repair of said product.
Contact customer support at 410-354-6000, support@armacostlighting.com,
or visit armacostlighting.com/support.
Installation considerations
Where will you locate your power supply?
■
How will you run and conceal the wires to your LED tape lighting?
■
What is the best mounting position for the LED tape light to achieve
■
your desired effect?
See the section titled "Mounting options" for cabinet lighting
■
placement tips.
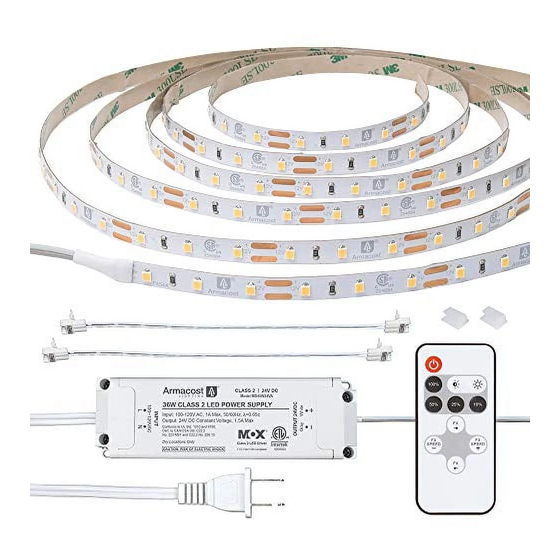
LED Tape Light Kit
PACKAGE CONTENTS
Plug-in power supply
RF receiver and 8.2 feet
LED tape light (pre-assembled)
SureLock Wire Lead Connectors (optional use)
INSTALLATION
Cutting the tape light or extending the tape
light length (optional)
Using the provided connectors, this tape light system can be
■
extended to a total length of up to 5m
Use only Armacost RibbonFlex Pro item #142210 (sold separately)
■
to extend the tape length
Additional connectors are available through the point-of-purchase
■
or directly from armacostlighting.com
IMPORTANT: Make sure to observe polarity when making connections,
■
positive to positive and negative to negative. Check to see that the
wire colors and the polarity markings printed on the tape line up.
To use the included SureLock Connectors, cut the LED tape with
■
scissors in the center of a copper pad (position A) as shown, or attach
the connector to the copper pad found at the end of the tape.
The tape can also be cut at silver solder joints (position B), but this
■
cut point should be used for soldered connections only.
A
Cut tape at
center of
copper pads
Use a SureLock Connector to make turns and go around corners. They
■
can also be spliced and extended for gaps of any size. 18–20 AWG
wire is recommended for custom lengths (not included).
( +
( + )
( + )
( –
( – )
( – )
NOTE: Be sure all 12-volt connections are secure and protected from
electrical shorting. Options include electrical tape, small wire nuts, crimp
connectors, etc.
451200
RF dimmer
remote
Wire support clips
Positive
Negative
B
Okay to cut at solder
joints, but do not
use connector
length to
( + )
( + )
+ )
fi t needs
( – )
( – )
– )
Item
1
Advertisement
Table of Contents

Subscribe to Our Youtube Channel
Related Manuals for Armacost Lighting RibbonFlex PRO


Summary of Contents for Armacost Lighting RibbonFlex PRO
- Page 1 5m The manufacturer warrants this fi xture to be free from defects in materials Use only Armacost RibbonFlex Pro item #142210 (sold separately) ■ and workmanship for a period of three (3) years from date of purchase.
- Page 2 How to use included connectors Adjust the lighting to various angles and positions to get the desired ■ level of illumination and lighting appearance. If the LEDs create undesirable light spots on walls, or refl ections, reposition the tape light The SureLock Connectors are used to join two sections of LED tape.
- Page 3 Creating above cabinet uplighting Removing the low-voltage output cable from the power supply will ■ allow cable runs through cabinets and around any obstacles as needed for a more custom installation. When reinstalling the cables Most cabinet tops have uneven surfaces. To create indirect uplighting ■...
- Page 4 Remove used batteries promptly. ■ WARNING: The remote contains a CR2025 ■ DC 3V button battery. If swallowed, it could cause severe injury or death within 2 hours. Baltimore, Maryland Seek medical attention immediately. armacostlighting.com © 2019 Armacost Lighting. All rights reserved. 191101...
Need help?
Do you have a question about the RibbonFlex PRO and is the answer not in the manual?
Questions and answers