
Subscribe to Our Youtube Channel
Related Manuals for McElroy DynaMc HP Series


Summary of Contents for McElroy DynaMc HP Series
- Page 1 Operator’s Manual 28, 250 and 412 Hand Pump Fusion Machines Manual: 1270901 Revision: E 10/18 Original Language: English...
- Page 2 Cancer and Reproductive Harm - www.P65warnings.ca.gov This product and other products could be protected by patents or have patents pending. All the latest patent information is available at patent.mcelroy.com...
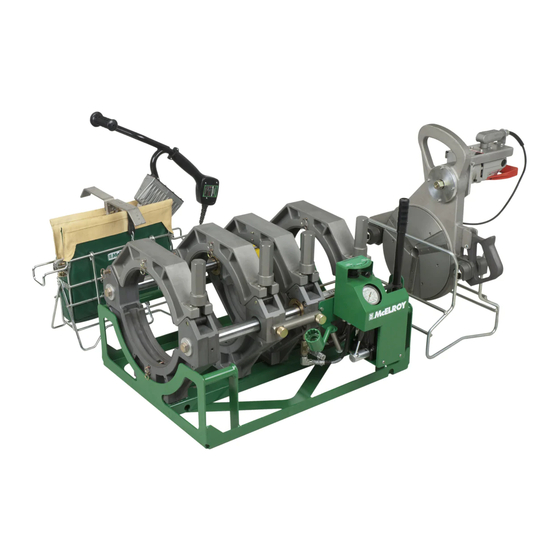
- Page 3 The DynaMc 412HP model fuses 4" IPS through 12" DIPS (110mm - 340mm) McElroy University For more than 30 years, McElroy has been the only pipe fusion machine manufacturer to continuously offer advanced training. Course offerings are meant to enhance your efficiency, productivity and safety in the proper use of McElroy machines.
- Page 4 McElroy or has become damaged McElroy reserves the right to make any changes in or due to misuse, negligence or casualty, or has not been improvements on its products without incurring any operated or maintained according to McElroy’s printed...
-
Page 5: Table Of Contents
Insulated Heater Stand ........2-6 COPYRIGHT © 2018, 2017, 2014, 2010 McELROY MANUFACTURING, INC. Tulsa, Oklahoma, USA All rights reserved All product names or trademarks are property of their respective owners. - Page 6 Table of Contents Butt Fusion Procedure Read Before Operating ........3-1 Check Oil Level .
- Page 7 Table of Contents Maintenance Preventative Maintenance ....... . . 6-1 Washing the Machine .
-
Page 8: Fusion Equipment Safety
Follow all applicable federal, state, local, and industry specific regulations. McElroy Manufacturing, Inc. cannot anticipate every possible circumstance that might involve a potential hazard. The warnings in this manual and on the machine are therefore not all inclusive. -
Page 9: General Safety
Fusion Equipment Safety General Safety Safety is important. Report anything unusual that you notice during set up or operation. LISTEN for thumps, bumps, rattles, squeals, air leaks, or unusual sounds. SMELL odors like burning insulation, hot metal, burning rubber, hot oil, or natural gas. -
Page 10: Electric Motors Are Not Explosion Proof
Fusion Equipment Safety Electric Motors are Not Explosion Proof Electric motors are not explosion proof. Operation of these components in an explosive atmosphere without necessary safety precautions ¡PELIGRO! will result in serious injury or death. See Section "Facer" in the Overview section for instructions on removing brushes from facer motor. -
Page 11: Units With Hydraulics
Fusion Equipment Safety Units With Hydraulics Although the hydraulic pressures in this machine are low compared to some hydraulically operated equipment, it is important to remember that a sudden hydraulic oil leak can cause serious injury, or even be fatal if the pressure is high enough. -
Page 12: Facer Blades Are Sharp
Fusion Equipment Safety Facer Blades Are Sharp Facer blades are sharp and can cut. Never attempt to remove shavings while the facer is running, or is in the facing position between the jaws. Use care when operating the facer, and when handling the unit. -
Page 13: Overview
Overview Theory of Heat Fusion The principle of heat fusion is to heat two pipe surfaces to a designated temperature, and then fuse them together by application of force. This develops pressure which causes flow of the melted materials, which causes mixing and thus fusion. When the thermoplastic material is heated, the molecular structure is transformed into an amorphous condition. -
Page 14: Introduction To The Dynamc 28, 250 And 412 Hand Pump Fusion Machine
Introduction to the DynaMc 28, 250 and 412 Hand Pump Fusion Machine The McElroy DynaMc HP fusion machines are manual hydraulic operated fusion machines designed to butt fuse polyethylene pipe. If fusing other thermoplastic pipe materials, refer to the pipe manufacturer's suggested procedures or appropriate joining standard. -
Page 15: Pump
Overview Hydraulic Fluid Reservoir The hydraulic pump has a reservoir that stores the hydraulic fluid. The hydraulic fluid is filled through a plug on the top of the reservoir. Refer to the "Check Hydraulic Fluid Level" section for instructions on checking and filling the hydraulic fluid. Refer to the "Hydraulic Fluids"... -
Page 16: Facer
Overview Facer Electric motors are not explosion proof. Operation of these components in a hazardous environment without necessary safety precautions will result in serious injury ¡PELIGRO! and death. Ensure facer power switch is in the off position. Connect facer to proper power source. Don't turn on facer until ready to face. -
Page 17: Heater
If the green indicator is not flashing then the controller may not be operating properly. If this occurs, disconnect power and have the heater repaired by a McElroy Authorized Service Center. The heater temperature is controlled by a microprocessor. It has a red indicator light on the handle at the bottom of the temperature scale. -
Page 18: Insulated Heater Stand
Overview Insulated Heater Stand The heater should always be stored in the insulated heater stand or blanket for protection of the operator and to minimize heat loss and risk of mechanical damage. TX00363-9-15-94 2 - 6... -
Page 19: Butt Fusion Procedure
Butt Fusion Procedure Read Before Operating Before operating this machine, please read this manual thoroughly, and keep a copy with the machine for future reference. The fusion procedures in this manual are for use with polyethylene pipe. If fusing other thermoplastic pipe materials, refer to the pipe manufacturer's suggested procedures or appropriate joining standard. -
Page 20: Set Up Pipe Supports
Butt Fusion Procedure Set up Pipe Supports Set up pipe stands or pipe rollers and adjust height so the pipe is in line with the jaws. TX02955-4-15-09 Install Clamping Inserts Select and install appropriate clamping inserts for the pipe that is being fused. -
Page 21: Jaw Configuration
Butt Fusion Procedure Determine Fusion Pressure The theoretical fusion pressure can be determined using the fusion pressure calculator that is supplied with the machine or by using the McCalc ® app is available for iOS, Android, Windows Phone and PC devices. Always add drag pressure to the theoretical fusion pressure. -
Page 22: Loading Pipe Into Machine
Butt Fusion Procedure Loading Pipe Into Machine Clean the inside and outside of pipe ends that are to be fused. Open the upper jaws and insert pipe in each pair of jaws with applicable inserts installed. Let the ends of the pipe protrude past the face of the jaws .75"... -
Page 23: Remove Facer
Butt Fusion Procedure Remove Facer Move the carriage control valve to the open carriage position and open the carriage. Release the trigger lock, and move the facer out. Remove chips from pipe ends. Do not touch faced pipe ends. Inspect both pipe ends for complete face off. If the face off is incomplete, return to Loading Pipe into Machine. -
Page 24: Position Carriage For Heater Insertion
Butt Fusion Procedure Position Carriage for Heater Insertion Move carriage to the right to open a gap large enough to insert the heater. TX00374-9-15-94 Check Heater Temperature NOTICE: Incorrect heating temperature can result in questionable fusion joints. Check heater plates periodically with a pyrometer and make necessary adjustments. -
Page 25: Inserting Heater
Butt Fusion Procedure Inserting Heater Heater is not explosion proof. Operation of heater in an explosive atmosphere without necessary safety precautions will result in serious injury or death. ¡PELIGRO! If operating in an explosive atmosphere, heater should be brought up to temperature in a safe environment, then unplugged before entering the explosive atmosphere for fusion. -
Page 26: Fusing The Pipe
Butt Fusion Procedure Fusing the Pipe NOTICE: Failure to follow pipe manufacturer's fusion procedures may result in a bad joint. After following the pipe manufacturer's suggested heating procedure: Shift carriage control valve to the open position. Move the carriage to the right just enough to engage the stripper bar. -
Page 27: Opening Fixed Jaws
Butt Fusion Procedure Opening Fixed Jaws Open the fixed jaws. TX00381-9-16-94 Position Machine for Next Joint Move the fusion machine into position for the next fusion joint. TX02985-5-4-09 Install Next Piece of Pipe Move the carriage control valve to the open position and actuate the pump lever to open the carriage completely. -
Page 28: Special Operations - In Ditch
Special Operations - In Ditch Remove Carriage from Base The carriage can be removed from the base for close quarters in ditch fusion. To remove the carriage: Remove one of the nuts from the threaded rod at the base of the carriage. -
Page 29: Clamp Carriage Assembly To Pipe
Special Operations - In Ditch Clamp Carriage Assembly to Pipe Position carriage assembly on side of the pipe. Lift pipe and slide carriage assembly under pipe. Rotate carriage assembly around to a normal upright position. Attach the top jaws and loosely clamp around pipe. TX00879-2-19-96 Make Fusion Joint Refer to the "Butt Fusion Procedure"... -
Page 30: Remove Carriage Assembly From Ditch
Special Operations - In Ditch Remove Carriage Assembly from Ditch Loosen clamp knobs and remove top jaws. Rotate carriage assembly from under the pipe. IMPORTANT: Always rotate unit with valve system facing up to protect against damage. Attach upper jaws to carriage. Tighten clamp knobs. Attach sling to carriage. -
Page 31: Special Operations - Lifting Fusion Machine
Special Operations - Lifting Fusion Machine Lifting Safety Follow all applicable federal, state, local, and industry specific regulations when lifting. Safety warnings: Do not exceed rated load or lift loads greater than the rated load rating of the lifting device. Do not operate a damaged or malfunctioning lifting device. -
Page 32: Powered Lifting
Special Operations - Lifting Fusion Machine Powered Lifting Powered lifting requires a hoist or lifting equipment of proper lifting capacity to lift the machine. Tighten the jaw clamp knobs. Attach a properly rated lifting sling through the center of all four jaws. -
Page 33: Maintenance
Maintenance Preventative Maintenance To insure optimum performance, the machine must be kept clean and well maintained. With reasonable care, this machine will give years of service. Therefore, it is important that a regular schedule of preventive maintenance be kept. Store machine inside, out of the weather, whenever possible. TX00428-8-10-95 Washing the Machine The machine should be cleaned, as needed with a soap and... -
Page 34: Check Gauge
Maintenance Check Gauge Gauge should be checked daily. The gauge should read zero when the unit is not under pressure. Damaged gauges should be replaced. TX02974-4-15-09 Clean Jaws and Inserts To prevent slippage and insure proper alignment, the jaws and inserts must be clean. -
Page 35: Fasteners Must Be Tight
Maintenance Fasteners Must Be Tight Check all nuts, bolts, and snap rings to make certain they are secure and in place. TX00437-9-13-94 Facer The facer should be lubricated annually. TX00438-9-15-94 Facer Blades Blades bolt directly to the blade holder and should be inspected for damage and sharpness. -
Page 36: Clean Heater Surfaces
Maintenance Clean Heater Surfaces The heater faces must be kept clean and free of any plastic build up or contamination. Before each fusion joint the heater surfaces must be wiped with a clean, non-synthetic cloth. NOTICE: Do not use an abrasive pad or steel wool. Use a non-synthetic cloth that won't damage surfaces. -
Page 37: Heater Indicator Light
If the green indicator is not flashing then the controller may not be operating properly. If this occurs, disconnect power and have the heater repaired by an McElroy Authorized Service Center. The heater has a red indicator light on the handle at the bottom of the temperature scale. -
Page 38: Fusion Machine Checklist
Maintenance Checklist Fusion Machine Checklist Item to Check Satisfactory Needs Repair Comments Repair UNIT Machine is clean All pins and snaprings are in place All nuts and bolts are tight All placards and handles are in place All clamp knobs turn freely Cords and plugs are in good condition All hardware is on the basic machine Hydraulic pump is filled to correct level... -
Page 39: Determining Fusion Pressure
Determining Fusion Pressure Variable Definitions O.D. = Outside Diameter of Pipe (inch) = Wall Thickness of Pipe (inch) = 3.14 = Standard Dimensional Ratio of Pipe (unitless) = Interfacial Pressure of Pipe (PSI) TEPA = Total Effective Piston Area of Carriage Cylinders (inch²) Formulas O.D. - Page 40 Hydraulic Fluids Hydraulic Fluids The use of proper hydraulic fluid is mandatory to achieve maximum performance and machine life. Use a clean, high quality, anti-wear hydraulic fluid with a viscosity index (VI) of 135 minimum. It should have a maximum viscosity of 500 cSt (2000 SSU) at startup (ambient temperature) and a minimum viscosity of 13 cSt (65 SSU) at the maximum fluid temperature (generally 80°F above ambient).
- Page 41 142 lbs. (64 kg) Facer: 39 lbs. (17.7 kg) Heater: 21 lbs. (9.5 kg) 27 lbs. (12.2 kg) Specifications: Maximum Pressure: 1400 psi max. Fluid Capacity: 1 quart Designed for connecting the McElroy Datalogger® unit . 10 - 1...
- Page 42 277 lbs. (125 kg) Facer: 54 lbs. (24.5 kg) Heater: 24 lbs. (10.9 kg) 34.7" 31.7" 882mm 805mm Specifications: Maximum Pressure: 1400 psi max. Fluid Capacity: 1 quart Designed for connecting the McElroy Datalogger® unit . TX02977-4-15-09 10 - 2...
- Page 43 About this manual . . . McElroy Manufacturing continually strives to give customers the best quality products available. This manual is printed with materials made for durable applications and harsh environments. This manual is waterproof, tear resistant, grease resistant, abrasion resistant and the bonding quality of the printing ensures a readable, durable product.
Need help?
Do you have a question about the DynaMc HP Series and is the answer not in the manual?
Questions and answers