Table of Contents
Advertisement
Advertisement
Table of Contents

Related Manuals for Hach Pocket Pro+ Multi 2


Summary of Contents for Hach Pocket Pro+ Multi 2
- Page 1 User Manual DOC022.52.80399 ™ Pocket Pro + Multi 2...
-
Page 2: Specifications
Specifications Specifications are subject to change without notice. Specification Details Dimensions (W x D x H) 37 x 30 x 170 mm (1.45 x 1.18 x 6.69 in.) Enclosure rating IP67 Weight 135 g (0.297 lb) with batteries Power requirements (internal) AAA alkaline batteries (4x) Battery life 450 hours (200 hours with backlight on) -
Page 3: General Information
General information In no event will the manufacturer be liable for direct, indirect, special, incidental or consequential damages resulting from any defect or omission in this manual. The manufacturer reserves the right to make changes in this manual and the products it describes at any time, without notice or obligation. -
Page 4: Product Overview
Certification Canadian Radio Interference-Causing Equipment Regulation, IECS-003, Class B: Supporting test records reside with the manufacturer. This Class B digital apparatus meets all requirements of the Canadian Interference- Causing Equipment Regulations. Cet appareil numérique de classe B répond à toutes les exigences de la réglementation canadienne sur les équipements provoquant des interférences. -
Page 5: Product Components
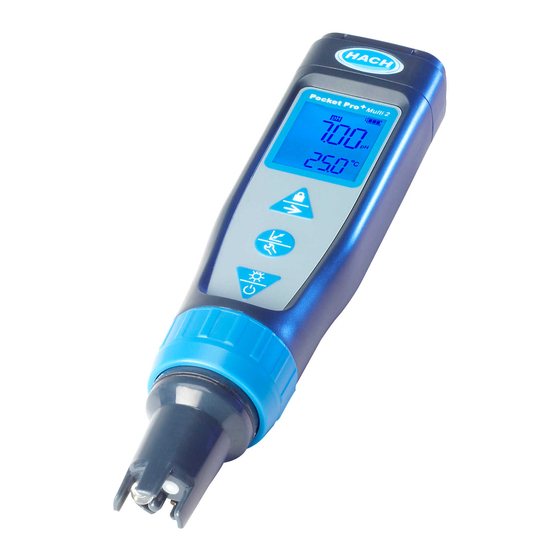
Figure 1 Product features 1 Sensor cap 3 Keypad 5 Lanyard attachment 2 Sensor 4 Display 6 Pocket clip Product components Make sure that all components have been received. Refer to Figure 2. If any items are missing or damaged, contact the manufacturer or a sales representative immediately. Figure 2 Product components ™... -
Page 6: Install The Batteries
Install the batteries C A U T I O N Explosion hazard. Incorrect battery installation can cause the release of explosive gases. Be sure that the batteries are of the same approved chemical type and are inserted in the correct orientation. Do not mix new and used batteries. W A R N I N G Fire hazard. -
Page 7: Keypad Description
Figure 4 Display overview 1 Calibration icon 5 Battery icon 9 Temperature 2 Lock icon 6 Parameter value 10 Custom standard (C1, C2) 3 Sensor? icon 7 Calibration standard(s) measured for last calibration (low, medium, high) 4 Parameter 8 Calibration standard(s) expected Table 1 Display icons Icon Description... - Page 8 Figure 5 Keypad overview 1 Power/Backlight key 2 Calibration/Settings key 3 Lock/Parameter key Table 2 Key functions Description Push and hold to set the power to on or off. Push to set the backlight to on or off. After 1 minute of no activity, the backlight switches off. Push to start a calibration of the parameter shown at the top of the display.
- Page 9 Table 3 Number of calibration points Parameter Calibration procedure Calibration points Calibration standards Conductivity Auto 1–3 147 µS/cm, 1413 µS/cm, 12.88 mS/cm Custom Any value Auto 1–3 USA: 4.01, 7.00, 10.01 NIST: 4.01, 6.86, 9.18 Custom 1–2 Any value Auto calibration – pH Items to collect: One, two or three auto-recognition calibration standards 1.
- Page 10 Custom calibration – pH Items to collect: One or two calibration standards or samples of known pH value 1. Set the power to on. 2. Remove the cap from the sensor. 3. Push and hold until "pH" shows. 4. Go to the settings menu. Make sure the bUFr setting is set to Cus (custom standard). Refer to Configure the settings on page 11.
-
Page 11: Advanced Operation
5. Rinse the sensor and cap with deionized water and blot dry. 6. Pour the water sample into the cap to the fill line. 7. Put the sensor fully into the cap. The measured value shows on the top line. 8. -
Page 12: Maintenance
Maintenance C A U T I O N Multiple hazards. Only qualified personnel must conduct the tasks described in this section of the document. Clean the sensor Clean the sensor when: • "SENSOR?" shows on the display • Stabilization is slow •... -
Page 13: Replacement Parts And Accessories
Replacement parts and accessories W A R N I N G Personal injury hazard. Use of non-approved parts may cause personal injury, damage to the instrument or equipment malfunction. The replacement parts in this section are approved by the manufacturer. Note: Product and Article numbers may vary for some selling regions. - Page 14 Tel. +49 (0) 2 11 52 88-320 SWITZERLAND Fax (970) 669-2932 Fax +49 (0) 2 11 52 88-210 Tel. +41 22 594 6400 orders@hach.com info@hach-lange.de Fax +41 22 594 6499 www.hach.com www.hach-lange.de © Hach Company/Hach Lange GmbH, 2014. All rights reserved. 12/2014, Edition 2...
Need help?
Do you have a question about the Pocket Pro+ Multi 2 and is the answer not in the manual?
Questions and answers