Integrated Visual Data Technology Inc. ED3 SkidWeigh Plus Series Installation & Calibration Manual
Lift truck on-board check weighing system with mobile zebra label printer qln420
Hide thumbs
Also See for ED3 SkidWeigh Plus Series:
- Installation & calibration manual (20 pages) ,
- Installation & calibration manual (15 pages)
Table of Contents
Advertisement
Quick Links
!
Installation & Calibration Manual
Integrated Visual Data Technology Inc. 3439 Whilabout Terrace, Oakville, Ontario, Canada L6L 0A7
ED3 SkidWeigh Plus Series
Lift Truck On-board Check Weighing System with
Mobile Zebra Label Printer QLn420
Mobile Label Printer
(Bluetooth interface with ED3 SkidWeigh Plus)
Forklift cradle
Optional Mounting
Arm
ED4-
Zebra V1.25
www.skidweigh.com
Advertisement
Table of Contents

Related Manuals for Integrated Visual Data Technology Inc. ED3 SkidWeigh Plus Series


Summary of Contents for Integrated Visual Data Technology Inc. ED3 SkidWeigh Plus Series
- Page 1 Installation & Calibration Manual ED3 SkidWeigh Plus Series Lift Truck On-board Check Weighing System with Mobile Zebra Label Printer QLn420 Mobile Label Printer (Bluetooth interface with ED3 SkidWeigh Plus) Forklift cradle Optional Mounting ED4- Zebra V1.25 Integrated Visual Data Technology Inc. 3439 Whilabout Terrace, Oakville, Ontario, Canada L6L 0A7...
-
Page 2: Electromagnetic Compatibility
General Installation Guide This ED4-Zebra SkidWeigh Plus V1.25 Series installation & calibration guide describes how to install, calibrate, test and use your on-board check weighing unit. Following the instructions in the ADMINISTRATION MENU guide will enable you to get the system time set up and weighing calibration function operating quickly. In the event that you require additional assistance, please contact customer support via e-mail at support@skidweigh.com , visit... -
Page 3: Overview Of Components
Overview of components The standard ED4-Zebra SkidWeigh Plus check weighing system consist of two main components: * Digital indicator, wiring harness, mounting bracket Option: (Zebra mobile printer QLn420 with mounting accessories) * Hydraulic pressure transducer with 3 wires cable * Installation & calibration manual and operator usage instruction Operational principal The ED4-Zebra SkidWeigh Plus series operational principal is based on the hydraulic pressure transducer mounted in the vehicle lifting hydraulic circuit that will automatically activate the “weighing cycle / specific algorithm ”... -
Page 4: Compact Size
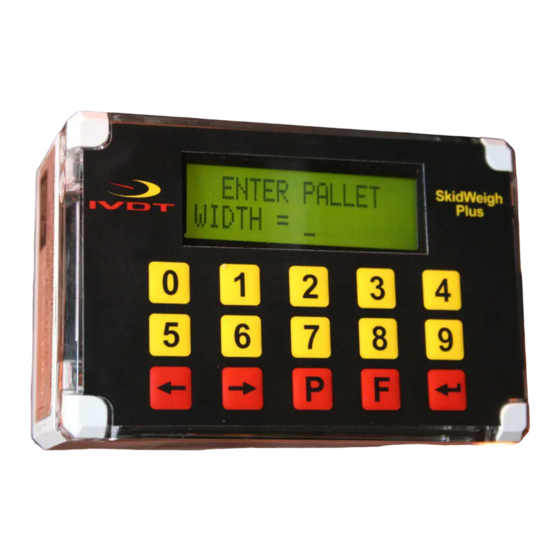
Choose the correct location and make sure that: - Indicator is visible and within reach of the operator - Location so that operator has a clear unobstructed view of the working environment Compact size All of the SkidWeigh systems are compact, housing dimension of only 120 x 80 x 55 mm is ideal for the installations to material handling vehicles of all kinds. - Page 5 Keypad Bluetooth Icon SCROLL KEYS Indicates connection status with Zebra Printer Print and save to USB port “Enter key” ↵ F 9 Administrative All SkidWeigh systems are internally short circuit protected with resettable fuse. There is no need to install external inline fuse in orange wire that is connected to the ignition switch.
- Page 6 Administration Menu Instructions With LCD display showing time /date to enter into the Administration Menu press F and number 9. If the LCD display is showing “ENTER ID NUMBER”. Input default ID# of 111 or any other valid ID number. The LCD display will show date/time.
- Page 7 LCD Display Aug 28, 2010 12:20:23 “Enter key” ↵ Press to confirm the setting. The cursor will automatically move to the next item to be changed ( Month, Day, Year, Hours, Minutes, Seconds). On the last correction, seconds item press “Enter key” ↵ to confirm new date / time set up.
- Page 8 USB port USB Port Protective Cover Saving data to USB memory stick (Optional) - Insert memory stick into USB port With LCD display showing date /time press F and than number 9 and input password ___________. Follow instructions shown on the LCD display LCD Display <>...
- Page 9 Weighing scale function calibration The ED4-Zebra SkidWeigh Plus calibration is automatic and is done by lifting empty and loaded forks (or any other attachment such as paper clamp) just above the ground. MAKE SURE THAT YOU HAVE A KNOWN LOAD WEIGHT AND KEEP IT NEARBY TO COMPLETE THE CALIBRATION.
- Page 10 After few seconds the LCD display will show LCD Display CALIBRATION 1 LOWER FORKS At this point you must lower the empty forks to the ground. The LCD display prompt you to input known calibration load weight. LCD Display CALIBRATION 1 WEIGHT = ❏...
- Page 11 LCD Display CALIBRATION 1 LOWER FORKS LCD Display CALIBRATION 1 CONFIGURATED As soon the loaded forks are lowered to the ground LCD will show data / time. System is ready to be used! LCD Display AUG 28, 2010 12:25:23 Calibration of the ED4-Zebra system weighing function is finished. Integrated Visual Data Technology Inc.
- Page 12 Onboard Mobile Label Printer (Bluetooth) Note: For user guide consult QLn420 software & documen- tation CD supplied with every Zebra Printer kit. - User Guide, Mobile Printer P1028026-004 Rev.A - User Guide,Vehicle Cradle P1052234-001 Rev.A General The QLn420-VC forklift cradle allows use of the Zebra QLn420 printer in a vehicle. The vehicle cradle receives power from a DC power adapter (Zebra Part No.
- Page 13 Vehicle Power Supply 12 to 60 VDC Cradle power plug Two wires, BLACK and Type to enter text Optional mounting bracket for Printer User Guide P1028026-004 REVa. cradle Barcode Label Bluetooth Icon LCD Control Panel Integrated Visual Data Technology Inc. 3439 Whilabout Terrace, Oakville, Ontario, Canada L6L 0A7 www.skidweigh.com...
Need help?
Do you have a question about the ED3 SkidWeigh Plus Series and is the answer not in the manual?
Questions and answers