
Related Manuals for Lorex Vantage LW2281


Summary of Contents for Lorex Vantage LW2281
- Page 1 WIRELESS DIGITAL SECURITY CAMERA INSTRUCTION MANUAL ENGLISH VERSION 1.0 LW2281 www.lorextechnology.com...
- Page 2 Thank you for purchasing this product. This manual refers to the following models: • LW2281 To learn more about this product and to learn about our complete range of accessory products, please visit our website at: www.lorextechnology.com CAUTION RISK OF ELECTRIC SHOCK DO NOT OPEN CAUTION: TO REDUCE THE RICK OF ELECTRIC SHOCK DO NOT REMOVE COVER.
- Page 3 Customer Care (for warranty and accessory sales) customerservice@lorexcorp.com Customer Feedback info@lorexcorp.com By Phone: North America: Customer Service: 1-888-425-6739 (1-888-42-LOREX) Tech Support: 1-877-755-6739 (1-877-75-LOREX) Mexico: 1-800-514-6739 International: +800-425-6739-0 (Example: From the UK, dial 00 instead of +) M a y 5 201 1 - R11...
- Page 4 NO DEVUELVA ESTE PRODUCTO A LA TIENDA NE RETOURNEZ PAS CE PRODUIT AU MAGASIN Cerciórese de por favor colocar su producto en www. Veuillez veiller à enregistrer votre produit à www.lorex- lorexcctv.com/registration para recibir actualizacio- cctv.com/registration pour recevoir des mises à jour et nes y la información del producto...
- Page 5 B E F O R E Y O U S TA R T THIS PRODUCT MAY REQUIRE PROFESSIONAL INSTALLATION LOREX IS COMMITTED TO FULFILLING YOUR SECURITY NEEDS • We have developed user friendly products and documentation. Please read the Quick Start Guide and User Manual before you install this product.
- Page 6 ESTE PRODUCTO PUEDE EXIGIR UNA CE PRODUIT POURRAIT EXIGER UNE INSTALACIÓN PROFESIONAL INSTALLATION PROFESSIONNELLE LOREX S’ENGAGE À SATISFAIRE LOREX SE COMPROMETE A SATISFACER VOS BESOINS SÉCURITAIRES SUS NECESIDADES EN SEGURIDAD • Favor de leer la guía de instalación rápida y la •...
- Page 7 Important Safeguards In addition to the careful attention devoted to quality standards in the manufacture process of your product, safety is a major factor in the design of every instrument. However, safety is your responsibility too. This sheet lists important information that will help to ensure your enjoyment and proper use of the product and accessory equipment.
- Page 8 Installation (Continued) Service Ventilation Servicing - Slots and openings in the case are - Do not attempt to service this video provided for ventilation to ensure reliable operation equipment yourself, as opening or removing covers of the product and to protect it from overheating. may expose you to dangerous voltage or other These openings must not be blocked or covered.
- Page 9 WARNING STRANGULATION HAZARD: Infants have STRANGLED in power cords. Keep power cords more than 3 feet away from cribs, bassinets, play yards and other safe sleep environments for infants. NOTICES Industry Canada Notice: FCC Notice: This equipment has been certified and found to This device complies with...
- Page 10 Features • Real time (25 frames per second) wireless video. • Adaptive FHSS digital wireless technology minimizes conflicts with competing wireless signals. • Simple installation. No video cable required • Connect multiple receivers to your surveillance recorder (DVR) to create a wireless surveillance solution •...
-
Page 11: Table Of Contents
Table of Contents 1. Getting Started ....... . . 1 2. -
Page 13: Getting Started
Getting Started 1. Getting Started The system comes with the following components: 1 X WIRELESS CAMERA 1 X CAMERA MOUNTING STAND* 1 X WIRELESS RECEIVER* (WITH SUNSHADE)* 1 X MOUNTING KIT* 2 X POWER ADAPTERS* 1 X RCA/BNC ADAPTER* (Mounting kit contents may (FOR CAMERA &... -
Page 14: Wireless Receiver
Wireless Receiver 2. Wireless Receiver 2.1 Front Removable Wireless Antenna (SMA): Connects to antenna jack at the back of receiver. Front LED: Glows green to indicate receiver is powered on. Pairing Button: For details, see “Pairing Cameras” on page 7. 2.2 Rear Termination Cable: Contains AC Power, RCA video (yellow), and RCA audio (white) connectors. -
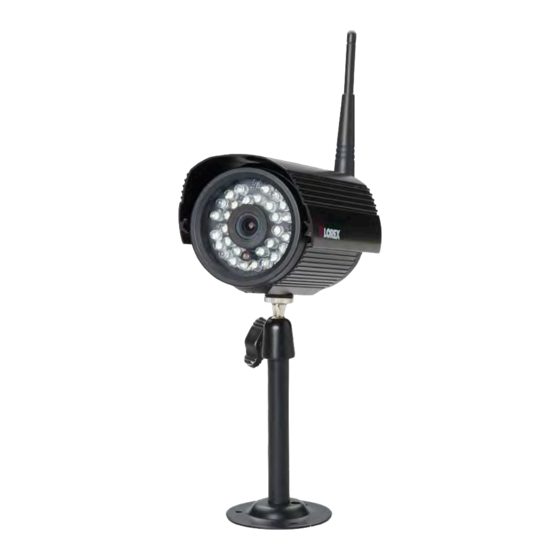
Page 15: Wireless Camera
Wireless Camera 3. Wireless Camera Removable Wireless Antenna (SMA): Connects to antenna jack at the back of camera. Camera Stand Pairing Button: For details, see “Pairing Cameras” on page 7. Antenna Jack: Connect the wireless antenna here. AC Power Cable Attention - This camera includes an Auto Mechanical IR Cut Filter. -
Page 16: Installing The Camera
Installing The Camera 4. Installing The Camera • Before you install the camera, carefully plan where and how it will be positioned and where you will route the cable that connects the camera to the power adapter. • Before starting permanent installation, verify the camera’s performance by observing the image on a monitor when camera is positioned in the same location / position where it will be permanently installed. - Page 17 Installing The Camera Screw the camera onto the head of the stand (1). Adjust the angle of the camera until the desired view is set. Tighten the thumbscrew to secure the camera position (2). Connect the power cable from the camera to the power adapter. Plug the power adapter into a power outlet or surge protector.
-
Page 18: Installing The Wireless Receiver
Installing the Wireless Receiver 5. Installing the Wireless Receiver Before powering on the receiver, make sure to first connect and power on the camera. This will ensure a proper connection. Screw the wireless antenna to the back of the receiver. Connect the yellow video cable and white audio cable (mono) to your TV, DVR, or observation system. -
Page 19: Pairing Cameras
Pairing Cameras 6. Pairing Cameras IMPORTANT The camera and receiver have already been pre-paired at the factory, which means that they are exclusively communicating with each other. If for some reason the pairing is lost, follow these steps to pair up the camera and receiver. To pair the camera to the receiver: Make sure that the camera and receiver are both powered up. -
Page 20: Appendix A: System Specifications
Appendix A: System Specifications 7. Appendix A: System Specifications 7.1 Receiver Specifications Receiving Frequency Range 2.400GHz~2.480GHz RX Sensitivity -81dBm Demodulation GFSK Data Rate 160 Kb/s Supported Resolution VGA (640 x 480) up to 25 Frames per Second Termination RCA Video, RCA Audio Power Requirement 12V DC +/- 10% Power Consumption... -
Page 21: Appendix B: About Digital Wireless Technology
8. Appendix B: About Digital Wireless Technology The Digital Wireless signal transmission type used by Lorex digital wireless cameras is also known as FHSS—Frequency Hopping Spread Spectrum. The 2.4GHz (2.400-2.480GHz) band is divided into sections or paths of 2MHz per section, and each second, the transmission signal hops hundreds of times in a specified sequence within this frequency range. -
Page 22: Appendix C: Facts About Digital Wireless Cameras
Appendix C: Facts About Digital Wireless Cameras 9. Appendix C: Facts About Digital Wireless Cameras 9.1 Wired vs. Wireless Cameras A wired camera has a video cable that transmits the video signal from the camera to a recording or viewing device. A wireless camera does not use a video cable. -
Page 23: Are Digital Wireless Camera Signals Secure
9.5 How many frames per second should I expect from a digital wireless camera? Current Lorex digital wireless cameras offer 10 - 30 FPS (Frames Per Second) performance. Actual frame rate depends mainly on signal strength and resolution (see the chart above). -
Page 24: Appendix D: Troubleshooting
Appendix D: Troubleshooting 10. Appendix D: Troubleshooting If you have problems with your system, there is often a quick and simple solution. Please try the following: Problem Solution There is no picture from the • Make sure that the camera is plugged into a power outlet camera and that the power adapter is plugged in properly. -
Page 25: Appendix E: Frequently Asked Questions
Appendix E: Frequently Asked Questions 11. Appendix E: Frequently Asked Questions Q: What is the maximum distance I can have between the camera and the receiver? A: Typically 500 feet (152m) with a clear line of sight in open space, or approximately 165 feet (50m) in a house. -
Page 26: Appendix F: Extending Wireless Signal Range
Appendix F: Extending Wireless Signal Range 12. Appendix F: Extending Wireless Signal Range DISCLAIMER: Certain accessories are not available in all markets. There are several ways to boost your wireless signal as well as options to help you extend the range of the wireless signal. Clear Line-of-Sight The digital wireless signal is virtually interference free. - Page 27 Appendix F: Extending Wireless Signal Range 2.4 GHZ Directional Wireless Panel Antenna Use the 2.4GHz Directional Wireless Panel Antenna (model #: ACCANTD9) to focus a wireless signal onto one specific camera in order to increase the range of transmission (clear line-of-sight between the camera and the antenna is required).
- Page 28 LW2281 Ve rs i o n 1 .0 www.lorextechnology.com Copyright © 2012 Lorex Technology Inc.
Need help?
Do you have a question about the Vantage LW2281 and is the answer not in the manual?
Questions and answers