
Related Manuals for Equator Super Washer


Summary of Contents for Equator Super Washer
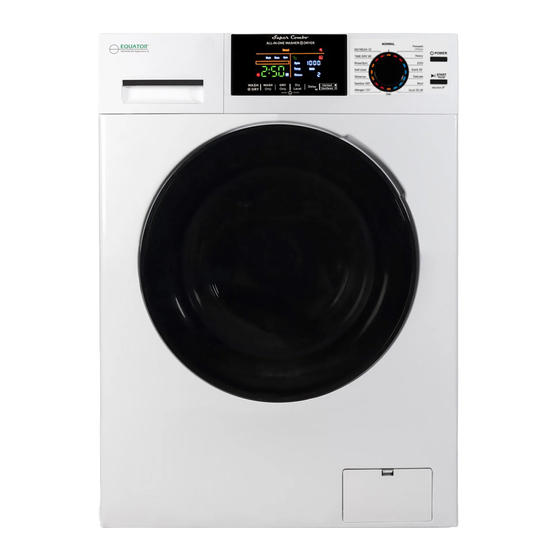
- Page 1 Super Washer Model: 835 QUESTIONS / SERVICE Phone/Text: 1-800-776-3538 Email: Service@ApplianceDesk.com...
- Page 2 Please read the Owner’s Manual carefully before using your Fully Automatic Washer ..............Introduction ..............Warranty ..............Exclusions .............. Technical Data ..........Important Safety Instructions ..............Helpful Hints .............. Pre-installation ............Diagram of the Washer ............Installation Instructions ............. Unpacking and Leveling ..............
- Page 3 Efficient Operation shorter which only needs to be cleaned every few months.
- Page 4 WARRANTY INFORMATION Your appliance is protected by this warranty under normal, personal, family or household use for 1 Year Parts & Labor and limited commercial use (90 days) in USA and Canada. WARRANTY Consolidated Brands undertakes to the consumer/owner to repair or, at our option, to replace any part of this product which proves to be defective in workmanship or material under normal personal, family or household use in USA and Canada, for a period of one years parts &...
- Page 5 EXCLUSIONS In no event shall Consolidated Brands be liable for incidental or consequential damages or for damages resulting from external causes such as abuse, operation misuse, neglect, alterations, normal wear and tear, incorrect voltage or acts of God. This warranty does not cover service calls which involve defective workmanship, damage due to other products while combined use with this product or materials covered by this warranty.
- Page 6 23.6 / 60 33.5 / 85 24 / 61 41.3 / 105 (lb / kg) Inlet and Drain Hose length 6 Feet Power cable length 6 Feet Electrical Testing Laboratories Note: All rights reserved. Designs, Specifications and Manual subject to change without notice...
- Page 7 the washer, turn on all hot water faucets and let the water flow from each for several minutes. This will release any accumulated Hydrogen.
- Page 8 CAUTION: TO REDUCE THE RISK OF ELECTRIC SHOCK, DO NOT REMOVE COVER (OR BACK). NO USER SERVICEABLE PARTS INSIDE. REFER SERVICING TO QUALIFIED SERVICE PROFESSIONALS. AND REDUCE WRINKLES.
- Page 10 Installation area Handling Please handle the machine carefully and use appropriate means while lifting and moving the machine so that it does not get damaged. Do not drag the machine on your floor. Do not hold on Appliance stability is very important otherwise to protruding parts when lifting.
- Page 13 white...
- Page 14 Minimum clearances to combustible surfaces: 2" (5 cm) clearance both sides and 3" (7.5 cm) rear. The Super Washer may be installed in a built-in, recessed area, closet or alcove. The installation spacing is in inches and is the minimum acceptable.
- Page 16 Make sure For small items such as socks, children’s garments and small towels please use a Washing Net Bag. and bleach in Dispenser C (Fig.12). Dispenser A Detergent for main wash Dispenser B Fabric Softener Dispenser C Detergent for pre-wash and bleach The blue cups are only for liquid detergent.
- Page 17 Max Extract Extra Rinse Press this selection button to add once more rinse cycle to the selected wash program. If you want to soak your clothes before the spin cycle, press this button to eliminate the No Spin spin function. This will keep the clothes in the rinse water after the last rinse cycle is finished. After the desired soak time, press this button again and the water will drain out and proceed to the last spin cycle.
- Page 18 NORMAL In a few minutes after the cycle ends, the door lock icon will change from locked to unlocked and then you can open the door easily.
- Page 20 Your Washer has been designed to operate with easy maintenance. Follow these simple maintenance procedures to obtain optimum performance: 1. Ensure that your machine was installed according to the correct installation procedures detailed in this Manual. 2. Do not use solvents either to clean the machine or to wash clothes. 3.
- Page 22 and approx 6 pints...
- Page 25 prevent over - sudsing. 3 feet (100 cm)
- Page 26 DIAGNOSTIC MENU Code Description Component Door close Door Switch Drain Drain Pump Water inlet Inlet Valves Water overfill Pressure Switch Motor Motor +Electronic Module Washing heater failure Washing heater Water level failure Water level sensor Communication between Communication display & electronic module Cable...
- Page 28 Built-In...
- Page 29 Service would be provided from Monday to Friday between normal business hours. Installation 1. Non-removal of shipping rods, causing vibration / internal damage. 2. Non-adjustment of feet to level machine, causing vibration / internal damage. 3. Non-removal of exhaust vent plate at the back while using Venting Dry mode, causing excess heat and resulting in damage to internal components.
- Page 30 Temp Options Cool, Warm, Hot, Air Dry 26.5 x 23.5 x 21.5 52 lbs.
- Page 31 28.5 inches 27.5 inches 27.5 inches...
- Page 36 Determine dryer position on wall and mark required bracket position. This dryer is not suitable to be directly placed on top of a washing machine. Instead use rear stacking kit or dryer stack rack. * A minimum 50mm is needed between the top of the dryer and the ceiling for ease of installation.