
Summary of Contents for GALAXIS SHOWTECHNIK PYROTEC PFE Advanced Mini 5 Outputs
- Page 1 User Manual Galaxis Showtechnik PYROTEC PFE Advanced Mini 5 Outputs Firmware V2.5 Revision date: March 12 2021 Batch No.: EUE700100, USE700100...
-
Page 2: Table Of Contents
Table of contents: 1 Introduction ............................4 Safety instructions ........................4 Requirements the operator has to fulfill and necessary qualification ........5 Safety Instructions ........................6 Application fields ........................9 2 Illustrations ............................10 Description of indicators and control elements ..............11 3 Basic operation of the device ...................... - Page 3 20 Accessories ............................39 21 CE marking of the EU version ......................39 22 Address of the manufacturer and contact details for requesting an EU declaration of conformity .. 39...
-
Page 4: Introduction
1 Introduction 1.1 Safety instructions Observe all safety instructions in this documentation! Safety instructions warn of dangers when handling devices and provide information on how to avoid them. They are classified according to the severity of the danger and divided into the following groups: Danger signals dangers for persons. -
Page 5: Requirements The Operator Has To Fulfill And Necessary Qualification
1.2 Requirements the operator has to fulfill and necessary qualification This product may only be operated by persons of legal age. In Germany the user must be at least 18 years of age. This product may only be used within the scope of a professional and occupational activity. Unintended firing DANGER Fatal injuries due to explosion/deflagration of pyrotechnic effects and... -
Page 6: Safety Instructions
1.3 Safety Instructions Safety instructions for the firing of pyrotechnical effects and aerial shells by using e-matches: The following instructions are for your understanding about important and basic safety principles. Our general safety requirements are based on our own experience plus the contact and feedback from our customers. - Page 7 11. Do not use damaged equipment. If a damage is found, immediately send the device back to the manufacturer for professional repair. Our warranty for the proper function for our equipment is only for components of our system, which have no damage. 12.
- Page 8 lethal consequences for the pyrotechnicians and other persons. Please note that wind conditions can be totally different a few meters above the ground. 23. Please assure that the firing can only be initiated through the pyrotechnician. Keep firing system under lock and key! Within our safety concept, all firing systems are set with individual codes, which inhibit unintended and accidental firing through third parties.
-
Page 9: Application Fields
possible unfired effects first disconnect the corresponding wiring and then switch off the receivers. Especially in the field of special effects, during the installation special care should be taken of how to disassemble unfired effects or installations in a safe way. 33. -
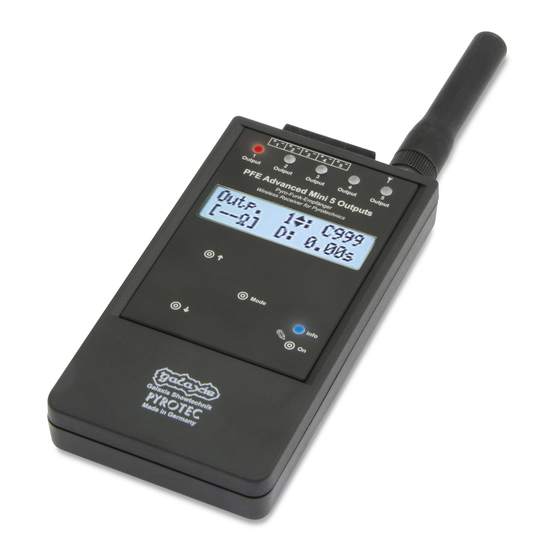
Page 10: Illustrations
2 Illustrations... -
Page 11: Description Of Indicators And Control Elements
2.1 Description of indicators and control elements Magnetic sensitive area By pointing to this area with the magnetic pen the parameter of 'Down' the current menu item will be decreased or changed. If you point on this field for a longer time the parameter will decrease automatically. -
Page 12: Basic Operation Of The Device
3 Basic operation of the device 3.1 Insertion of batteries, power supply, operation time First you have to insert new batteries. Please mind correct polarity. Open the battery compartment, insert the batteries and close the lid again afterwards. You should remove the batteries if you do not use the device for a longer time. Leaking batteries or moisture in the device WARNING Leaking batteries or moisture in the device may trigger firings. -
Page 13: Receiving Mode
If you have forgotten the programmed code you are still able to operate the device by entering the universal code 16777216. You can program a new user code in the submenu after entering this universal code so that you can use your device normally the next time. 3.5 Receiving mode The device will automatically enter the receiving mode after switching on. -
Page 14: The Function Of The Info Led
3.7 The function of the Info LED The following status information is being displayed by the Info LED: Blue color, The device is displaying start messages or the menu has been entered. Continuously Blue color, The device is in receiving mode. Flashing Red color, The device is in receiving mode and the accumulator should be charged... -
Page 15: The Monitoring Function Radio Interference
3.10 The monitoring function Radio Interference The receivers are monitoring their frequency permanently. An interference is present if an external carrier with a signal strength of more than 30% in respect to 100% maximum signal strength of the system is present for more than 45 seconds. 'RI' stands for 'Radio Interference' and is flashing in the display. - Page 16 This list shows which parameters are reset by this function: Hazard Zone A, active Acoustic Signals Flashing LED if Low. Battery Flashing LED if receiving Submenu Unlocked Maximum resistance 10 Ohms LCD Backlight auto & dimmed The memory of the channels and delays, the device ID number, the radio channel, menu language and the user code to switch on the device remain unchanged!
-
Page 17: The Menu
4 The menu The menu is divided in two sections: the main menu and the submenu. The submenu can be locked e.g. to simplify the operation for less skilled staff members. 4.1 The main menu By activation of 'Mode' for approx. one second the main menu is being entered. The first menu item is 'Switch off' and is fully described in the corresponding section in this manual. -
Page 18: The Menu Item 'Last Range Test Result
You can use this menu item for a range test, too. Activate the firing mode at your controller PFS Profi, PFS Pocket or PFC Advanced. The device is now measuring the signal strength of your controller. By changing the location of the receiver, you can try to find out which installation is best. You should definitely switch off the firing mode before you quit the menu and always make sure that there is no unintended activation of the firing button at the controller during the range test. -
Page 19: The Menu Selection 'Output Programming
The menu selection 'Output Programming' The next activation of 'Mode' leads to the menu section 'Output Programming'. You can select one of the following choices by activating 'Up' and 'Down': Output Programming: Keep up & Exit / Edit / Delete / Consecutive Channels 4.1.4.1 The menu item 'Output Programming: Keep up &... - Page 20 The editing of all relevant output parameters (firing channel, step delay) can be done either directly at the device or remotely from the PFC Advanced by using the function 'Remote data programming'. Furthermore, if our choreographic software PYROTEC Composer is being used, you may edit these parameters remotely with a computer and the USB Modem.
-
Page 21: The Continuity And Programming Check: 'Ok-Prg-Test
You may see this being displayed after confirming your selection with 'Mode'. The channel which has just been programmed is shown in the upper right corner of the display. The device will be finished with programming shortly. Of course, you may edit the firing channel assignment manually after the automatic channel programming. -
Page 22: The Submenu
The display phase with the programming information will follow the display phase with the OK-Test automatically. Meanwhile the following text will be displayed: 'CH' stands for Channel, 'D' for Delay of the stepping function. 'CH&D' means that both, Channel and Delay value, have been programmed. -
Page 23: The Menu Item 'Device Id Number
In this menu item you can program the 4 digit code. If 0000 has been programmed there will be no code request after power-up. Activate 'Up' now to change the code. If you have selected 'Yes' you will see this text in the display. The digits can be altered with 'Up' and 'Down'. -
Page 24: The Menu Item 'Rf Channel' (I.e. Frequency Selection)
The menu item 'RF Channel' (i.e. frequency selection) This menu item enables the user to determine which radio channel (RF = Radio Frequency) is being used by the device. The device shows the channel number as well as the frequency. With 'Up' and 'Down' you can adjust the radio channel. -
Page 25: The Menu Item 'Determine Hazard Zone
Alternatively you can apply for a license. In that case you will get a frequency assigned by a frequency coordinator. The disadvantage of a license is that the usage of the assigned frequency is only allowed in a certain region. You are allowed to use this frequency in a specific radius only. Every usage outside of this radius demands an additional license, except you are using a nationwide frequency (see above). -
Page 26: The Menu Item 'Acoustic Signals
The menu item 'Acoustic Signals' This menu item switches the acoustic signals of the device on or off. Beep tones etc. may be disturbing on theatre stages and in this case it is meaningful to disable the sounds. Please note that there will be no acoustic signals at all if the sounds are turned off, even no warning signal if the battery needs recharging. -
Page 27: The Menu Item 'Inner Temperature
The menu item 'Inner Temperature' The temperature inside of the device is displayed in this menu item as a user information. The temperature is allowed to vary in the range from -20 to +65°C. The LCD is becoming slow in extremely cold environments. This effect is completely normal and does not impair the function. -
Page 28: The Menu Item 'Recall Event Memory
It is a normal effect that the combination colors are slightly different from LED to LED because of the deviation in brightness. Color nuances are the result of that. All LEDs are emitting white light at the end of the test until 'Mode' is activated. -
Page 29: The Stepping Function (Optional)
5 The stepping function (optional) The stepping function is used mainly if short firing delays are required. Due to the high resolution of the delay programming the stepping function is ideally suited to generate e.g. accelerated stepping sequences. There are also lots of applications in pyromusicals and in the SFX business. Right after power-on you can see if a device is equipped with this function. - Page 30 It is highly recommended to extend a stepping sequence over lots of devices to minimize cable runs. Only one output per receiver will be used for a sequence in the most extreme case like in this example: Device 1; Output No. 1 = Firing Channel 72;...
-
Page 31: Firing Characteristic And Firing Power
6 Firing characteristic and firing power 6.1 General information Due to the high output voltage of 20 V, e-matches can be connected in either series or parallel connection. Provided that the conductor cross-section is sufficiently high, up to three e-matches of type 'A' or two e-matches of type 'U' can be fired in series or parallel connection. -
Page 32: The Function 'Event Memory
7 The function 'Event Memory' The device is equipped with a so-called 'event memory'. As soon as a firing command or stepping sequence is being executed or a hazard zone is being disabled this event will be stored in the memory. -
Page 33: Radio Range Test
8.1 Radio Range Test The remote access functions of the controller PFC Advanced make very convenient radio range tests possible because the signal strength of both devices (signal back and forth) are displayed at the controller. If you want to read the test result at the receiver or if you work with the transmitter PFS Profi or PFS Pocket the radio range test can also be done the conventional way. -
Page 34: Terminal Block Connector
10 Terminal block connector A new type of connection socket makes working much easier. No tools are required for connecting and disconnecting. To connect the ignitor wire, simply plug it into the contact mechanism and is automatically clamped. To disconnect the wires, simply press the respective button to release the wires. -
Page 35: Protection Against Water, Moisture, Humidity And Condensation
13 Protection against water, moisture, humidity and condensation This device is not waterproof. Always protect it from water, moisture, humidity and condensation. Leaking batteries or moisture in the device WARNING Leaking batteries or moisture in the device may trigger firings. •... -
Page 36: Damages Caused By Misusage, Maloperation, Malfunction
16 Damages caused by misusage, maloperation, malfunction This device has been designed for the firing of pyrotechnical effects in certain application fields, see 'Application fields'. Discuss all other applications with the manufacturer before usage. In the case that one of the events stated above has happened we are only liable if the causation was within our range of influence. -
Page 37: Technical Data
18 Technical data Radio parameters Frequency Band: 433.05 - 434.79 MHz EU version Maximum radio-frequency power transmitted: <=10 mW Channel Spacing: 25 kHz Number of radio channels: 70 (433.050 - 434.775 MHz) Modulation: FM narrow band Frequency Shift: +/- 3 kHz Duty Cycle: <10% Radio equipment class according to 2014/53/EU (RED): 1 Radio equipment type: non-specific short range device,... -
Page 38: Compatibility And Firmware Revision History
Power supply: 2 x AA cell, Alkaline batteries or NiMH rechargeable batteries Optional additional functions: - Stepping function - Sleep Mode Operation time: with Alkaline batteries with 2.700 mAh in receiving mode: approx. 18 h, with Alkaline batteries with 2.700 mAh in Sleep Mode: approx. 550 h, with NiMH rechargeable batteries with 2.000 mAh in receiving mode: approx. - Page 39 The EU version of this device is marked with the CE logo: Each device intended for operation in the EU is accompanied by an EU Declaration of Conformity. 22 Address of the manufacturer and contact details for requesting an EU declaration of conformity Galaxis Showtechnik GmbH Lohgerberstr. 2 84524 Neuötting Germany Tel.: +49 / 8671 / 73411...
Need help?
Do you have a question about the PYROTEC PFE Advanced Mini 5 Outputs and is the answer not in the manual?
Questions and answers