Advertisement
Advertisement
Table of Contents

Related Manuals for TAKE-A-LABEL TAL-2100ER


Summary of Contents for TAKE-A-LABEL TAL-2100ER
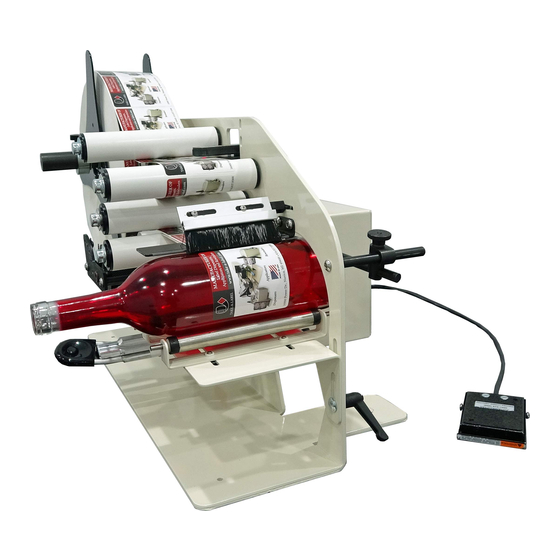
- Page 1 Operations Manual TAL-2100ER Electric Round Product Label Applicator...
- Page 2 Install waste wind clip (46) on waste wind shaft (45) placing the webbing between the shaft and the clip. Cycle the applicator by stepping on the footswitch (24) a few times to allow label to align. take-a-label.com • sales@take-a-label.com • 16900 Power Dr., Nunica, MI 49448 • 616.837.9300...
- Page 3 Remove one label from the webbing and place the webbing only in the photo eye. Press and hold the “Normal” button on photo eye for 3 seconds. When the lights finish flashing the photo eye is taught. take-a-label.com • sales@take-a-label.com • 16900 Power Dr., Nunica, MI 49448 • 616.837.9300...
- Page 4 Slide the label stop roller (28C) toward the back of the machine in small amounts. As the roller is moved back, the stop position of the label will be adjusted. Continue moving roller until a label gap is stopping at the Peel Plate (1). take-a-label.com • sales@take-a-label.com • 16900 Power Dr., Nunica, MI 49448 • 616.837.9300...
- Page 5 Raise the carriage to make a gap of approximately 1/16” between the bottom of the peel plate and the product. Rotate Brush and holder (41) down to help apply labels to product. take-a-label.com • sales@take-a-label.com • 16900 Power Dr., Nunica, MI 49448 • 616.837.9300...
- Page 6 Waste Wind Shaft 45131 Waste Wind Clip 45136 Unwind Disc 45155 Fuse Holder 45157 Fuse 25213 Power Cord 72618 Felt Pad 76800 Heavy Duty Motor 81912 Small Cord Grip take-a-label.com • sales@take-a-label.com • 16900 Power Dr., Nunica, MI 49448 • 616.837.9300...
Need help?
Do you have a question about the TAL-2100ER and is the answer not in the manual?
Questions and answers