Advertisement
Quick Links
O
P
E
R
A
T
O
P
E
R
A
T
M
O
D
E
M
O
D
E
T
A
M
P
T
A
M
P
I
O
N
S
M
I
O
N
S
M
L
T
A
L
-
3
L
T
A
L
-
3
A
P
P
L
I
C
A
A
P
P
L
I
C
A
TAKE-A-LABEL
16900 Power Dr.
Nunica, MI 49448
Phone: (616) 837-9300
Fax:
(616) 937-9301
http://www.take-a-label.com
E-Mail
sales@take-a-label.com
Page 1 of 16
A
N
U
A
L
A
N
U
A
L
1
0
0
T
1
0
0
T
T
O
R
T
O
R
Advertisement

Subscribe to Our Youtube Channel
Related Manuals for TAKE-A-LABEL TAL-3100T


Summary of Contents for TAKE-A-LABEL TAL-3100T
- Page 1 TAKE-A-LABEL 16900 Power Dr. Nunica, MI 49448 Phone: (616) 837-9300 Fax: (616) 937-9301 http://www.take-a-label.com E-Mail sales@take-a-label.com Page 1 of 16...
-
Page 2: Machine Startup
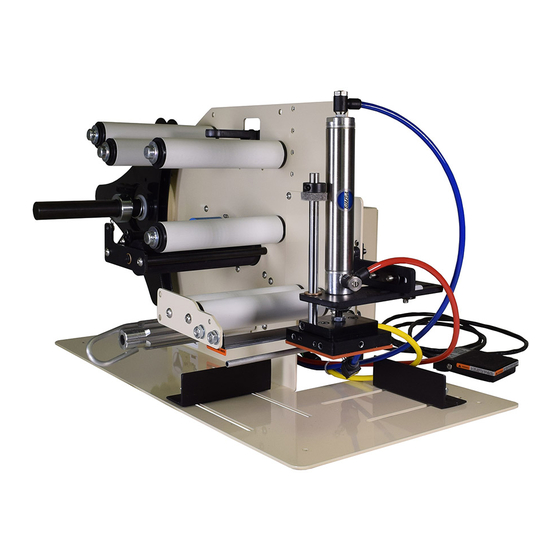
1. Unpack TAL-3100T Tamp Label applicator from shipping container. 2. Place the TAL-3100T on a firm level surface. 3. Plug the TAL-3100T into an 110VAC 15 AMP Grounded outlet. 4. Connect the labeler to a sufficient air supply. Minimum 80 PSI clean dry air. - Page 3 Tamp Head Placement: 1. The tamp head placement is crucial for consistent label application. 2. The vertical gap between the peel plate and tamp pad should range from 0”-1/32”. If not loosen the nut at the base of the tamp cylinder rod, and unthread to lower the tamp pad or screw in the rod to raise the tamp pad height.
- Page 4 Air Assist Tube Placement: 1. The air assist tube is used to assist the label out onto the vacuum pad. As a rule of thumb the blast patter from this tube should be directed at a 30° angle onto the vacuum pad. This angle may vary due to several factors, as a result different blast angles may have to be experimented with.
- Page 5 Teaching the photo eye: 1. It is recommended that you teach the photo eye (21) with every new roll of labels used. 2. Remove one label from the webbing and place the webbing only in the photo eye. 3. Press and hold the “Normal” button on photo eye for 3 seconds. When the lights finish flashing the photo eye is taught.
-
Page 6: Label Setup
Label Setup: The label advance potentiometer resides on top of the TAL-3100T electrical housing. The purpose is to adjust the stopping position of the label with respect to the peel plate. With the label advance pot turned all the way counterclockwise the photo eye will stop the applicator instantly when it senses a gap. - Page 7 Tamp Head Speed: 1. To adjust the speed of the tamp head, use a screwdriver to turn the flow control (44) screw clockwise to slow it down and turn the flow control (44) screw counterclockwise to make the tamp head travel faster. Page 7 of 16...
- Page 8 Tamp Heads Designed for Multipule Labels: 2. If your applicator has a tamp pad designed for mulitpule label sizes, you will need to open/close the valve on the vacuum line depending on which label you are running. When running the smallest label size the valve should be closed. 3.
- Page 9 Recommended Spare Parts List TAL-3100T: Qty. Description Part # Pinch Roller 31002 Waist wind Clip 45131 Drive belt 21031 Unwind Disc 45136 Motor 76800 Vacuum Generator 31725 Foot Switch 30110 Air Cylinder 30005 Circuit Board 31057 Unwind Felt Pad 72618...
- Page 10 Page 10 of 16...
- Page 11 Page 11 of 16...
- Page 12 Page 12 of 16...
- Page 13 TAL-3100T Parts List Item # Description 11002 Peel Plate 11008 Unwind Shaft 21002 Housing 21003 Housing Cover 21004 Outboard Support Plate 21010 Pinch Roller Shaft 21011 Idler Roller Rod 21031 Drive V Belt 21026 Motor Spacers 21027 Left Torsion Spring...
- Page 14 31701 Main Frame 31702 Tamp Head Plate 31703 Product Guide Bars 31721 Rubber Feet 31722 Valve Assembly 31723 Knobless Flow Control 31724 Miniature Flow Control 31725 Vacuum Generator 40007 On/Off Switch 45129 Waste Wind Shaft 45131 Waste Wind Clip 45136 Unwind Disc 45153 Power Cord Clamp...
-
Page 15: Optional Accessories
Optional Accessories LION 6300/8200 Clear Label Photo Eye: 1. Labels must pass under the “Sensing Area” indicator. 2. Remove a label and place the liner only in the sensor. 3. Press and hold the down arrow G button for at least one second. (Model 6300) 4. - Page 16 Registered Ink Imprinter: The registered ink imprinter allows you to imprint an alphanumeric code on the label prior to application to the bottle. This is commonly used for batch codes, expiration dates, or lot codes. • To adjust the printing location left to right on the web. Loosen two knobs and slide coder to appropriate location.
Need help?
Do you have a question about the TAL-3100T and is the answer not in the manual?
Questions and answers