Table of Contents
Advertisement
Advertisement
Table of Contents

Related Manuals for Hytera PNC380


Summary of Contents for Hytera PNC380
- Page 1 PNC380 PoC Radio User Manual Hytera Communications Corporation Limited...
- Page 2 Preface Welcome to the world of Hytera and thank you for purchasing this product. This manual includes a description of the functions and step-by-step procedures for use. To avoid bodily injury or property loss caused by incorrect operation, please carefully read the Safety Information Booklet before use.
- Page 3 Copyright Information Hytera is the trademark or registered trademark of Hytera Communications Corporation Limited (the Company) in the People's Republic of China (PRC) and/or other countries or areas. The Company retains the ownership of its trademarks and product names. All other trademarks and/or product names that may be used in this manual are properties of their respective owners.
-
Page 4: Table Of Contents
2.7 Switching the Input Method ........................ 11 2.8 Checking the Radio Information ......................11 3. PoC Service ............................12 4. Phone Call (PNC380 Pro Only) ......................13 4.1 Initiating a Phone Call ........................13 4.2 Receiving a Phone Call ........................14 5. - Page 5 7.4.1 Enabling or Disabling the WLAN Hotspot ................22 7.4.2 Setting up the Hotspot ......................22 7.5 Airplane Mode ............................ 23 7.6 NFC (PNC380 Pro Only) ........................23 7.7 USB ..............................23 8. Settings ..............................24 8.1 Radio Settings ............................ 24 8.1.1 Display ............................
- Page 6 User Manual Documentation Information 12.1 Installing an Application ........................35 12.2 Uninstalling an Application ....................... 35 12.3 Forcedly Stopping an Application ..................... 35 12.4 Clearing the Data or Cache ......................35 12.5 Setting the Access Permissions ....................... 36 13. Troubleshooting ........................... 37 14.
-
Page 7: Documentation Information
User Manual Documentation Information Documentation Information Instruction Conventions Icon Description Indicates references that can further describe the related topics. Indicates situations that could cause data loss or equipment damage. Notation Conventions Item Description Example To save the configuration, click Apply. Denotes menus, tabs, parameter names, Boldface window... - Page 8 User Manual Documentation Information Key Operations Operation Description Short press Press and release quickly. Long press Press and hold for preset time. Press and hold Keep the key pressed.
-
Page 9: Before Use
User Manual Before Use 1. Before Use 1.1 Packing List Please unpack carefully and check that you have received the following items. If any item is missing or damaged, contact your dealer. Item Quantity (PCS) Item Quantity (PCS) Radio Data Cable Battery Battery Cover Power Adapter... -
Page 10: Product Layout
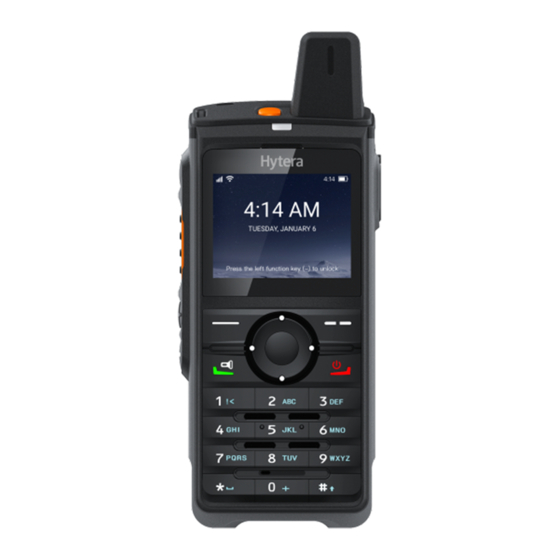
User Manual Before Use 1.2 Product Layout 1.3 (Optional) Installing the SIM Card and Micro SD Card Unlock the battery latch, and then remove the battery cover. The battery cover is tightly fastened to ensure optimum waterproof performance. It is recommended to remove the battery cover with tools. -
Page 11: Attaching The Battery
User Manual Before Use 1.4 Attaching the Battery Use the approved battery to avoid the risk of explosion. Dispose of the used battery according to "Precautions for Disposal" in the Safety Information Booklet. Insert the battery into the battery slot. Press the battery cover into place. -
Page 12: Attaching The Belt Clip
User Manual Before Use 1.5 Attaching the Belt Clip 1.6 Attaching the Audio Accessory Open the cover of the audio accessory connector, and then insert the audio accessory into the connector. To ensure optimum waterproof and dustproof performance, close the cover after removing the audio accessory. -
Page 13: Charging The Battery
User Manual Before Use 1.7 Charging the Battery Use the approved charger to charge the battery. Read the Safety Information Booklet before charging. The remaining lithium-ion battery power is limited to 30% pursuant to the new lithium battery shipment regulation approved by International Air Transport Association (IATA). -
Page 14: Basic Operations
User Manual Basic Operations 2. Basic Operations 2.1 Turning On or Off the Radio To turn on the radio, long press for two seconds. To turn off the radio, long press for two seconds, and then select Power off. 2.2 Restarting the Radio ... - Page 15 The radio operates in silent mode. The BT feature is enabled. A BT device is connected. The GPS is positioning. The Near Field Communication (NFC) feature is enabled (PNC380 Pro only). The memory is out of space. There is/are new message(s). There is/are missed call(s).
-
Page 16: Screen Operations
User Manual Basic Operations 2.4.2 Screen Operations Turning On or Off the Screen To turn off the screen, press SK. To turn on the screen, press any key on the keypad. Locking or Unlocking the Screen When the screen is not in use, you can lock it to avoid unintended operations, protect privacy, and increase battery life. -
Page 17: Switching The Input Method
User Manual Basic Operations 2.7 Switching the Input Method You can input symbols, numbers, characters, or letters through the keypad. Press to switch the input method. In number mode, press to enter "1". In other modes, press to input special characters. ... -
Page 18: Poc Service
User Manual PoC Service 3. PoC Service The Push-to-Talk over Cellular (PoC) service provides one-to-one and one-to-many voice communications over the wider-coverage public network. This service is available only when you have installed the PoC application on the radio. After the radio is connected to a WLAN or cellular network, you can initiate a call through the PoC application. Press the Navigation key to select the PoC application, and then press the OK/Menu key. -
Page 19: Phone Call (Pnc380 Pro Only)
User Manual Phone Call (PNC380 Pro Only) 4. Phone Call (PNC380 Pro Only) 4.1 Initiating a Phone Call Through Manual Dialing Do either of the following: Press the Navigation key to select , and then press the OK/Menu key. ... -
Page 20: Receiving A Phone Call
User Manual Phone Call (PNC380 Pro Only) Through Messaging Press the Navigation key to select , and then press the OK/Menu key. Press the Navigation key to select the message. Press 4.2 Receiving a Phone Call When you receive a phone call, do either of the following: ... -
Page 21: Messages (Pnc380 Pro Only)
User Manual Messages (PNC380 Pro Only) 5. Messages (PNC380 Pro Only) You can send text messages. 5.1 Sending a Message Through Messaging Press the Navigation key to select , and then press the OK/Menu key. Press the OK/Menu key to create a new message. -
Page 22: Replying A Message
User Manual Messages (PNC380 Pro Only) Through Call Logs Do either of the following: Press the Navigation key to select , and then press the OK/Menu key. Press Press the Navigation key to enter the tab. Press the Navigation key to select the call log. - Page 23 User Manual Messages (PNC380 Pro Only) Press the Navigation key to select the message. Press the OK/Menu key to enter the message interface. Press the Navigation key to select the message content. Press the Option key, and then do either of the following: To forward the message, press the OK/Menu key.
-
Page 24: Contacts (Pnc380 Pro Only)
User Manual Contacts (PNC380 Pro Only) 6. Contacts (PNC380 Pro Only) 6.1 Creating a Contact Through Manual Dialing Do either of the following: Press the Navigation key to select , and then press the OK/Menu key. Press Press the Navigation key to enter the tab, and then enter the phone number. -
Page 25: Editing Or Deleting A Contact
User Manual Contacts (PNC380 Pro Only) Press the Navigation key to enter the tab. Press the OK/Menu key. Enter the contact name and phone number. Press the Option key to save the contact. Through Messaging Press the Navigation key to select , and then press the OK/Menu key. -
Page 26: Network And Data Sharing
User Manual Network and Data Sharing 7. Network and Data Sharing 7.1 Mobile Network Before connecting to the mobile network, make sure that the SIM card is installed and the mobile data service is activated. 7.1.1 Checking the Data Usage You can view the amount of data usage to avoid exceeding the data usage limit. -
Page 27: Pairing With A Bt Device
7.3 BT The BT feature allows you to transmit voice through wireless earpiece or wireless ring PTT. The PNC380 Pro supports short-distance pictures, audio files, and videos sharing through the BT. 7.3.1 Pairing with a BT Device Press the Navigation key to select , and then press the OK/Menu key. -
Page 28: Modifying The Bt Device Name
User Manual Network and Data Sharing system to improve the accuracy of indoor positioning. This feature is suited for position tracking and navigation in the indoor or semi-enclosed areas. To enable or disable the feature, do as follows: Press the Navigation key to select , and then press the OK/Menu key. -
Page 29: Airplane Mode
Press the Navigation key to select More, and then press the OK/Menu key. Press the OK/Menu key to enable or disable Airplane mode. 7.6 NFC (PNC380 Pro Only) The Near Field Communication (NFC) is a wireless connection technology that offers easy, secure and fast communication. -
Page 30: Settings
User Manual Settings 8. Settings 8.1 Radio Settings 8.1.1 Display Adjusting the Brightness You can adjust the brightness to make the screen brighter or dimmer in different situations. Press the Navigation key to select , and then press the OK/Menu key. Press the Navigation key to select Display, and then press the OK/Menu key. -
Page 31: Sound
Press the Navigation key to select Sound, and then press the OK/Menu key. Press the Navigation key to select Volumes, and then press the Navigation key left or right. Customizing the Alert Sound (PNC380 Pro Only) Press the Navigation key to select , and then press the OK/Menu key. -
Page 32: Battery
User Manual Settings Freeing up the Storage Space Press the Navigation key to select , and then press the OK/Menu key. Press the Navigation key to select Storage, and then press the OK/Menu key. Press the OK/Menu key to view the internal storage. Press the Navigation key to select Cached data, and then press the OK/Menu key. -
Page 33: System Settings
User Manual Settings 8.2 System Settings 8.2.1 Location The Location feature allows the radio to obtain its location information through WLAN, mobile network, BT, or GPS. The location-related apps, such as Camera and Hytalk can access the location data of the radio. Setting the Location Mode Press the Navigation key to select , and then press the OK/Menu key. -
Page 34: Factory Data Reset
User Manual Settings Press the Navigation key to select Languages, and then press the OK/Menu key. Press the Navigation key to select the display language, and then press the OK/Menu key. 8.2.3 Factory Data Reset The Factory Data Reset feature will erase all information on the radio such as personal information and downloaded apps. - Page 35 User Manual Settings Setting the Time Format You can set the time format to 12-hour or 24-hour. Press the Navigation key to select , and then press the OK/Menu key. Press the Navigation key to select Date & time, and then press the OK/Menu key. Press the Navigation key to select Use 24-hour format, and then press the OK/Menu key to enable the feature.
-
Page 36: Upgrade
User Manual Settings 8.2.5 Upgrade During the upgrade, do not power off the radio. Otherwise, the radio may be not used. Be sure to back up your data before upgrade. Ensure that the battery power is more than 30% before upgrading. When an update is available, you can upgrade the system in one of the following ways: ... -
Page 37: Camera (Pnc380 Pro Only)
User Manual Camera (PNC380 Pro Only) 9. Camera (PNC380 Pro Only) The Camera application allows you to shoot photos and videos. 9.1 Taking a Photo Press the Navigation key to select , and then press the OK/Menu key. (Optional) Press the Option key to select Settings to set the Resolution and Flash. -
Page 38: Gallery (Pnc380 Pro Only)
User Manual Gallery (PNC380 Pro Only) 10. Gallery (PNC380 Pro Only) The Gallery application allows you to manage pictures and videos. 10.1 Photos 10.1.1 Viewing a Photo Press the Navigation key to select , and then press the OK/Menu key. -
Page 39: Managing A Video
User Manual Gallery (PNC380 Pro Only) Press the OK/Menu key again to play the video. (Optional) Press the Navigation key left or right to rewind or fast-forward the radio. 10.2.2 Managing a Video Open the video. For details, see step 1–3 in 10.2.1 Playing a... -
Page 40: Sound Recorder
User Manual Sound Recorder 11. Sound Recorder The SoundRecorder application allows you to record voice at any time during your work time or daily life. 11.1 Recording an Audio File Press the Navigation key to select , and then press the OK/Menu key. Press the OK/Menu key to start recording. -
Page 41: Applications
User Manual Applications 12. Applications 12.1 Installing an Application To protect the device from malware or viruses, download the trusted applications only. To avoid personal information leakage or misuse, read the instruction carefully and operate with caution when installing an application. You can download and install applications from the MDM after successfully connected and registered with it. -
Page 42: Setting The Access Permissions
User Manual Applications To clear the data, press the OK/Menu key. To clear the cache, press the Navigation key to select Clear cache, and then press the OK/Menu key. 12.5 Setting the Access Permissions You can manage the permissions for apps to access privacy features, so as to protect your personal data and avoid information leakage. -
Page 43: Troubleshooting
Restart the radio. display, or LED temporarily. indicator do(es) not The keys, LCD display, or LED Contact your dealer or Hytera technicians work normally. indicator may be damaged. for maintenance. The keys may fail to function Restart the radio. - Page 44 User Manual Troubleshooting Phenomena Analysis Solution Both the mobile and WLAN network are turned on, but the WLAN Turn the WLAN off. connection is unstable. Make sure call participants are within the The signal may be weak. communication range. The radio may be at an unfavorable You are unable to position.
-
Page 45: Care And Cleaning
User Manual Care and Cleaning 14. Care and Cleaning To guarantee optimal performance as well as a long service life of the radio, follow the tips below. 14.1 Product Care Do not pierce or scrape the radio. Do not drop the radio or collide with other objects. ... -
Page 46: Optional Accessories
User Manual Optional Accessories 15. Optional Accessories Use the accessories specified by the Company only. Otherwise, we will not be liable for any loss or damage arising out of use of any unauthorized accessories. Contact your dealer for the optional accessories used with the radio. -
Page 47: Abbreviations
User Manual Abbreviations 16. Abbreviations Abbreviation Full Name Global Positioning System Liquid-Crystal Display Light-Emitting Diode Mobile Device Management Personal Computer PTT Over Cellular Push-To-Talk Secure Digital Memory Card Subscriber Identity Module Side Key Universal Serial Bus WLAN Wireless Local Area Networks... - Page 48 Hytera Communications Corporation Limited. © 2021 Hytera Communications Corporation Limited. All Rights Reserved. Address: Hytera Tower, Hi-Tech Industrial Park North, 9108# Beihuan Road, Nanshan District, Shenzhen, People's Republic of China Postcode: 518057 http://www.hytera.com...
Need help?
Do you have a question about the PNC380 and is the answer not in the manual?
Questions and answers