
Related Manuals for AllPondSolutions 700IF+


Summary of Contents for AllPondSolutions 700IF+
- Page 1 AQUARIUM INTERNAL FILTER WITH UV 700IF+ 700 LITRES PER HOUR FULLY SUBMERSIBLE FILTRATION PUMP LOW NOISE | HIGH OUTPUT TANKS UP TO 150L 9w UV STERILISATION 9w UV STERILISATION INCLUDES VENTURI PIPE...
- Page 2 To ensure your new aquarium filter is set up and running correctly, and to prevent any accidental damage or injury, please read and follow the below instructions carefully before using your product. SAFETY IMPORTANT! Disconnect the mains electricity supply before attempting any installation / maintenance of any kind.
-
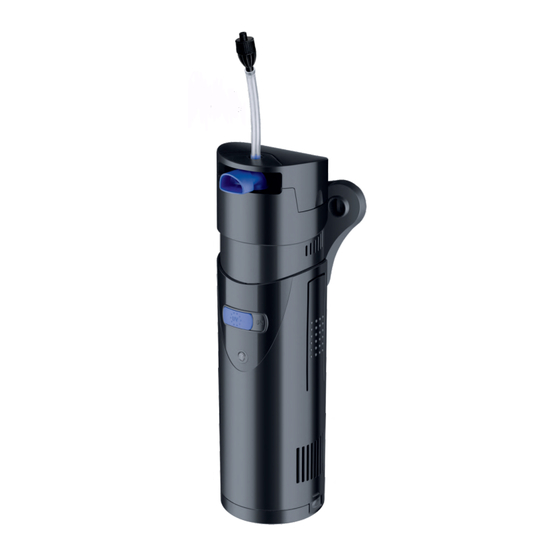
Page 3: Parts Diagram
PARTS DIAGRAM FILTER CASING AIR INLET VALVE BASE SUCTION CUPS TOP COVER O-RING BIO BALLS BASKET IMPELLER CHAMBER SCREW NUT BEARING QUARTZ TUBE IMPELLER SCREW MOTOR FILTER BODY UV BULB UV BULB UV BULB SPONGE LAMP TUBE PROTECTIVE SLEEVE BULB PROTECTOR CAP LAMP TUBE PROTECTIVE SLEEVE BACK COVER... - Page 4 Diagram 1 WARNING! MUST BE SUBMERGED Aquarium Tank Power Supply Cord The power cable must have a drip loop to · Drip avoid any condensation build up reaching Loop the mains (see diagram 1). If the plug does get wet, DO NOT unplug the cord. Disconnect the fuse or circuit breaker that supplies power to the appliance.
-
Page 5: Maintenance
ELECTRIC This unit comes complete with a generous supply of 3 core cable, however should any additional cable be required, the use of an approved waterproof cable connector with a proper rating is essential. A cord rated for less amperes or watts than the appliance rating may overheat. -
Page 6: Replacing The Uv Bulb
In general, it is recommended to disconnect your filter and clean the impeller and sponge monthly. The unit will become blocked with waste and protein slime over time, so regular cleaning is important for optimal performance. The frequency of how often you will need to clean and inspect your unit of course will depend on a lot of factors like how dirty the water is when you first start using your filter, the volume of your water and also how many fish you have. - Page 7 Unplug your filter at the mains and remove the plug from the socket. Remove the IF+ from the aquarium. Remove the Body by squeezing both pressure points on the side of the body and pulling the motor and body apart. Unscrew the screw and twist the screw nut counter clockwise.
- Page 8 Remove the top cover from the unit by squeezing both pressure points on the side of the it and pulling the cover and body apart. The impeller can be accessed by removing the adjustable outlet. The impeller can then be gently pulled away from the housing and inspected. Ensure that the plastic propeller part of the impeller is attached to the magnetic part and that they have not come apart or split.
- Page 9 Set Up Should you need to disassemble your unit for maintenance or repair purposes, please follow the steps below: Unplug the power cord from the mains. Move your unit to a flat stable surface near a sink or other drain. (Be sure to hold upright to avoid spillages.) Remove all parts from the box to check all parts are present.
-
Page 10: Troubleshooting
TROUBLESHOOTING Slow Flow Rate No Filter Operation / Slow Flow Rate 1. Always ensure the power has been turned on. 2. Follow the maintenance section. Ensure the water outlet is not blocked. 3. Locate the impeller and shaft and inspect for damage and clear the fittings and parts of any waste build-up. - Page 11 COMMON AQUARIUM QUESTIONS Why Is My Aquarium Water Cloudy? Causes: Bacterial blossom - As the new aquarium goes through the initial break-in Ÿ cycle, the water can become cloudy or at least a little hazy. It might take several weeks to establish beneficial bacterial colonies that are able to clear waste from the water.
- Page 12 You may also consider reducing the amount of food you give your fish. Nitrates - As the amount of fish waste rises so do the nitrates. Make sure to Ÿ perform regular water changes, check your filter is clean and adequate for your aquarium size and do not overstock it.
-
Page 13: Specifications
SPECIFICATIONS UV POWER POWER 700L/H MAX OUTPUT 150L MAX TANK VOLUME DIMENSIONS 76X90X290 (LxWxH) mm WARRANTY The All Pond Solutions 700IF+ is guaranteed against defects in material or workmanship under normal aquarium usage and comes with 12 months warranty for all electrical parts. The warranty period commences from the date of purchase. - Page 14 No liability is assumed with respect to loss or damage to livestock or personal property irrespective of the cause thereof. Please ensure that only genuine All Pond Solutions components are used when completing a replacement or repair. Spare parts are available at our official website or from your local supplier.
- Page 16 All Pet Solutions Limited Trading as All Pond Solutions Unit 203 Riverside Way, Uxbridge, Middlesex, England, UB8 2YF...
Need help?
Do you have a question about the 700IF+ and is the answer not in the manual?
Questions and answers