Table of Contents
Advertisement
Quick Links
STEP 1: Connect to a Network
IMPORTANT! To listen to the SiriusXM Music for Business Internet Service, you will need to
subscribe to the service. If you have not yet subscribed, call 1-866-345-SIRIUS (7474) to
subscribe and obtain your SiriusXM Music for Business credentials (username and password).
NOTE! You cannot use a regular streaming subscription for the SiriusXM Business Radio. The
Business Radio requires a Music for Business subscription.
This Quick Start Guide covers the most common type of wired network connection to the Internet.
SiriusXM strongly recommends a wired internet connection for all business installations. An
Ethernet cable is included. The network must be connected to the Internet.
If your network requires manual configuration refer to the User Guide. Also refer to the
"Troubleshooting" section in the User Guide if you encounter any problems.
A wireless network connection (Wi-Fi) may be used instead of a wired network connection. Refer
to the User Guide for instructions for a Wi-Fi connection.
Turning the Tune knob scrolls through menus and lists to highlight items, and pressing the Tune
knob selects a highlighted item.
Connect to a Wired Network
a.
a.
Connect the Power Adapter to the DC IN 12V connector on the Radio, and plug the Power
Adapter to an AC outlet.
b.
b.
When prompted press the Power button. The Network Wizard screen will be displayed.
c.
c.
Connect the Ethernet cable which is included with the Radio to the LAN connector on the
back of the Radio. Connect the other end to your local network.
d.
d.
Turn the Tune knob to highlight Wired and
press the Tune knob.
e.
e.
DHCP is highlighted. Press the Tune knob to
select DHCP. (If your network requires a static
IP consult the User Guide.)
f.
f.
The Radio will show "Connecting...".
g.
g.
If the Radio has successfully connected to the
network, the Ethernet icon in the upper right
corner will be displayed without a red X.
If there is no network connectivity, the
Ethernet icon will be displayed with a red
X. Check the Ethernet cable connection. If
necessary, refer to the User Guide for more
detailed network setup information. The User
Guide is available at:
www.siriusxm.com/guides
h.
h.
Connect the Radio to a stereo system using
the provided Stereo Audio Cable, and turn
the stereo system on.
STEP 2: Enter Your SiriusXM Account Information
Enter Your SiriusXM User Name and Password
a.
a.
Next you will be prompted to enter your
Music for Business credentials. Highlight
Username and press the Tune knob. Then
enter each character in your username and
press the Tune knob. When complete press
the Submit button. Your username is case
sensitive.
b.
b.
Next enter your SiriusXM password. Highlight
Password and press the Tune knob. Then
enter each character in your password. When
complete press the Submit button. Your
password is case sensitive.
c.
c.
The Radio will check your SiriusXM username and password. If correct, "SirusXM credentials
accepted" will be briefly displayed.
d.
d.
Next you will be prompted to select your time zone. Turn the Tune knob to highlight your
time zone and press the Tune knob to select.
e.
e.
If you are prompted that an Internet Update is available, allow the update to install. Turn
the Tune knob to highlight Install Update and press the Tune knob to select. Wait until the
update has completed. When you see the message, "Please press the Power button" or the
clock displayed on the screen, press the Power button.
Selecting a Channel
a.
a.
The Home Screen will be shown. (If not, press
the Home button.) The Category icon will be
highlighted. Press the Tune knob.
b.
b.
Turn the Tune knob to highlight a category
and press the Tune knob to display a list of
channels.
c.
c.
Turn the Tune knob to highlight a channel and
press the Tune knob to tune to the channel.
Network connected
No network connection
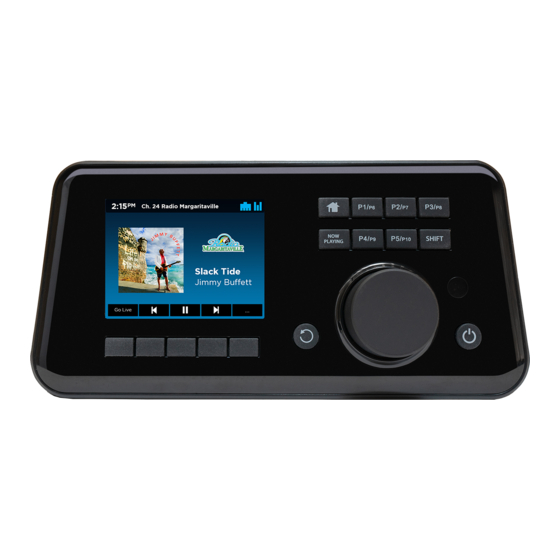
Business Radio Functions and Connectors
Button Functions and Connections
Tune Knob (Multifunction)
Now Playing Button
Turning the knob at the Now
Press to return to the Now
Playing screen displays the
Playing screen. While at the Now
Channel Listing screen; pressing
Playing screen, press to learn more
the knob at the Now Playing
about the channel, show, or artist.
screen displays the Direct Tune
screen; turning the knob in a
menu or user input screen scrolls
through and highlights menu
items and choices; pressing the
Front View
knob in a menu or user input
screen selects the highlighted
item.
P1/
P2/
P6
P7
Display Screen
NOW
P1/
P2/
PLAYING
P6
P7
Context Sensitive Buttons (5)
These buttons change their
functions according to the
context. Press to select
the function shown on the
display screen just above the
button.
Back Button
Press to return to the
previously displayed screen.
Rear View
LAN
LAN Network Connection
L
R
Used for a wired Ethernet
AUX IN
connection
STEREO OUT
MONO OUT
Stereo Out
Mono Out
Connection L/R
Connection
Used to connect the
Radio to a stereo
connect the
audio system
Radio to a
phone system
The SXBR3 Business Radio User Guide is available at www.siriusxm.com/guides.
Home Button
Press to access the Home
screen for listening modes
and configuration options.
P1 - P10 Preset Buttons
Press to tune to a preset
channel; press and hold to
set the current channel as a
preset.
Shift Button
P3/
P8
Press to shift between
preset banks P1-P5 & P6-P10.
SHIFT
The "S" icon is shown at the
top right when in Shift mode
for presets P6-P10.
Power/Standby Button
Press to turn On/Standby.
Power Connection
Power connector for
DC IN 12V
the supplied AC Power
–
+
Adapter (12 volts)
Aux In Connection
Used to connect
an alternate audio
source to the Radio
Used to
Advertisement
Table of Contents

Subscribe to Our Youtube Channel
Related Manuals for Sirius XM RAdio BR3


Summary of Contents for Sirius XM RAdio BR3
- Page 1 STEP 1: Connect to a Network Business Radio Functions and Connectors STEP 2: Enter Your SiriusXM Account Information Button Functions and Connections Enter Your SiriusXM User Name and Password IMPORTANT! To listen to the SiriusXM Music for Business Internet Service, you will need to Next you will be prompted to enter your subscribe to the service.
- Page 2 Show Title 1.866.635.2349 Artist Name Song Title Return to Live Broadcast © 2020 SiriusXM Radio Inc. SiriusXM, Pandora and all related logos are trademarks of Sirius XM Radio Inc. and its Rewind Play/ Fast- Contextual options such as respective subsidiaries. Other marks, channel names and logos are the property of their respective owners. All...
Need help?
Do you have a question about the BR3 and is the answer not in the manual?
Questions and answers