Sirius XM RAdio Stratus 7 User Manual
Radio & vehicle kit
Hide thumbs
Also See for Stratus 7:
- User manual (80 pages) ,
- Quick start manual (16 pages) ,
- Quick start manual (2 pages)
Table of Contents
Advertisement
Advertisement
Table of Contents

Related Manuals for Sirius XM RAdio Stratus 7


Summary of Contents for Sirius XM RAdio Stratus 7
- Page 1 User Guide Stratus 7 Radio & Vehicle Kit...
- Page 3 Signal . . . . . . . . . . . . . . . . . . . . . . . . . . . .47 Stratus 7 Functions . . . . . . . . . . . . . . . . . 8 Factory Default .
-
Page 4: Introduction
• Home kit included — add accessories to listen in a vehicle, office, or on the go . Use this manual to familiarize yourself with all of your Stratus 7’s features and capabilities . For the latest information about your Stratus 7 and other... -
Page 5: Safety And Care Information
Introduction Safety and Care Information IMPORTANT! Self installation instructions and tips are provided for your convenience . It is your responsibility to determine if you have the knowledge, skills, and physical ability required to properly perform an installation . SiriusXM shall have no liability for damage or injury resulting from the installation or use of any SiriusXM or third party products . - Page 6 Introduction Warning! • Opening the case may result in electric shock . • If the liquid crystal fluid comes in contact with your skin, wipe the skin area with a cloth and then wash the skin thoroughly with soap and running water .
-
Page 7: What's In The Box
Introduction What’s in the Box? menu Home Dock Stratus 7 Radio select memo menu – mute jump band AC Adapter Audio Cable Indoor/Outdoor Remote Home Antenna Control Unpack your Stratus 6 radio carefully and make sure that everything shown is present . If anything is missing or damaged, or if your the radio fails to operate, notify your dealer immediately . -
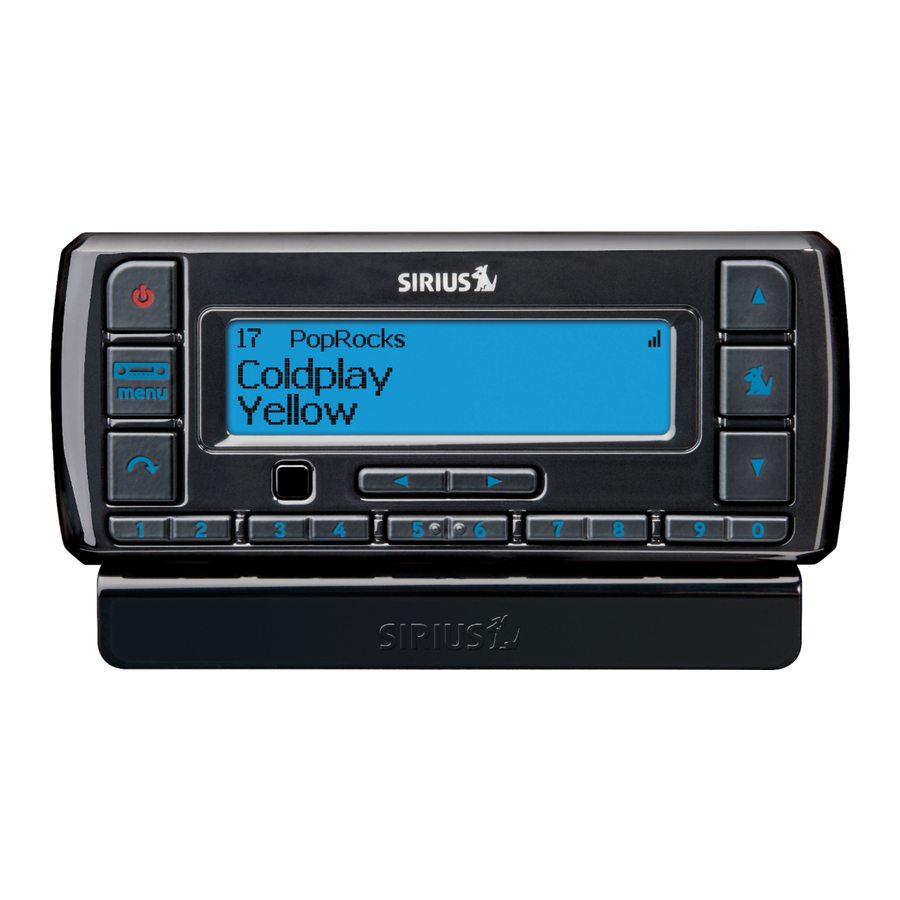
Page 8: Stratus 7 Functions
Stratus 7 Functions FM / Menu Button Power Button FM: Press to access and cycle Press to turn through FM presets . Stratus 7 on and off . Menu: Press and hold to Up and Down access advanced features Buttons and configuration options;... -
Page 9: Connections
Introduction Home Dock Color-Coded Connections The color-coded Home Dock makes it simple to connect the cables to the appropriate connectors at the rear of the dock . Rear View AUDIO ANT (Silver) AUDIO (Green) POWER (Red) Connection for Connection for Connection for the Indoor/ stereo system or... -
Page 10: Replacement
Introduction Remote Control Battery Replacement The Remote Control has a child safe battery compartment which requires a pointed object to open the battery compartment . A paper clip is recommended, as shown . To Replace the Battery: 1. Press the paper clip or Paper Clip other object into the lock release opening... -
Page 11: Home Installation
Home Installation There are two parts to setting up your Home Kit . First, connecting the Home Dock to your stereo or powered speakers, then placing and aiming the Home Antenna . Let’s start with getting your Home Dock set up . Step 1: Connect the Home Dock When installing the Home Dock in your home, choose a location in close proximity to your home stereo system or powered speakers, and also where... - Page 12 Home Installation Connect the Home Power Adapter Connect the Home Power Adapter to the PWR connector at the rear of the Home Dock, and plug it into a wall outlet . AUDIO Connect the Home Dock to a Home Stereo System or Powered Speakers The Home Dock can be connected to your home stereo system, or to a pair of powered speakers .
- Page 13 Home Installation To Connect the Home Dock to Your Home Stereo System The Home Dock can be connected to your home stereo system through the AUX IN or LINE IN connection of your home stereo system, using the provided Stereo Audio Cable . 1.
- Page 14 Home Installation To Connect the Home Dock to Your Powered Speakers The Home Dock can be connected directly to a pair of powered speakers . 1. Connect the 3 .5 mm (1/8”) connector from the powered speakers to the AUDIO OUT connector at the rear of the Home Dock . 2.
- Page 15 Home Installation Dock Your Radio Place the radio into the Home Dock, aligning the connector on the Stratus 6 with the connector on the Home Dock, and gently press the Radio down until it is fully seated in the Home Dock . Press the power button on the radio to turn it on .
-
Page 16: Antenna
Home Installation Step 2: Install the Indoor/Outdoor Antenna To begin, try experimenting with the Home Antenna to get a feel for the reception in your location . Move the antenna around the room or from room to room . Aim it from different windows . In major metropolitan areas, you might find that you get great reception in several locations without worrying too much about aim and placement . - Page 17 Home Installation you’re facing? Move the antenna closer to the window . TIP! Still not sure which way is south or where to place your Home Antenna? Look up your location on an online mapping Web site that offers satellite views of street addresses where you can easily see which way is south, and what window may offer an unobstructed view...
- Page 18 Home Installation If you don’t have a window where you receive a consistent signal, or placing the antenna in a window is not a practical solution for you, BETTER reception can be achieved by placing the antenna outside on a window ledge, porch, table, or patio .
- Page 19 Home Installation the cable from the antenna location to the interior of the home, working the cable through the basement, under a window sill, etc ., and make adjustments to take up cable slack as necessary . TIP! If your Indoor/Outdoor Antenna’s cable isn’t long enough, visit siriusxm .ca, or your favourite retailer, and consider a 15 m (50 ft .) Indoor/Outdoor Antenna Extension Cable or a Wireless Home Signal Repeater .
- Page 20 Home Installation If the signal reception is good, but there is no audio, verify your audio connection . • If you are connected to a home stereo system, be sure the system is set to the auxiliary input source, and you have connected the Stereo Audio Cable to the auxiliary input connectors .
-
Page 21: Subscribe
Before you can enjoy Commercial-Free Music, plus Sports, News, Talk & Entertainment, you need to activate your Stratus 7: 1. Make sure your Stratus 7 is turned on, tuned to Sirius Preview channel 184, and receiving the Sirius signal so that you can hear the Sirius audio . - Page 22 . When your service is activated, your Stratus 7 will display an alert message . To continue, press any button . Once subscribed, Stratus 7 will receive and you can tune to channels in your subscription plan .
-
Page 23: Using Your Stratus 7
Using Your Stratus 7 The Main Display Whenever you power your Stratus 7 On, it will automatically tune to the last channel you were listening to before it was powered Off . Stratus 7’s display screen will show the channel number, the song or show being played, and the artist name of the current channel . -
Page 24: My Channels
Using Your Stratus 7 My Channels Channels are organized into categories to make it easier for you to find the ones that suit your taste . My Channels is a special category that displays the channels contained in your subscription plan . You can display this and any category by pressing until the category is displayed . -
Page 25: Navigation Basics
Using Your Stratus 7 Navigation Basics Power Button Pressing the Power button turns Stratus 7 On or Off . Navigation Buttons Use the Left, Right, Up, and Down buttons to navigate through various features and functions of Stratus 7 . -
Page 26: Jump Button
Using Your Stratus 7 screen, pressing and holding the Select button tunes to the previous channel that was being played . FM/Menu Button FM provides easy tuning of FM presets for optimized PowerConnect performance . Repeatedly pressing FM displays and cycles through the list of preset FM channels one at a time . -
Page 27: Listening To Satellite Radio
Using Your Stratus 7 Listening to Satellite Radio Tune a channel: 1. Press and release to immediately tune to the next or previous channel . 2. Press and hold to speed scroll through the channels . Release to tune to channel which is displayed . - Page 28 Using Your Stratus 7 Direct Tune A channel can be tuned directly by entering the channel number using the number buttons . 1. To directly tune a channel press the Select button . 0 3 5 C h i l l...
- Page 29 Using Your Stratus 7 Jump When configured properly, pressing jump will tune to the traffic and weather channel of a selected city, from a list of the 20 most congested cities . This button allows you to quickly tune the traffic/weather broadcast of the selected city, and then tune back to the original channel to which you were listening by pressing jump again .
- Page 30 Using Your Stratus 7 Returning to main display screen When changing the Radio options using the menu options, pressing and holding menu in most instances will return you to the main display screen . In some instances, you may need to follow the instructions on the display screen .
-
Page 31: Fm Presets
FM presets make it easy to quickly access stored FM channels and choose a new FM channel from them . Use FM presets when you use PowerConnect to listen to your Stratus 7 through your vehicle’s FM radio . To start using a different FM preset: 1. -
Page 32: Special Features
Special Features Parental Lock Your Stratus 7 has the ability to lock channels you do not want others (such as children) to access without your permission . Locked channels will not appear in the channel or category list . The default lock code is 0000 . - Page 33 Special Features 6. Once you have entered the code you C o n f i r m C o d e will then be prompted to enter the # ____ new code again to confirm . If you entered the same lock code again, the code is saved .
- Page 34 Special Features the right of the channel name . 7. You can continue to select channels for locking or unlocking . When you are finished, press and hold menu to exit .
-
Page 35: Stratus 7
— all with a single subscription . • In the Home, Office, etc . – With a Home Kit, you can play your Stratus 7 over an existing home, office, or other stereo system . -
Page 36: Configuring Your Stratus 7
Configuring Your Stratus 7 Sirius ID Your Stratus 7 has a numeric 12-digit ID which uniquely identifies the Radio . This ID is used during the activation process . To display the Sirius ID: 1. Press and hold menu until the menu options are displayed . -
Page 37: Area
FM channels in your area . For convenience, write down or print out the list . Tune Stratus 7 to a favorite Sirius channel (or to channel 184, if it’s not yet activated) . Turn on your vehicle’s FM radio . Pick the first FM channel on your Channel Finder list and tune the FM radio to that channel . - Page 38 . Pick the first FM channel on your list and tune the FM radio to that channel . Then tune Stratus 7 to the same FM channel . (Refer to “Set and Select an FM Channel” on page 41 .) You should hear the Sirius channel through your vehicle’s radio .
- Page 39 . If this is the case, we recommend saving the best FM channels as presets on your FM radio and Stratus 7 . Then you simply select and match the best channel for the area you are in .
-
Page 40: Turn Fm Transmitter On/Off
Turn FM Transmitter On/Off The built-in FM Transmitter in Stratus 7 works with the PowerConnect Vehicle Dock, and is used when you choose to listen to Stratus 7 through your vehicle’s FM radio . To turn the FM Transmitter On or Off: 1. -
Page 41: Set And Select An Fm Channel
Configuring Your Stratus 7 Set and Select an FM Channel Stratus 7 allows you to easily store (i .e ., preset) up to 5 different FM channels . At any time, you can select any one of these 5 FM presets to... - Page 42 Configuring Your Stratus 7 FM channel . The FM channel you selected will be confirmed on the display screen and Stratus 7 will tune to the FM channel . 6 Set your vehicle’s FM radio to same FM channel .
-
Page 43: Jump Settings
Configuring Your Stratus 7 Jump Settings Jump can be set to jump to the traffic and weather channel of one of the 20 most congested cities . You’ll need to select the desired city from the list . To configure jump: 1. -
Page 44: Display
Configuring Your Stratus 7 Display The Display option allows you adjust the brightness and contrast of Stratus 7’s display to improve its visibility in different lighting conditions . You also can set the mode of the display screen to show channel name or category name information . - Page 45 Configuring Your Stratus 7 To change the display screen mode: 1. Press and hold menu until the menu options are displayed . 2. Press to scroll to and highlight Display and press the Select button . 3. Press to scroll to and highlight M o d e Mode and press the Select button .
-
Page 46: Audio Level
. Audio level is used to adjust Stratus 7’s volume level to match the volume of other audio sources you may use, such as a CD player, other FM stations, or an MP3 player . -
Page 47: Signal
Configuring Your Stratus 7 Signal For best reception, your Magnetic Mount Antenna should have an unobstructed view of the Sirius satellites . In large cities, terrestrial transmitters (ground repeaters) help increase the signal coverage . Your Stratus 7 can display the received strength of the satellite and terrestrial signals being received . -
Page 48: Factory Default
You can clear all of your personal settings, such as favorite channels, and return the Radio to its original out-of-the-box settings . To restore Stratus 7 to the factory defaults: NOTE! Restoring defaults permanently removes all personal settings . 1. Press and hold menu until the menu options are displayed . -
Page 49: Troubleshooting
Troubleshooting Stratus 7 has been designed and built to be trouble-free but if you experience a problem, try this: • Check that all connections are firm and secure . • Make sure the vehicle power socket is clean and free of corrosion . - Page 50 Troubleshooting If this happens: Try this: Radio does not power on • AC Power Adapter is not connected, or the AC outlet into which it is plugged is not working . • Check that the AC Power Adapter is connected to the home dock . Try plugging the AC Power adapter into a different outlet .
-
Page 51: Product Specifications
5 Volts DC, 1 .5A, Center Positive Operating Temperature: 5° to +40° C (23° to 104° F) Stratus 7 Radio Dimensions: 4 .5 in (W) x 1 .9 in (H) x 0 .7 in (D) 115 mm (W) x 48 mm (H) x 17 mm (D) Weight: 2 .3 oz (66 g) -
Page 52: Patent Information
(or derivative thereof ) except in compliance with applicable export laws, rules and regulations . The user of this or any other software contained in a Sirius XM Radio Inc is explicitly prohibited from attempting to copy, decompile, reverse engineer, hack, manipulate or disassemble the object code, or in any other way convert the object code into human-readable form . -
Page 53: Ic Statement
IC Statement Warning Changes or modifications not expressly approved by the manufacturer could void the user’s authority to operate the equipment . Canadian Compliance This Class B digital apparatus complies with Canadian ICES-003 . IC STATEMENT Operation is subject to the following two conditions: (1) this device may not cause interference, and (2) this device must accept any interference, including interference that may cause undesired operation of the device . -
Page 54: Copyrights And Trademarks
Copyrights and Trademarks © 2016 Sirius XM Canada Inc .“SiriusXM”, the SiriusXM logo, channel names and logos are trademarks of Sirius XM Radio Inc . and are used under license .“NFL” and the NFL Shield design are trademarks of the National Football League . -
Page 55: Owners Record
Owners Record The model number is located below and the Sirius ID is located on the label on the back of Stratus Record the Sirius ID in the space provided below . Refer to these numbers whenever you call your dealer regarding this product . Model Number: SSV7 Sirius ID:___________________________... -
Page 56: Template
Indoor/Outdoor Antenna Template 1-3/8” 1-1/8”... - Page 58 Sirius XM Canada Inc. 135 Liberty St. - 4th floor Toronto, Ontario, M6K 1A7 1-888-539-7474 © 2016 Sirius XM Canada Inc . Stratus 7 User Guide 161129a...
Need help?
Do you have a question about the Stratus 7 and is the answer not in the manual?
Questions and answers