SiriusXM ONYX EZR - Satellite Radio Quick Start Guide
- User manual (56 pages) ,
- User manual (48 pages) ,
- Quick start manual (2 pages)
Advertisement
- 1 What's in the Box
- 2 Find a Location for Onyx EZR and Mount it
- 3 Mount the Magnetic Mount Antenna
- 4 Route the Antenna Cable
- 5 Connect the PowerConnect Power Adapter
- 6 Verify Signal Reception
- 7 Connect the Audio
- 8 Button Functions
- 9 Subscribe
- 10 Main Display
- 11 Specifications
- 12 Documents / Resources
What's in the Box

Do not attempt to install, activate, or adjust any of the setting options described in this Quick Start Guide unless your vehicle is parked in a safe location.

Onyx EZR Radio

PowerConnect™ Vehicle Dock

Vent Mount and Extended Vent Clamps

Dash Mount

Antenna & Dash Mount Alcohol Preparation Pads

Screws (4)

Power Connect Power Adapter

Aux In Cable

Magnetic Mount Antenna
Find a Location for Onyx EZR and Mount it
Select either the Dash Mount method or the Vent Mount method for your Onyx EZR. You will need a phillips-head screwdriver to complete the installation.

To make the cable connections easier, wait until after you have connected all the cables to the dock before you attach the dock to the dash or to a vent.
Dash Mount Method
The air temperature needs to be at least 60°F to install the Dash Mount. If needed, turn on the heater in your vehicle.
- Select a flat surface for the Dash Mount with ample room for Onyx EZR. Avoid mounting on leather surfaces. Choose a location that doesn't interfere with the driver's vision or access to driving controls, one that won't interfere with the deployment of airbags or other safety equipment, and makes Onyx EZR easily accessible for operation. (Airbag locations are typically marked with "SRS" logos.)

- Orient the adhesive foot so that Onyx EZR is easily accessible. Loosen the knob and adjust the adhesive foot to position 1, 2, or 3, and then tighten it.

- Attach the Dash Mount to the PowerConnect Vehicle Dock using the 4 provided screws.
![]()
- Before you attach the Dash Mount to the dash, skip ahead and finish the remainder of the vehicle installation so that the cables are attached to the dock.
- Once the cables have been attached to the dock, clean the mounting surface in the vehicle with the alcohol preparation pad and let it dry thoroughly.
- Once the surface is dry, remove the adhesive liner. Press and hold the Dash Mount in place for 30 seconds. Allow the adhesive to cure for 2-4 hours.
![]()
- You can tilt the dock mounting plate in your preferred direction.
![]()


Vent Mount Method
- Select a vent with ample room for Onyx EZR, one that won't interfere with the deployment of airbags or other safety equipment, and makes Onyx EZR easily accessible for operation. (Airbag locations are typically marked with "SRS" logos.)

- Some vents have recessed louvers. If yours are recessed, remove the regular vent clamps and install the extended vent clamps.

- Attach the Vent Mount to the PowerConnect Vehicle Dock using the 4 provided screws.
![]()
- Before you attach the Vent Mount to the vent, skip ahead and finish the remainder of the vehicle installation so that the cables are attached to the dock.
- Once the cables have been attached to the dock, install the Vent Mount onto the vehicle vent. (Note that for clarity the illustrations below do not show the Vehicle Dock attached to the Vent Mount.)
- Insert the vent mount into the vent opening.
![]()
- Push until hooked on the rear of the vent louver. Rest the foot against the bottom of the vent.
![]()
- If necessary, adjust the tilt of the Vent Mount by repositioning the foot to a different tilt adjustment hole.
![]()
- Insert the vent mount into the vent opening.


Mount the Magnetic Mount Antenna


- Mount the Magnetic Mount Antenna outside your vehicle, on a clean and dry horizontal surface that will always face the sky.
- Choose the location for the antenna according to your type of vehicle. Center it between the left and right sides, and away from other antennas.
TIP: Use the Alcohol Prep Pad to clean the surface.
Route the Antenna Cable

NOTE: These instructions are for a sedan or coupe where the antenna is mounted above the front windshield. The Onyx EZR User Guide (with Vehicle Kit) has detailed antenna cable routing instructions for all types of vehicles. Go to www.siriusxm.com/ guides for the User Guide.
- Tuck the antenna cable under the windshield rubber molding and run it to the nearest corner.
- Route the cable out of the molding and into the rubber weather stripping around the door opening.
- Lift the weather stripping. Tuck and run the cable inside it to the bottom of the door opening. Replace the weather stripping.
- Pull the cable out and route it to Onyx EZR.
- Plug the Magnetic Mount Antenna connector into the silver ANT connector at the rear the PowerConnect Vehicle Dock.
![]()

TIP: Include enough slack in your routing to accommodate open doors or the hood lid. Coil any excess cable in a hidden location and keep it away from any vehicle pedals or controls.
Connect the PowerConnect Power Adapter
- Insert the PowerConnect Power Adapter into your vehicle's cigarette lighter or power adapter socket. Plug the other end into the red PWR connector at the rear of the PowerConnect Vehicle Dock.
![]()
- Use the wire guide on the top pf the dock to organize the wires connected to the dock.
![]()
- Place Onyx EZR into the dock and press the Power button.
![]()


Verify Signal Reception
- Be sure the vehicle is outside and the antenna has a clear view of the sky.
- Verify that you are receiving the XM signal. The Onyx EZR Radio should be tuned to XM channel 1, the XM Preview channel. There should at least be two bars on the lower left corner of the screen that denotes antenna signal strength. If not, be sure that you have mounted the antenna on the outside of the vehicle, as shown in step 2, and that the vehicle is parked outdoors with a clear view of the sky. Move the vehicle away from any obstructed area, for example, if you are parked in a garage, or parked near a large structure.

- You can also press menu and then press
![]() to scroll to and highlight Signal Indicator. Press the Select button. The Satellite and Terrestrial bars show the strength of the signal being received. If the signal reception is good, press and hold menu to return to XM channel 1, the XM Preview channel.
to scroll to and highlight Signal Indicator. Press the Select button. The Satellite and Terrestrial bars show the strength of the signal being received. If the signal reception is good, press and hold menu to return to XM channel 1, the XM Preview channel.

 to scroll to and highlight Signal Indicator. Press the Select button. The Satellite and Terrestrial bars show the strength of the signal being received. If the signal reception is good, press and hold menu to return to XM channel 1, the XM Preview channel.
Connect the Audio
Decide on one of the following in-box audio connection options. You can also refer to "Connect the Audio" in the Onyx EZR User Guide (with Vehicle Kit) for additional audio connection options, such as a cassette adapter or the FM Direct Adapter (FMDA) (both sold separately). Go to www.siriusxm.com/guides for the User Guide.
Option 1: Best: Use the provided Aux In Cable, if your vehicle's stereo system has an auxiliary input jack.
- Plug one end of the cable into the green AUDIO connector at the rear of the PowerConnect Vehicle Dock and the other end into the auxiliary input jack on the vehicle's stereo system.

- Turn on your vehicle's stereo system and set it to play from the auxiliary input source.
- You should hear XM Preview channel 1 through your vehicle's stereo system.
- Go back to Step 1 "Find a Location for Onyx EZR and Mount It" on the opposite side and finish installing the Dash or Vent Mount. Then the installation is complete.

TIP!
Refer to your vehicle's owner's manual to fi nd the location of the auxiliary input jack, or consult the vehicle dealer.
Option 2: Good: Use the PowerConnect feature of Onyx EZR. PowerConnect plays the XM audio through your vehicle's FM radio.
- Use the SiriusXM FM Channel Finder at www.siriusxm.com/fmchannel. Go to the website and enter your zip code. The Channel Finder will suggest a list of available FM channels in your area. For convenience, write down or print out the list.
- Pick the first FM channel on your list. Tune your vehicle's FM radio to this FM channel.
- Set your Onyx EZR to transmit on the same FM channel that you have selected on your vehicle's FM radio:
- Press menu and then press
![]() to scroll to and highlight FM Settings. Press the Select button.
to scroll to and highlight FM Settings. Press the Select button. - FM Channels will be highlighted. If it is not highlighted, press
![]() to scroll to and highlight FM Channels. Press the Select button.
to scroll to and highlight FM Channels. Press the Select button. - iii. Press to
![]() scroll to and highlight FM2. Press the Select button.
scroll to and highlight FM2. Press the Select button. - Press
![]() and
and ![]() to tune in steps of.2, or press
to tune in steps of.2, or press ![]() and
and ![]() to tune in steps of 1 to select the available FM channel you have chosen. Press the Select button to select the FM channel.
to tune in steps of 1 to select the available FM channel you have chosen. Press the Select button to select the FM channel. - Start Using will be highlighted. Press the Select button.
- The selected FM channel will be confirmed on the display screen. Press and hold menu to return to the main display screen.
![]()
- Press menu and then press
- You should now hear XM Preview channel 1 through your vehicle's FM radio. If you are not satisfied with the audio quality, move to the next FM channel on your list and repeat the process. Continue until you have found an FM channel with which you are satisfied.

- If you are satisfied with the audio quality, go back to Step 1 "Find a Location for Onyx EZR and Mount It" on the opposite side and finish installing the Dash or Vent Mount. Then the installation is complete.
 to scroll to and highlight FM Settings. Press the Select button.
 and
and  to tune in steps of.2, or press
  to tune in steps of 1 to select the available FM channel you have chosen. Press the Select button to select the FM channel.

TIP!
You may find an FM channel with static or silence on your vehicle's FM radio that does not work with your Onyx EZR. It is possible that some type of inaudible interference is present that prevents reception of the SiriusXM broadcast. Your only options are to use another FM channel or a di erent audio connection method.
Button Functions

FM Button
Press to access and cycle through FM presets; press and hold to access FM settings.
Up and Down Buttons
Press to preview and tune to channels through the channel lineup; also press to scroll through lists and highlight items in lists.
Power Button
Press to turn Radio on and off.
Menu Button
Press to access advanced features and confi guration options; when in confi guration options, press and hold to return to main display screen.
Left and Right Buttons
Press to search for channels by category.
Select Button
At the main display screen press to display and dismiss the favorite channel preview pane; press to confi rm selection of highlighted item in a menu or list.
Direct Button
Press to enter a channel number using the number buttons and directly tune to the channel.
TuneMix Button
Press to begin TuneMix; press and hold to add or remove channels from TuneMix.
Jump Button
Press to go back to the previous channel to which you were listening; press and hold to change display screen mode.
Number Buttons
Press to tune to a stored favorite channel; press and hold to store a favorite channel. Also used to enter channel numbers when the Direct button is pressed.
Subscribe
You can follow either the general activation and subscription process or use the on-board activation guide to activate your Onyx EZR and subscribe to the SiriusXM service.
General activation and subscription process:
- Make sure your Onyx EZR is turned on, receiving the XM signal, and tuned to XM Preview channel 1 so that you can hear SiriusXM audio.
- Make a note of your SiriusXM Radio ID. You can find it by selecting Radio ID in menu items, by tuning to channel 0, on a label on the bottom of the gift box, and on the label on the back of your Onyx EZR.

* The phone number shown above may di er from the one shown on your Onyx EZR. All numbers are valid.

NOTE!
The SiriusXM Radio ID does not use the letters I, O, S, or F.
- To subscribe:
- Online: Go to www.siriusxm.com/activatenow to access or set up an online account, subscribe to the service, and activate your Radio.
- By phone: Call 1-866-587-4225.
Activation usually takes 10 to 15 minutes after you have completed the subscription process, but may take up to an hour. We recommend that your Radio remain on until subscribed. Once subscribed, the Radio will receive and you can tune to the channels in your subscription plan.
Press  or
or to tune to other channels, and
  or
or to browse the di erent categories of channels. Learn what all the buttons do in the panel below.
Activation guide:
For your convenience, Onyx EZR has an on-board activation guide. You can activate your radio and subscribe to the XM service by using this guide, where you will be guided step-by-step through the subscription process. To access and use the guide, simply follow these steps:
- Turn Onyx EZR on and press the menu button.
- Activate Radio will be highlighted. Press the Select button.
- Follow the directions on each successive screen until you complete the subscription process.


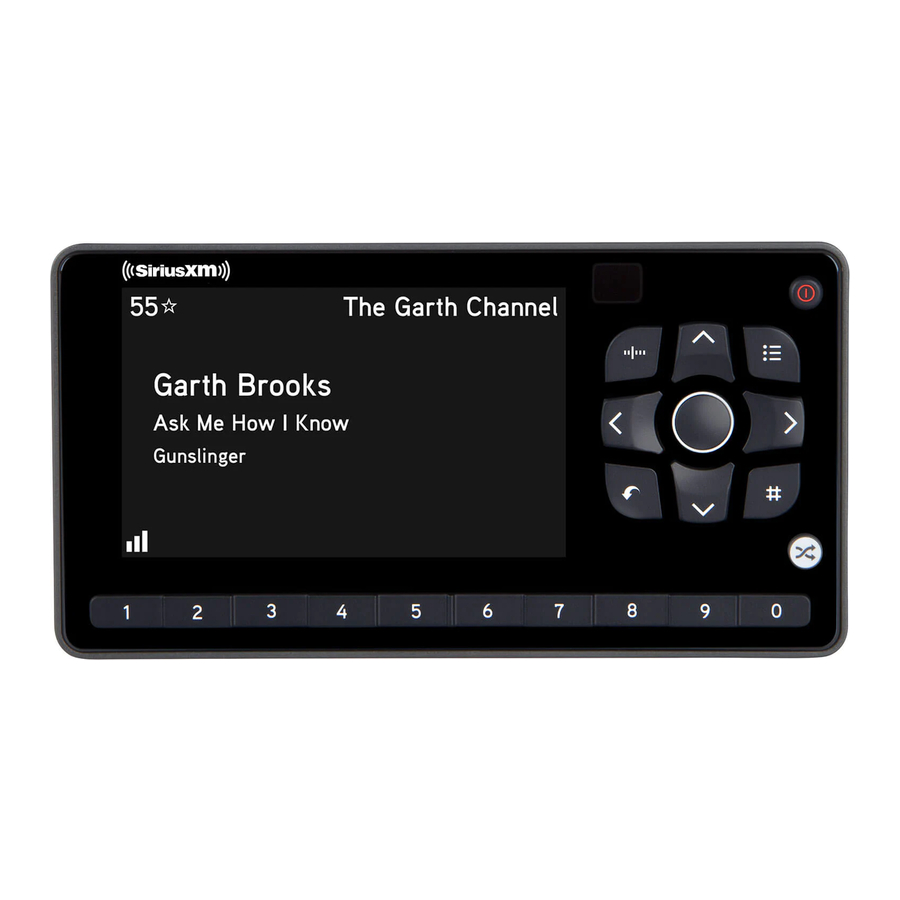
Main Display
When listening to a channel, information about the channel and what is currently playing is displayed.
The Onyx EZR User Guide is available at: www.siriusxm.com/guides.

Specifications
| System | |
| Power Requirements: | 9-16 V DC,500 mA (max) |
| Operating Temperature: | -4°F to +140°F (-20°C to +60°C) |
| Audio Output: | 1.0 Vrms (max) |
| Onyx EZR Radio | |
| Dimensions: | 5.0 in (W) x 2.7 in (H) x 0.72 in (D) 128 mm (W) x 68 mm (H) x 18.5 mm (D) |
| Weight: | 3.9 oz (111 g) |
| PowerConnect Vehicle Dock | |
| Dimensions: | 4.0 in (W) x 2.6 in (H) x 1.2 in (D) 102 mm (W) x 65 mm (H) x 31 mm (D) |
| Weight: | 1.6 oz (46 g) |
| Audio Connector: | 1/8 in (3.5 mm) female |
| Antenna Connector: | SMB male |
| PowerConnect Power Adapter | |
| Dimensions: | 3.7 in (W) x 1.7 in (H) x 1.3 in (D) 94 mm (W) x 43 mm (H) x 34 mm (D) |
| Weight: | 2.4 oz (69 g) |
| Input / Output: | 9-16 V DC / 5 V DC, 1.5 A |
| Cable Length: | Approximately 4.6 ft (1.4 m) |
| Vehicle Antenna | |
| Type: | SiriusXM Magnetic Mount |
| Connector: | SMB female, right angle |
| Cable Length: | Approximately 23 ft (7.0 m) |
| Aux In Cable | |
| Connectors: | 1/8 in (3.5 mm) stereo male to 1/8 in (3.5 mm) stereo male |
| Cable Length: | Approximately 4 ft (1.2 m) |
Sirius XM Radio Inc.
1221 Avenue of the Americas, 36th Floor
New York, NY 10020
siriusxm.com
1.866.635.2349

Documents / Resources
References
SiriusXM: Everything You Want to Hear Lives Here
Amazon.com: SiriusXM
Frequency
Activate Now | SiriusXM
SiriusXM: Everything You Want to Hear Lives Here
Download manual
Here you can download full pdf version of manual, it may contain additional safety instructions, warranty information, FCC rules, etc.
Download SiriusXM ONYX EZR - Satellite Radio Quick Start Guide
Advertisement


Need help?
Do you have a question about the ONYX EZR and is the answer not in the manual?
Questions and answers