Table of Contents
Advertisement
Available languages
Available languages
Quick Links
100000000/SP5663
USE AND CARE GUIDE
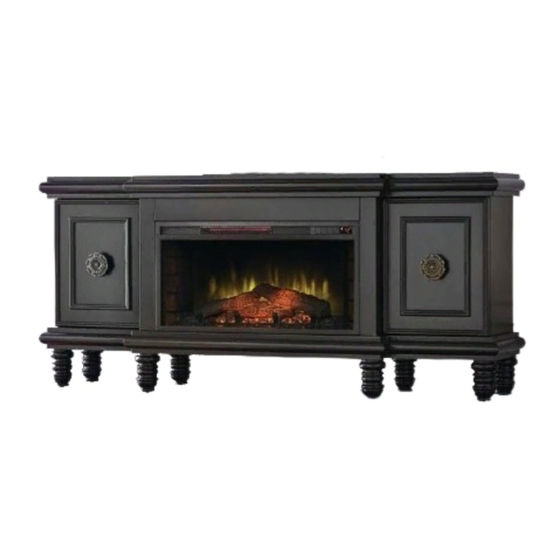
Athens 63 in. Media Console Electric Fireplace with Bluetooth in Black
QUESTIONS, PROBLEMS, MISSING PARTS? BEFORE RETURNING TO THE STORE,
CALL HOME DECORATORS COLLECTION CUSTOMER SERVICE
8 A.M. - 7 P.M., EST, MONDAY - FRIDAY, 9 A.M. - 6 P.M., EST, SATURDAY
1-800-986-3460
HOMEDEPOT.COM/HOMEDECORATORS
THANK YOU
continually create quality products designed to enhance your home. Visit us online to see our full line of products available for your home
improvement needs. Thank you for choosing Home Decorators Collection!
Advertisement
Chapters
Table of Contents

Related Manuals for Home Decorators Collection Athens SP5663


Summary of Contents for Home Decorators Collection Athens SP5663
- Page 1 8 A.M. - 7 P.M., EST, MONDAY - FRIDAY, 9 A.M. - 6 P.M., EST, SATURDAY 1-800-986-3460 HOMEDEPOT.COM/HOMEDECORATORS THANK YOU continually create quality products designed to enhance your home. Visit us online to see our full line of products available for your home improvement needs. Thank you for choosing Home Decorators Collection!
-
Page 2: Table Of Contents
Table of Contents Safety Information ............. 3 Assembly ..............7 Operation ..............14 Warranty ..............4 Fireplace Remote APP Download .......17 Pre-Assembly ............. 5 Tools Required ........... 5 Using the Fireplace Remote App ......Product ............5 FCC/IC Information ..........20 .............. -
Page 3: Safety Information
SAFETY INFORMATION Please read and understand this entire manual before attempting DANGER: If the information in this manual is not to assemble, operate or install the product. If you have any question followed exactly, an electric shock or re may result regarding the product, please call customer service at causing property damage, personal injury or loss of life. -
Page 4: Warranty
Safety Information (continued) Warranty ELECTRICAL CONNECTION □ A 15-amp, 120-volt, 60 Hz circuit with a properly grounded outlet is required. Metal Preferably, the replace will be on a dedicated circuit as other appliances on the Screw same circuit may cause the circuit breaker to trip or the fuse to blow when the Cover of heater is in operation. -
Page 5: Pre-Assembly
Pre-Assembly PLANNING ASSEMBLY □ Before you begin, locate the instructions and hardware. Be sure you have all of the parts and can identify them. □ To avoid scratching the nish, assemble the product on a soft, non-abrasive surface such as carpet or cardboard. □... -
Page 6: Package Contents
Pre-Assembly PACKAGE CONTENTS Part Description Quantity Part Description Quantity Base Insert Top Front Trim Top Panel Feet Side Panel Back Panel Inner Left Panel Shelf Inner Right Panel Door Insert Left Front Trim Insert (SP2814-IR-FGPBBT) Insert Right Front Trim Remote Control HOMEDEPOT.COM/HOMEDECORATORS Please contact 1-800-986-3460 for further assistance. -
Page 7: Assembly
Assembly Attaching plastic brackets Attach the Plastic Brackets (DD) to the Insert Top Front Trim (H) by using three Bolts (BB) shown as below. Attaching plastic brackets Attach the four Plastic Brackets (DD) to each Side Panel (C) by using four Bolts (BB) shown as below. HOMEDEPOT.COM/HOMEDECORATORS Please contact 1-800-986-3460 for further assistance. - Page 8 Assembly (continued) Attaching plastic brackets Installing the insert right front trim Attach six Plastic Brackets (DD) to the Inner Right Panel (E) Insert the Right Front Trim (G) to the Inner Right Panel (E) by using six Bolts (BB) shown as below. by using two Bolts (BB) shown as below.
- Page 9 Assembly (continued) Installing the hinge and handle Install the Handle (HH) to each Door (L) by inserting the bolts through the Doors (L) and turning clockwise into the Handle (HH). Installing the feet Screw the six Feet (B) to the Base (A) shown as below. HOMEDEPOT.COM/HOMEDECORATORS Please contact 1-800-986-3460 for further assistance.
- Page 10 Assembly (continued) Assembling the base Insert four Wooden Dowels (GG) into the pre-drilled holes in the Base (A) as shown. Install two Side Panels (C), Inner Right Panel (E) and Inner Left Panel (D) to the Base (A) by using eight Bolts (BB) as shown. Insert four Wooden Dowels (GG) into the pre-drilled holes in the Insert Top Front Trim (H).
- Page 11 Assembly (continued) Installing the back covers Install the Back Covers (J) by using sixteen Screws (CC) as shown. Installing the doors and shelves Tighten the screws to attach the hinges to the hinge plates on the Doors (L) as shown. Insert the eight Shelf Clips (AA) into the interior of the Side Panels (C, D &...
- Page 12 Assembly (continued) Installing the insert Loosen the pre-attached screws and remove the two mounting brackets attached to the back of the Insert Right Front Trim (G) and Insert Left Front Trim (F). Lift the replace insert carefully into the back of the unit and center in the insert in the opening.
- Page 13 Assembly (continued) Installing the Anti-tip over device Drill two holes into the wall and insert Wall Anchor (MM). Then install the Safety Mounting Tape (II) on the top rear of the Top Panel (I) using a Washer (LL) and Screw (JJ). Attach opposing side of the Safety Mounting Tape (II) using Washer (LL) and Screw (KK) fastened into Wall Anchor (MM).
-
Page 14: Operation
OPERATION Control Panel Display The replace can be operated by either the remote control or the control panel. HOMEDEPOT.COM/HOMEDECORATORS Please contact 1-800-986-3460 for further assistance. - Page 15 OPERATION (CONTINUED) Operation Powering the Fireplace Mode Button Push the Power button to supply power to all functions of Press the Mode button to cycle through the different the replace and put the insert in a standby mode. functions. Each time the Mode button is pressed, the mode will enter the next function - Temperature, Timer, Push the Power button again to turn off all functions.
- Page 16 OPERATION (CONTINUED) Operation Adjusting the Logset Brightness Adjusting the Flame Brightness The ame brightness mode should be used to set the ame The logset brightness mode should be used to set the brightness. logset brightness. Use Up or Down “ ”...
-
Page 17: Fireplace Remote App Download
Fireplace Remote App Download Operation DOWNLOAD THE FIREPLACE REMOTE APP To get started using the Fireplace Remote app, download the Fireplace Remote app from the iTunes App Store or Google Play App Store by searching for “Fireplace Remote Source Pro” or scan the QR code below for direct links to the iTunes and Google Play app stores. -
Page 18: Using The Fireplace Remote App
Using the Fireplace Remote App Operation To Connect Turn on the replace. Switch on Bluetooth on your mobile device. Fig. 1 Tap the side menu icon (Fig. 1). Tap "+" or "Add" icon (Fig. 2) and start searching for the replace nearby (Fig. - Page 19 Using the Fireplace Remote App (continued) Operation Control Screen (Fig. 10) Press "+" or "-" to adjust the Ember Bed Brightness settings: L0 (dimmest), L1, L2, L3, L4, L5 (brightest). Press "+" or "-" to adjust the Temperature settings: 59°F – 86°F (15°C – 30°C), ON, OFF. Press "+"...
-
Page 20: Fcc/Ic Information
FCC/IC Information Operation Please read and understand this entire manual before attempting to assemble, operate or install the product. This equipment has been tested and found to comply with the limits for a Class B digital device, pursuant to Part 15 of the FCC Rules. - Page 21 CARE AND MAINTENANCE (CONTINUED) Operation NOTE: When the heater is not in use, the heater should be stored in a dry location, away from possible damage. The power cord should be stored properly to avoid contact with hot or sharp objects. Replacing the Remote Control Battery When the remote control stops operating or its range seems reduced, it is time to replace the batteries.
-
Page 22: Troubleshooting
Troubleshooting Operation PROBLEM POSSIBLE CAUSE CORRECTIVE ACTION Check that unit is plugged into a standard 120 volt outlet. Then make sure No power, logs do not glow. The unit does not have power. power is set at “ON” position. E1 displayed on control panel. The overheat protection device Unplug the unit and wait 5-10 minutes to allow the sensor to reset itself. - Page 23 Questions, problems, missing parts? Before returning to the store call Home Decorators Customer Service 8 a.m. - 7 p.m., EST, Monday - Friday, 9 a.m. - 6 p.m., EST, Saturday 1-800-986-3460 HOMEDEPOT.COM/HOMEDECORATORS RETAIN THIS MANUAL FOR FUTURE USE. REV. 1...
- Page 24 GRACIAS Agradecemos la confianza que ha puesto en Home Decorators Collection a través de la compra de esta chimenea eléctrica. Nos esforzamos por crear continuamente productos de calidad diseñados para mejorar su hogar. Visítenos en Internet para ver nuestra línea completa de productos...
- Page 25 Índice Información de seguridad ........3 Ensamblaje .............. 7 Funcionamiento ............14 Garantía ..............4 Descarga de la aplicación remota de la chimenea .. 17 Pre-ensamblaje ............5 Herramientas requeridas ........... 5 Cómo usar la aplicación remota de la chimenea Especi caciones del producto ..........
-
Page 26: Información De Seguridad
Información de seguridad Por favor, lea y comprenda este manual completo antes de PELIGRO: Si no se sigue con exactitud la información en este intentar ensamblar, operar o instalar el producto. Si tiene manual, puede resultar un choque eléctrico o incendio ocasionando preguntas respecto al producto, llame a Servicio al Cliente daños a la propiedad, lesiones personales o la muerte. -
Page 27: Garantía
Información de seguridad (continuación) Warranty CONEXIÓN ELÉCTRICA □ Se requiere un circuito de 15 Amp, 120 Voltios, 60 Hz con un tomacorriente aterrizado Tornillo adecuadamente. De preferencia, la chimenea estará en un circuito dedicado, ya que metálico otros dispositivos en el mismo circuito podrían hacer que el disyuntor de circuito se Cubierta de active o el fusible explote cuando el calefactor esté... -
Page 28: Pre-Ensamblaje
Pre-ensamblaje PLANIFICACIÓN DEL ENSAMBLAJE □ Antes de comenzar, localice las instrucciones y el herraje. Asegúrese de tener todas las piezas y que pueda identi carlas. □ Para evitar rayar el acabado, ensamble este producto sobre una super cie suave no abrasiva, como una alfombra o cartones. □... -
Page 29: Contenido Del Paquete
Pre-ensamblaje CONTENIDO DEL PAQUETE Pieza Descripción Cantidad Pieza Descripción Cantidad Base Moldura frontal superior del inserto Panel superior Patas Panel lateral Panel trasero Panel izquierdo interno Repisa Panel derecho interno puerta Moldura frontal izquierda del inserto Inserto (SP2814-IR-FGPBBT) Moldura frontal derecha del inserto Control remoto HOMEDEPOT.COM/HOMEDECORATORS Póngase en contacto con el 1-800-986-3460 para asistencia adicional. -
Page 30: Ensamblaje
Ensamblaje Instalación de los soportes plásticos Instale los soportes plásticos (DD) a la moldura frontal superior del inserto (H) usando tres pernos (BB) como se muestra a continuación. Instalación de los soportes plásticos Instale los cuatro soportes plásticos (DD) en cada panel lateral (C) usando cuatro pernos (BB) como se muestra a continuación. HOMEDEPOT.COM/HOMEDECORATORS Póngase en contacto con el 1-800-986-3460 para asistencia adicional. - Page 31 Ensamblaje (continuación) Instalación de los soportes plásticos Instalación de la moldura frontal derecha del inserto Instale seis soportes plásticos (DD) en el panel derecho interno (E) usando seis pernos (BB) como se muestra Inserte la moldura frontal derecha (G) en el panel derecho a continuación.
- Page 32 Ensamblaje (continuación) Instalación de la bisagra y asa Instale el asa (HH) en cada puerta (L) insertando los pernos a través de las puertas (L) y girando hacia la derecha en el asa (HH). Instalación de las patas Atornille las seis patas (B) en la base (A) como se muestra a continuación. HOMEDEPOT.COM/HOMEDECORATORS Póngase en contacto con el 1-800-986-3460 para asistencia adicional.
- Page 33 Ensamblaje (continuación) Ensamblaje de la base Inserte cuatro espigas de madera (GG) en los agujeros pre-perforados en la base (A) como se muestra. Instale dos paneles laterales (C), el panel derecho interno (E) y el panel izquierdo interno (D) en la base (A) usando ocho pernos (BB) como se muestra.
- Page 34 Ensamblaje (continuación) Instalación de las cubiertas traseras Instale las cubiertas traseras (J) usando dieciséis tornillos (CC) como se muestra. Instalación de las puertas y las repisas Apriete los tornillos para sujetar las bisagras a las placas de la bisagra en las puertas (L) como se muestra. Inserte los ocho ganchos de repisa (AA) en el interior de los paneles laterales (C, D y E).
- Page 35 Ensamblaje (continuación) Instalación del inserto A oje los tornillos pre-instalados y retire los dos soportes de montaje instalados en la parte de atrás de la moldura frontal derecha del inserto (G) y la moldura frontal izquierda del inserto.(F). Levante con cuidado el inserto de la chimenea en la parte de atrás de la unidad y centre en la abertura del inserto.
- Page 36 Ensamblaje (continuación) Instalación del dispositivo anti-vuelco. Perfore dos agujeros en la pared e inserte el ancla de pared (MM). Luego instale la cinta de montaje de seguridad (II) sobre la parte trasera superior del panel superior (I) usando una arandela (LL) y tornillo (JJ). Instale el lado opuesto de la cinta de montaje de seguridad (II) usando arandela (LL) y tornillo (KK) sujetados en el ancla de pared (MM).
-
Page 37: Funcionamiento
Funcionamiento Panel de control Pantalla La chimenea puede ser operada por el control remoto o por el panel de control. HOMEDEPOT.COM/HOMEDECORATORS Póngase en contacto con el 1-800-986-3460 para asistencia adicional. - Page 38 Funcionamiento (continuación) Operation Cómo energizar la chimenea Botón de modo Presione el botón de encendido para suministrar energía Presione el botón de modo para alternar a través de las a todas las funciones de la chimenea y ponga el inserto diferentes funciones.
- Page 39 Funcionamiento (continuación) Operation Ajuste de la luminosidad del Ajuste de la luminosidad de la llama conjunto de leños El modo de luminosidad de la llama se debe usar para ajustar la luminosidad de la llama. El modo de luminosidad del conjunto de leños se debe usar Use los botones Up o Down (arriba o abajo) “...
-
Page 40: Descarga De La Aplicación Remota De La Chimenea
Descarga de la aplicación remota de la chimenea Operation DESCARGA DE LA APLICACIÓN REMOTA DE LA CHIMENEA Para comenzar a usar la aplicación remota de la chimenea, descargue la aplicación remota de la chimenea de iTunes App Store o Google Play App Store buscando “Fireplace Remote Source Pro”... -
Page 41: Cómo Usar La Aplicación Remota De La Chimenea
Cómo usar la aplicación remota de la chimenea Operation Para conectar Encienda la chimenea Encienda al Bluetooth en su dispositivo móvil. Fig. 1 Toque el ícono del menú lateral (Fig. 1). Toque "+" o el ícono "Add" (Fig. 2) y comience a buscar la chimenea más cercana (Fig. - Page 42 Cómo usar la aplicación remota de la chimenea Operation (continuación) Pantalla de control (Fig. 10) Presione "+" o "-" para ajustar las con guraciones de luminosidad de la cama de brazas. L0 (más atenuada), L1, L2, L3, L4, L5 (más brillante). Presione "+"...
-
Page 43: Información De Fcc/Icc
Información de FCC/ICC Operation Por favor, lea y comprenda este manual completo antes de intentar ensamblar, operar o instalar el producto. Este equipo ha sido probado y encontrado en cumplimiento con los límites correspondientes a un dispositivo digital de la Clase B, conforme a la Parte 15 de las Reglas de la FCC. - Page 44 Cuidado y mantenimiento (continuación) Operation NOTA: Cuando el calefactor no esté en uso, debe ser almacenado en un lugar seco, lejos de posibles daños. El cable eléctrico se debe guardar adecuadamente para evitar el contacto con objetos calientes o losos. Cambio de la batería del control remoto Cuando el control remoto deja de funcionar o su rango parece reducido, es momento de cambiar las baterías.
-
Page 45: Resolución De Fallas
Resolución de fallas Operation PROBLEMA POSIBLE CAUSA ACCIÓN CORRECTIVA Compruebe que la unidad esté conectada en un tomacorriente estándar No hay energía, los leños La unidad no tiene energía. de 120 voltios. Luego asegúrese de que la energía esté en la no brillan posición “ON”. - Page 46 ¿Tiene preguntas, problemas, o faltan piezas? Antes de regresar a la tienda, llame a servicio al cliente de Home Decorators Collection de lunes a viernes de 8 a.m. a 7 p.m., sábado de 9 a.m. a 6 p.m.,hora local del Este 1-800-986-3460 HOMEDEPOT.COM/HOMEDECORATORS...
Need help?
Do you have a question about the Athens SP5663 and is the answer not in the manual?
Questions and answers