Table of Contents
Advertisement
Quick Links
Advertisement
Table of Contents

Related Manuals for Aercus WS2085


Summary of Contents for Aercus WS2085
- Page 1 WS2085 PROFESSIONAL WIRELESS WEATHER STATION WITH USB UPLOAD...
-
Page 2: Usb Upload
WS2085 PROFESSIONAL WIRELESS WEATHER STATION WITH USB UPLOAD Operation Manual About This Manual Thank you and congratulations on selecting this professional weather station. We are positive you will enjoy the benefits of accurate weather readings and information that our weather stations offer. This manual will guide you step-by-step through setting up your device. -
Page 3: Getting Started
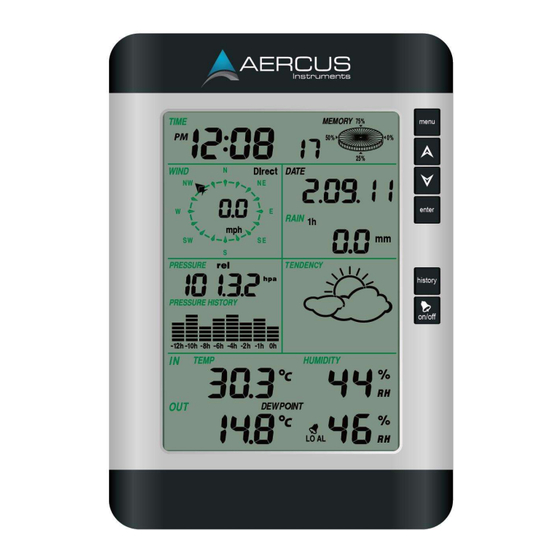
Getting Started The WS2085 weather station includes a base station (receiver), a transmitter unit, one wind direction sensor, one wind speed sensor, one rain gauge, one USB cable and a downloadable software. 1. Time 2. Wind Speed and Direction 3. Barometric Pressure 4. -
Page 4: Important Notes
Note: The performance of Alkaline batteries can be significantly reduced in colder environments resulting in loss of signal. In this case we recommend the use of Lithium batteries in the thermo-hygro sensor. Aercus Instruments™ - WS2085 P a g e... -
Page 5: Setup - Sensors
5. Bubble level 6. Antenna 7. U-Bolt 8. Battery compartment 9. Reset button 10. LED Indicator: light on for 4s if the unit power up. The LED will flash once every 48 seconds Aercus Instruments™ - WS2085 P a g e... - Page 6 Figure 5 (left). Tighten the set screw, with a Philips screwdriver (size PH0), as shown on the right. Make sure the cup assembly can rotate freely. There should be no noticeable friction when it is turning. Aercus Instruments™ - WS2085 P a g e...
-
Page 7: Install Wind Vane
Insert 2xAA batteries into the battery compartment and tighten the screw of battery cover. The LED indicator on the back of the transmitter will turn on for four seconds and flash every 48 seconds. Figure 7: Battery installation diagram Aercus Instruments™ - WS2085 P a g e... -
Page 8: Mount Outdoor Sensor
Reference Figure 8, the mounting assembly includes two U-Bolts and a bracket that tightens around a 2.5cm to 5cm diameter pole (not included) using the four U-Bolt nuts. Aercus Instruments™ - WS2085 P a g e... - Page 9 Using a bent-open paperclip, press and hold the RESET BUTTON (see Figure 10) to affect a reset: the LED turns on while the RESET button is depressed, and you can release the button. The LED should then resume as normal, flashing approximately once every 48 seconds. Aercus Instruments™ - WS2085 P a g e...
- Page 10 The following is a table of reception loss vs. the transmission medium. Each “wall” or obstruction decreases the transmission range by the factor shown below. Medium RF Signal Strength Reduction Glass (untreated) 5-15% Plastics 10-15% Wood 10-40% Brick 10-40% Concrete 40-80% Metal 90-100% Aercus Instruments™ - WS2085 10 | P a g e...
- Page 11 Australia (WA) Central time (N. America) South Africa Mountain time (N. America) Eastern Europe Pacific time (N. America) Western/Central Europe Alaska time (N. America) United Kingdom/GMT Hawaii time (N. America) Aercus Instruments™ - WS2085 11 | P a g e...
- Page 12 Wind speed high alarm (press ON/OFF to enable/disable). If the alarm is enabled, an alarm symbol appears in the display. Wind direction alarm (press ON/OFF to enable/disable). If the alarm is enabled, an alarm symbol appears in the display. Aercus Instruments™ - WS2085 12 | P a g e...
- Page 13 Met Service or Bureau of Meteorology websites. Absolute pressure is selected, skip this step. Pressure high alarm (press ON/OFF to enable/disable). If the alarm is enabled, an alarm symbol appears in the display. Aercus Instruments™ - WS2085 13 | P a g e...
-
Page 14: Pressure Bar Graph
3 hours indicating the storm warning feature has been activated. Aercus Instruments™ - WS2085 14 | P a g e... -
Page 15: Indoor Temperature
Outdoor temperature low alarm (press ON/OFF to enable/disable). If the alarm is enabled, an alarm symbol appears in the display. Maximum temperature (since last reset). Resetting the maximum outdoor temperature value - Aercus Instruments™ - WS2085 15 | P a g e... -
Page 16: Outdoor Humidity
Base Station. Reset To Factory Default Settings While in normal display, press and hold the UP key for 20 seconds to reset all settings to the manufacturer’s default settings. Aercus Instruments™ - WS2085 16 | P a g e... - Page 17 PC Connection An important feature of the WS2085 is the capability for the recorded data to be downloaded, stored and displayed on your PC. Data Storage The Base Station allows the internal storage of up to 4,080 complete sets of weather data with time and date.
-
Page 18: Troubleshooting
Insecurely mounted sensor trees can also sway in strong winds and cause false rain readings. Aercus Instruments™ - WS2085 18 | P a g e... -
Page 19: Specifications
Genuine faults can typically be diagnosed without requiring the unit to be returned and replacement parts sent quickly if needed. For all others please contact the retailer who sold you this item. Aercus Instruments™ - WS2085 19 | P a g e... - Page 20 - or their consequences. DECLARATION DE CONFORMITE UE Par la présente, Aercus Instruments, déclare que cette station météo sans fil (Modèle : WS3085) est conforme aux exigences essentielles et autres dispositions pertinentes de la Directive 1999/5/CE. Une copie de la Déclaration de conformité datée et signée est disponible sur simple demande auprès de contact@aercusinstruments.com.
Need help?
Do you have a question about the WS2085 and is the answer not in the manual?
Questions and answers