Table of Contents
Advertisement
Quick Links
Advertisement
Table of Contents

Related Manuals for VARSITY Scoreboards VSBX-642LED


Summary of Contents for VARSITY Scoreboards VSBX-642LED
- Page 1 OPERATION INSTRUCTIONS MODEL VSBX-642LED www.varsityscoreboards.com...
-
Page 2: Table Of Contents
Table of Contents CONTROLLER DEFINITIONS ..........................3 COMMUNICATION CABLES ..........................4 Connecting a Hard Wired Cable: ........................4 Connecting a Wireless Transmitter: ......................4 GETTING STARTED ............................... 5 A Note about the LCD Display: ........................5 OPTIONS MENU ..............................6 Changing Game Modes: ............................ -
Page 3: Controller Definitions
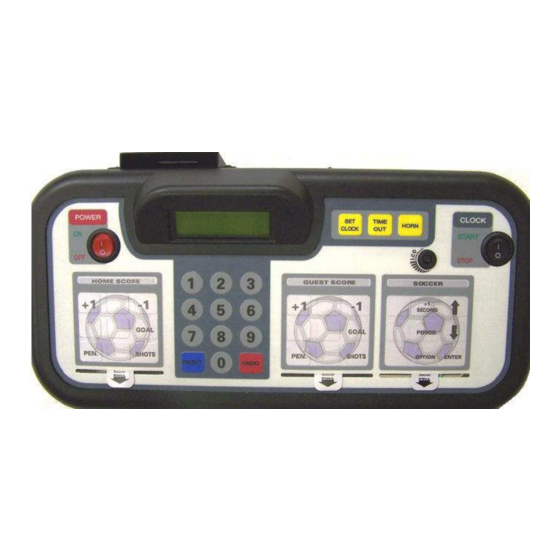
CONTROLLER DEFINITIONS Before continuing, take a few moments and familiarize yourself with the following terms as they apply to the controller. They are referenced frequently throughout this manual. 1. POWER Switch: The POWER switch is used to turn the controller ON and OFF. 2. -
Page 4: Communication Cables
COMMUNICATION CABLES Connecting a Hard Wired Cable: 1. Using the supplied 20-ft. DIN cable, connect one end to either of the DIN sockets on back of the controller and the other end to the junction box receptacle. 2. Connect the AC Adapter to the power jack on the back of the controller and into a standard 120V power source. -
Page 5: Getting Started
GETTING STARTED Begin by making sure the Game Inserts that came with your scoreboard are in the proper location on the controller, as in the image below. A Note about the LCD Display: The LCD display provides the scorer with any information that the scoreboard will display. The Up/ Down Arrows on the GAME Keypad are used to scroll the information on the LCD Display. -
Page 6: Options Menu
OPTIONS MENU The scoreboard controller is configured with default settings. Use this section of the Operating Instructions manual to make changes to the default settings. To access the Options Menu the controller must first be in “game” mode. When the controller is turned on and either RESET or ENTER has been pressed to begin game play the controller is in “game”... -
Page 7: Game Settings
GAME SETTINGS Time of Day Function (T.O.D.): The <TIME OF DAY> function in the SOCCER option menu will display the time of day on the controller’s LCD and the scoreboard clock but disables all scoring functions. To set the time of day using the <TIME OF DAY>... -
Page 8: 0.1 Sec Enable
i. Example: To enter a time of 90 minutes, press 9, 0, 0, 0, then ENTER. To enter a time of 8 minutes, press 0, 8, 0, 0, then ENTER. 0.1 SEC ENABLE: Displays tenths of a second when the game clock counts down to less than zero. 1. -
Page 9: Period
keypad. 2. To decrease either score by one, press the -1 appropriate key on the appropriate team’s keypad. Period: • To increase the PERIOD by one (1), press the PERIOD key. Half: • To change the half indicator from 1 to 2nd and vice versa, press the PERIOD key. - Page 10 NOTICE: This equipment has been tested and found to comply with the limits for a Class A digital device, pursuant to Part 15 of the FCC Rules. These limits are designed to provide reasonable protection against harmful interference when the equipment is operated in a commercial environment. This equipment generates, uses, and can radiate radio frequency energy and, if not installed and used in accordance with the instruction manual, may cause harmful interference to radio communications.
Need help?
Do you have a question about the VSBX-642LED and is the answer not in the manual?
Questions and answers