Table of Contents
Advertisement
Quick Links
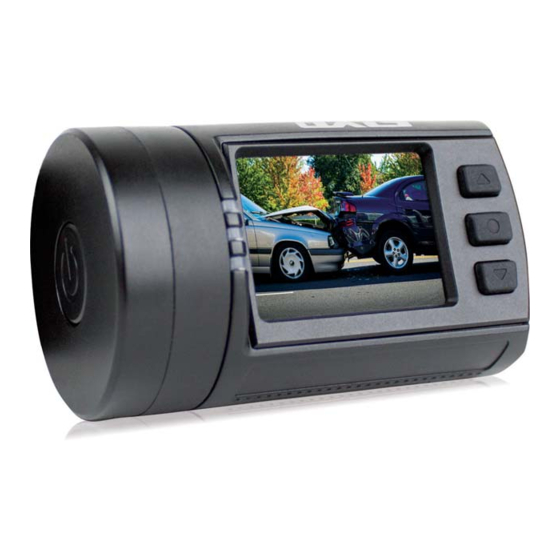
DVR6
COMPACT SUPER HD DVR with GPS & 256GB SUPPORT
SPECIFICATIONS
GENERAL
- Display;
- Chipset:
- Image Sensor:
- Resolutions:
- Lens Viewing Angle:
- Memory Support:
- GPS Function:
- Mapping Data:
- G-Sensor:
- Motion Detection:
- Lane Departure Warning:
- Seamless loop recording:
- Auto Record:
- Outputs:
- PC Interface:
- Power Supply:
- Battery:
- Dimensions:
- Mounting:
INCLUDED
- 12/24V Car Charger
- Hardwire Power Kit
- GPS Antenna Glass Mount
- Micro USB Lead
INSTRUCTION MANUAL
1.5" TFT LCD
Ambarella A7LA50
4MP CMOS
Super HD 2304x1296p, 2560x1080p,
1920x1080p, 1280x720p 30/60fps
135°
2 x 128GB Micro SD Card (Not Included)
Yes
Route, Speed, G-Sensor Data
Yes
Yes
Yes
Yes
Yes - After Power On
HDMI
USB
12/24V Cig Lead
Built-in Lithium Battery
68W x 39H x 47Dmm (Without Mount)
2 Sided Tape (Included)
1 1
1
Advertisement
Table of Contents

Related Manuals for Axis Ambarella A7LA50


Summary of Contents for Axis Ambarella A7LA50
- Page 1 DVR6 COMPACT SUPER HD DVR with GPS & 256GB SUPPORT SPECIFICATIONS GENERAL - Display; 1.5” TFT LCD - Chipset: Ambarella A7LA50 - Image Sensor: 4MP CMOS - Resolutions: Super HD 2304x1296p, 2560x1080p, 1920x1080p, 1280x720p 30/60fps - Lens Viewing Angle: 135°...
-
Page 2: Table Of Contents
CONTENTS PRECAUTIONS ...................... 2 QUICK START GUIDE ..................3 UPGRADING ......................3 PRODUCT STRUCTURE ................... 4 OPERATION ......................6 SETTINGS ........................ 8 USER INTERFACE & PLAYER ................. 14 MOUNTING ......................15 POWER SOURCE ....................16 TROUBLESHOOTING ..................17, 18 CODECS ........................18 NOTES ........................ -
Page 3: Quick Start Guide
QUICK START GUIDE - 1) Connect the supplied hardwire kit or insert the lighter charger into the cigarette socket and power on the DVR6. - 2) After the DVR automatically turns on, hold the UP button to access the menu. Press the UP and DOWN buttons to navigate the menu. -
Page 4: Product Structure
PRODUCT STRUCTURE 1 - Mount 2 - Top cooling holes 3 - Speaker holes 4 - CPL mounting bar 5 - Lens 6 - Front cooling holes 7 - Bottom cooling holes 8 - Side cooling holes 9 - Power indicator 10 - Recording indicator 11 - GPS/MIC indicator 12 - HDMI output... - Page 5 14 - TFT screen 15 - Mounting contacts 16 - UP button 17 - OK button 18 - DOWN button 19 - MIC holes 20 - MicroUSB port 21 - Card A slot 22 - POWER button 23 - Mount 24 - MicroUSB port 25 - VHB port 26 - Mounting contacts...
-
Page 6: Operation
OPERATION TURN CAMERA ON/OFF - Turn on by pressing the power button (22) - It receives power eg - when vehicle engine is started. - It loses power eg - when vehicle engine is stopped. - It is in standby for a long time without any button pressed. - When the internal battery runs out if there is no external power supply. - Page 7 PLAYBACK ON TV - When the camera is connected to a TV with a HDMI cable, the camera screen will turn playback on the camera. - To connect a TV for playback via an AV connection, use the customised AV-out cable (optional accessory).
-
Page 8: Settings
BEFORE USING IMPORTANT!! BEFORE USING, PLEASE FOLLOW INSTRUCTIONS BELOW FORMAT CARDS 1. Format both micro SD cards in a computer (FAT32). 2. Put both cards into the DVR6 and turn the DVR6 on. 3. In the settings > ‘choose card’, select card A. 5. - Page 9 PHOTO RESOLUTION - Here you can choose the photo resolution. Higher resolution photos will take more storage space. Options: 13MP (4800 x2700 16:9) 9MP (4000 x2250 16:9) 4MP (2688 x1512 16:9) PHOTO QUALITY and contact. Better quality photos will take more storage space. Options: SUPERFINE FINE...
- Page 10 SETTINGS FLICKER your country is unknown. Options: AUTO 60HZ 50HZ ROTATE IMAGE 180° - When you want to mount the camera up-side-down, the setting will rotate the recorded image 180° so the correct orientation will appear on your TV/computer. - The button functions will change at the same time so that the UP button is still at the top when the camera is rotated.
- Page 11 15 seconds after the motion stops. Here you can set the detection sensitivity. Options: MIDDLE HIGH BOOT SOUND Options: AV OUT Options: GREEN INDICATOR Options: GPS STATUS MIC STATUS G-SENSOR SENSITIVITY - The G-Sensor is used to detect 3-axis impacting forces. If any impact over the Options: 2.5G 3.5G 4.5G...
- Page 12 SETTINGS POWER OFF DELAY - If there are no button actions when the camera is in standby, the camera will auto Options: 1 MIN 3 MIN 5 MIN SCREEN OFF DELAY - If there are no button actions when the camera is on standby or recording, the camera Options: 15 SEC 30 SEC...
- Page 13 DATE STAMPING Options: YYMMDD MMDDYY DDMMYY TIME STAMPING Options: 12 HOURS 24 HOURS DATE AND TIME - Here you can set the system date and time. The date/time information will be automatically updated if GPS satellites are connected. 2016/11/11 12:12 time zone date time...
-
Page 14: User Interface & Player
UI & PLAYER * NOT AVAILABLE COMPUTER PLAYBACK: VIDEO MAP AREA AREA CONTROL PROGRESS VIDEO G-SENSOR DATA FILE BROWSER SPEED... -
Page 15: Mounting
MOUNTING CAMERA SPECIFICATIONS The DVR6 camera is designed for easy & quick mounting to your windscreen with the adhesive pad. 1) Mount the camera to the mounting bracket with power cable plugged into either the mount or camera body. 2) Check for a suitable position on the windscreen with the camera powered on. mount bracket or use the adhesive pads in the accessory bag. -
Page 16: Power Source
POWER SOURCE to HEAD LIGHTS DVR6 to FUSE CONSOLE - The DVR6 camera can be powered by the lighter socket lead or hardwire kit. - The lighter power socket is an easy & fast connecting method. - The hardwire kit is a tidy solution. The 12V leads are connected to the car fuse or vehicle battery and the 5V lead is connected to your camera. -
Page 17: Troubleshooting
TROUBLESHOOTING CANT RECORD A VIDEO OR TAKE A PICTURE Please check that there is enough storage space on the MicroSD card, or if you have CAMERA STOPS RECORDING OCCASIONALLY high speed Class 10 MicroSD card. “FILE ERROR” MESSAGE DURING VIDEO OR IMAGE PLAYBACK Corrupt data storage or card may have come to end of it’s cycle life. -
Page 18: Codecs
TROUBLESHOOTING THE CAMERA CONTINUES AUTOMATIC RECORDING AND WONT STOP Maybe the camera is working on Motion Detect mode. Check whether there is an icon on the screen. When the Motion Detection is ON, it will auto start recording when a moving object appears within the range of camera. -
Page 19: Notes
NOTES... - Page 20 DVR6 JS007WQK...
Need help?
Do you have a question about the Ambarella A7LA50 and is the answer not in the manual?
Questions and answers