Advertisement
Quick Links
ASSEMBLY INSTRUCTIONS
ASSEMBLY RATING
The Assembly Rating is a 5-point
system that shows the degree of effort
needed in assembling a specific
product (with 1 being easy and 5 being
difficult). For most products, two
persons are recommended.
EASY
YNJ-1862C2
DIFFICULT
Page 1
E-commerce-Enitial Lab
Tools Required for Assembly
Allen Wrench
Phillips Screwdriver
Hammer
2 PERSON RECOMMENDED
(Included)
(Not Included)
(Not Included)
18.04.17
Advertisement

Related Manuals for Furniture of America YNJ-1862C2


Summary of Contents for Furniture of America YNJ-1862C2
- Page 1 E-commerce-Enitial Lab ASSEMBLY INSTRUCTIONS YNJ-1862C2 Tools Required for Assembly ASSEMBLY RATING The Assembly Rating is a 5-point Allen Wrench system that shows the degree of effort (Included) needed in assembling a specific product (with 1 being easy and 5 being Phillips Screwdriver difficult).
- Page 2 Thank you for your purchase! We hope you will enjoy your new product for many years to come. Our commitment to providing quality products does not simply end when a purchase is made. We stand behind our products and will provide any support needed in order for you to fully enjoy your purchase.
- Page 3 Page 3...
- Page 4 PRE-ASSEMBLY INTRODUCTION Unless you are particularly adept at assembling flat-pack/knock-down furniture, we understand building ready-to-assemble furniture can be a frustrating experience for some. To help avoid confusion and to make the assembly process quicker and smoother, we have provided some helpful tips.
- Page 5 CAM LOCK FASTENER ASSEMBLY INSTRUCTIONS Page 5...
-
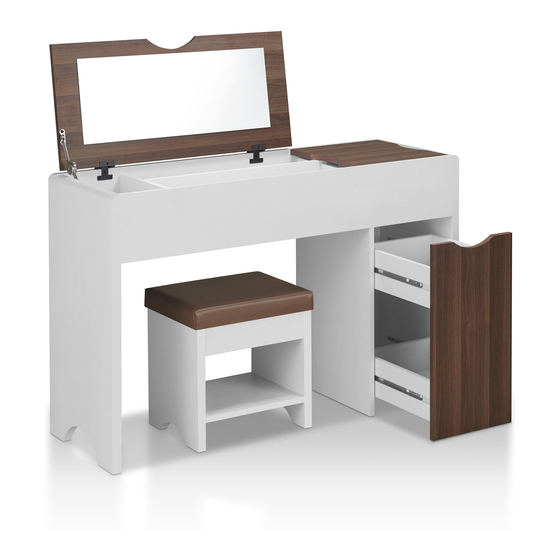
Page 6: Parts List
VANITY TABLE ASSEMBLY INSTRUCTIONS MODEL # YNJ-1862C2 Please keep for future reference PARTS LIST 2PCS 2PCS 2PCS DIMENSIONS 47.24" (W) X15.75" (D) X29.92" (H) 2PCS DIMENSIONS 15.75" (W) X11.81" (D) X15.94" (H) Before you begin, please read "Assembly and Care Advice","Pre-... -
Page 7: Get Ready
VANITY TABLE MODEL #YNJ-1862C2 Get Ready. Please group boards as below. 2PCS 2PCS 2PCS 2PCS Drawer Body Mirror /Top Panel 2PCS 2PCS Chair Page 7... - Page 8 ASSEMBLY INSTRUCTIONS Align hinges (#8) to panel (#B), STEP1 then secure by using screws (#9). Hardware #1=10pcs Hardware #3=10pcs Hardware #8=2pcs Hardware #9=6pcs Hardware #10=2pcs Use a dab of glue in dowel holes before inserting dowels (#3). Page 8...
- Page 9 ASSEMBLY INSTRUCTIONS Align hinge (#7) to panel (#F), STEP2 then secure by using screws (#7). Hardware #1=12pcs Hardware #3=3pcs Hardware #7=1set + 2pcs Page 9...
- Page 10 ASSEMBLY INSTRUCTIONS STEP3 Hardware #1=13pcs Hardware #3=11pcs Page 10...
- Page 11 ASSEMBLY INSTRUCTIONS STEP4 Hardware #1=4pcs Hardware #3=4pcs STEP5 Hardware #2=4pcs Please refer to page 5 on how to fasten cam locks(#2) to cam bolts (#1). Align and secure side panels (#O,P) to front panel (#N) by using cam locks (#2), then slide bottom panel (#W) through the grooves of the side panels (#O,P).
- Page 12 ASSEMBLY INSTRUCTIONS STEP6 Hardware #4=8pcs STEP7 Hardware #2=2pcs Hardware #5=2pcs Page 12...
- Page 13 ASSEMBLY INSTRUCTIONS STEP8 Hardware #2=5pcs Hardware #5=2pcs Page 13...
- Page 14 ASSEMBLY INSTRUCTIONS STEP9 Hardware #2=8pcs Flip 180 Degrees Page 14...
- Page 15 ASSEMBLY INSTRUCTIONS STEP10 Hardware #2=3pcs Hardware #11=6pcs Page 15...
- Page 16 ASSEMBLY INSTRUCTIONS STEP11 Hardware #2=5pcs Hardware #9=6pcs Hardware #13=1pc Align hinges on panel (#B) to panel (#E), then secure by using screws (#9). Page 16...
- Page 17 ASSEMBLY INSTRUCTIONS STEP12 Hardware #6=4pcs Hardware #7=2pcs Align hinge to panel (#B), then secure by using screws (#7). Extend the two outer slides of the runners so that they could align with the sides of the drawer. Make sure the pre-drilled holes from the drawer align with the screw holes of the outer slides.
- Page 18 ASSEMBLY INSTRUCTIONS STEP13 Hardware #2=8pcs Hardware #11=4pcs Unfinished Finished Page 18...
- Page 19 ASSEMBLY INSTRUCTIONS STEP14 Hardware #2=4pcs Make sure the product is rested on a flat surface and does not feel loose or wobbly. If it does, double check that the bolts/screws are secured and properly tightened. ASSEMBLY IS COMPLETED Page 19...
Need help?
Do you have a question about the YNJ-1862C2 and is the answer not in the manual?
Questions and answers