Table of Contents
Advertisement
Advertisement
Table of Contents

Related Manuals for Encore ENHWI-N


Summary of Contents for Encore ENHWI-N
- Page 1 ENHWI-N ENCORE 802.11n Wireless Router User Manual...
-
Page 2: Ce Mark Warning
No part of this document can be copied or reproduced in any form without written consent from the company. Trademarks: All trade names and trademarks are the properties of their respective companies. Copyright © Encore Electronics, Inc. 2007, All Rights Reserved. -
Page 3: Table Of Contents
Power Connection ································································································ 4 Restore Default Button ························································································· 4 Network configuration setup ························································································ 5 Computer configuration setup······················································································ 5 Wireless Router configuration setup ············································································ 7 Network Setting ··········································································································· 9 WAN Interface Setup ···························································································· 9 LAN Interface Setup ··························································································· 13 QoS Settings ······································································································ 15 Wireless Settings ·······································································································... - Page 4 Config ················································································································· 44 Firmware Upgrade······························································································ 45 Information················································································································· 45 System Information····························································································· 45 Packet Statistics ································································································· 46 Routing Table······································································································ 46 System Log ········································································································ 47 Logout························································································································ 47 Logout ················································································································ 47 Reboot················································································································ 47...
-
Page 5: Unpacking Information
Unpacking Information Thank you for purchasing ENCORE 802.11n Wireless Router. Before you start, please check all the contents of this package. The product package should include the following: 1. One Wireless Router 2. One power adapter 3. One User Manual (CD) 4. -
Page 6: Key Features
Key Features The switch provides the following key features: Compatible with IEEE 802.11n, 802.11g/b wireless standards. Provides three 802.11n/g/b wireless Reverse SMA detachable antennas High speed transfer data rate up to 300Mbps Supports wireless data encryption with 64/128-bit WEP, WPA and WPA2 Supports authentication for wireless connectivity based on ESSID Supports Multiple BSSID. -
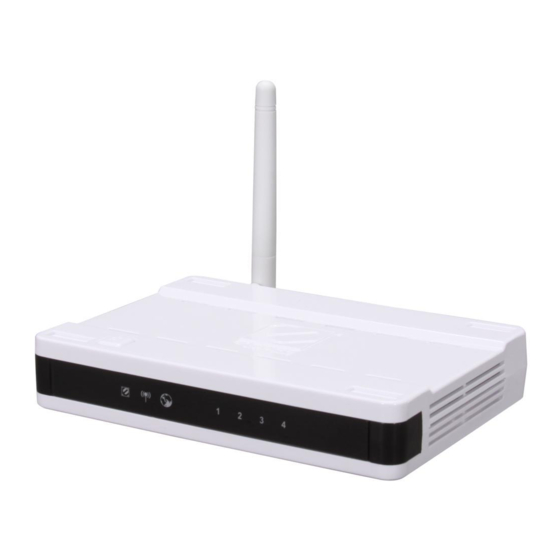
Page 7: The Front Panel
The LED will be dark for a few seconds when the system is started. After that, the LED will blink periodically to show the Wireless Router is working normally. If the LED stays green/dark that means the system failed, you need to contact your agent or try to reboot the system. -
Page 8: The Rear Panel
The rear panel of the Wireless Router is shown below. Power Connection Plug the circle end of the power adapter firmly into the rear panel of the Wireless Router, and the other end put into an electric service outlet then the system is ready. -
Page 9: Installing And Using Wireless Router
Installing And Using Wireless Router This Chapter provides a step-by-step guide to the installation and configuration of the Wireless Router. We suggest you go over the whole chapter and then do more advanced operation. Network configuration setup Steps to build up the network: Connect the ADSL or Cable modem to the Ethernet WAN port on the back of the Wireless Router by using the UTP cable. - Page 10 Procedures to configure IP addresses for your computer 1. If you are in Classic Start menu view, click Start > Settings > Control Panel > Network Connections. If you are in Start menu view, click Start > Control Panel > Network Connections.
-
Page 11: Wireless Router Configuration Setup
Wireless Router configuration setup In order to make the whole network operate successfully, it is necessary to configure the Wireless Router through your computer has a WEB browser installed. Please follow up the steps listed below. 1. Double click the Internet WEB browser icon on your desktop screen (Netscape Communicator 4.0 and Internet Explorer 3.0 or update version) - Page 12 4. The Graphic User Interface After the password authorization, the Information page shows up as the home page of the Graphic User interface. You may click on each folder on left column of each page to get access to each configuration page. Note: Please note that you should click the Save Settings button to apply your configuration to this device.
-
Page 13: Network Setting
Network Setting WAN Interface Setup This page allows users to configure those parameters for connecting to Internet. You may select the WAN Access Type from the “My Connection type” column and configure parameters for each mode. - Page 14 Enter the DNS provided by your ISP in 1 and 2 server. To enable the Maximum Transmission Unit of Router setup. Any packet over this number will be chopped up into suitable size before sending. Larger number will enhance the transmission performance.
- Page 15 “Automatically”, if not choose “Manually” and enter the DNS provided by your ISP in DNS 1, 2. DHCP MTU To enable the Maximum Transmission Unit of Router setup. Any packet over this number will be chopped up into suitable size before sending. Larger number will enhance the transmission performance.
-
Page 16: Pppoe Mode
DNS provided by your ISP in DNS 1, 2. PPPoE MTU To enable the Maximum Transmission Unit of Router setup. Any packet over this number will be chopped up into suitable size before sending. Larger number will enhance the transmission performance. -
Page 17: Lan Interface Setup
LAN Interface Setup To set up the configuration of LAN interface, private IP of you router LAN port and subnet mask for your LAN segment. - Page 18 Enable DHCP Server To give your LAN Client an IP, you have to enable DHCP server. If not, manual setting up your client IP is necessary when you want to use the router as your client’s default gateway. DHCP IP Range Specify the DHCP Client IP address range default (100~150).
-
Page 19: Qos Settings
QoS Settings The QoS (Quality of Service) Settings page provides different priority to different users or data flows. - Page 20 Total Bandwidth Settings You can setup the total upload/ download bandwidth manually (default 102400). Bandwidth QoS Settings Items Information Enable this Rule Mark to enable the configuration, and clear to disable. Type Select the type of download or upload. LAN IP Address Fill in the MAC address that you are going to control.
-
Page 21: Wireless Settings
Wireless Settings Basic Settings You can set up the configuration of your Wireless and monitor the Wireless Clients associate with your AP. Items Information Enable Wireless Mark the checkbox to enable Wireless interface or uncheck to disable. Wireless Mode To select a band for this device to match 802.11g/b/n mixed, 802.11g/b mixed, 802.11b, 802.11g, or 802.11n. -
Page 22: Advanced Settings
Advanced Settings You can set advanced wireless LAN parameters of this router. We recommend not changing these parameters unless you know what changes will be there on this router. - Page 23 (default 1 beacon). RTS Threshold If the packet size is smaller than the Request To Send threshold, the wireless router will not send this packet by using the RTS/CTS mechanism (default 2347 bytes). Fragment Threshold Specifies the maximum size of packet during the data transition.
-
Page 24: Security Settings
WPA encryption to secure your wireless network. As default, the authentication is configured as safe mode. Please select None/WEP/WPA (Personal) in the drop list. If you select none, any data will be transmitted without encryption and any station can access the router. - Page 25 Open: Wireless AP can associate with this wireless router without WEP encryption. Shared Key: Wireless AP can associate with this wireless router only with WEP encryption. Select to use the WEP key value of 1,2,3 or 4 as in the following settings.
- Page 26 WPA Configuration Items WPA Mode WPA Encryption Pre-Shared Key WPA ReKey Method WPA ReKey Interval Pairwise Master Key Cache Interval Pre-Authentication Support Mark * Please click on the Save Settings button or the Reset Settings button on the above table to save/reset the configurations.
-
Page 27: Access Control
Access Control To restrict the Number of Access authentication of Stations, set up the control list in this page. You may select “Allow Listed” to allow those allowed MAC addresses or select “Deny Listed” to ban those MAC addresses from accessing to this device. - Page 28 MAC Access Control Settings Items Information Enable this Mark to enable the configuration, and clear to disable. Rule MAC Address Fill in the MAC address that you are going to control. Description Give a definition to the MAC Address. Action After configuring the above settings, click Add to add a new list in the following MAC Access Control List.
-
Page 29: Wds Settings
Wireless Distribution System allows the router to communicate with other APs wirelessly. To make it work, you must ensure that these APs and the Router are in the same Channel and add these APs MAC Address and Comment values into the WDS list. - Page 30 Encryption Type Select the option in the drop list to enable WEP, WPA/TKIP, and WPA/AES encryption types. If you select None, any data will be transmitted without encryption and any station can access the router. WPA Encryption For encryption type of WPA/TKIP and WPA/AES, you have to fill in the WPA encryption key.
-
Page 31: Wps Settings
WPS Settings... - Page 32 WPS Connection Settings Items WPS Config Method Add Enrollee PIN Code * Please click on the Save Settings button or the Reset Settings button on the above table to save/reset the configurations. WPS Information Shows the information of WPA configured, status, SSID, authentication mode, and pre-shared key.
-
Page 33: Nat Settings
NAT Settings NAT (Network Address Translation) involves re-writing the source and/or destination addresses of IP packets as they pass through a Router or firewall. NAT enable multiple hosts on a private network to access the Internet using a single public IP address. -
Page 34: Virtual Server
Virtual Server After marking or clearing the enable checkbox, it takes 5 seconds for this device to refresh the page. - Page 35 Virtual Server Settings Items Information Enable this Rule Mark to enable the configuration, and clear to disable. Application Select Select an application for your demand. WAN Port Fill in the port number of WAN. Protocol Select the protocol type of TCP, UDP or Both LAN Server IP Fill in the IP of your LAN Server.
-
Page 36: Virtual Dmz
The virtual DMZ (Demilitarized Zone) is used to enable protocols, which need to open ports on the router. The router will forward all unspecified incoming traffic to the host specified in this page. To configure it, mark to enable and then enter the Host IP... -
Page 37: Firewall Settings
Firewall Settings IP Filter The Wireless Router could filter the outgoing packets for security or management consideration. You can set up the filter against the IP addresses to block specific internal users from accessing the Internet. After marking or clearing the enable checkbox, it takes 5... - Page 38 IP Filter Settings Items Information Enable this Mark to enable the configuration, and clear to disable. Rule IP Address Fill in the IP address that you are going to filter. Protocol Select the protocol type of TCP, UDP or Both Filter Mode Select the filter mode of Always or by Schedule Date Define...
-
Page 39: Port Filter
The firewall could not only obstruct outside intruders from intruding your system, but also restricting the LAN users. Port filtering restricts certain type of data packets from your LAN to Internet through the router. After marking or clearing the enable checkbox, it takes 5 seconds for this device to refresh the page. - Page 40 Port Filter Settings Items Information Enable this Rule Mark to enable the configuration, and clear to disable. Port Range Fill in the port range that you are going to filter. The valid numbers are 1~65535. Protocol Select the protocol type of TCP, UDP or Both Filter Mode Select the filter mode of Always or by Schedule Date Define...
-
Page 41: Mac Filter
MAC Filter The Wireless Router could filter the outgoing packets for security or management consideration. You can set up the filter against the MAC addresses to block specific internal users from accessing the Internet. After marking or clearing the enable checkbox, it takes 5 seconds for this device to refresh the page. -
Page 42: Website Filter
configuration, or the Delete button to delete the list. Website Filter The Website Filter allows users to prevent certain website from accessing by users in LAN. This filter will block those websites that contain certain keywords. After marking or clearing the enable checkbox, it takes 5 seconds for this device to refresh the page. -
Page 43: Services Settings
Services Settings DDNS Settings DDNS (Dynamic Domain Name Server) service allows users to connect to this device via a fixed and easy-to–remember hostname. Items Enable DDNS Service Provider Domain Name User Name/Email Password/Key Confirmed Password * Please click on the Save Settings button or the Reset Settings button on the above table to save/reset the configurations. -
Page 44: Upnp Settings
UPnP Settings The UPnP (Universal Plug and Play) service allows devices to connect seamlessly and to simplify the implementation of networks in the home (data sharing, communications, and entertainment) and corporate environments. This page allows user to monitor the information of UPnP clients. -
Page 45: System Log Settings
System Log Settings The System Log Settings page shows the information of the current activities on the router. Items System Log Log Type Log Message Size Remote Log Remote Log Server Address Fill in the sever address for remote log. -
Page 46: Date/Time Settings
Date/Time Settings This page allows users to configure the date and time of the router. To specify manually, select the date and time from the drop list and click the Save Settings button. To synchronize time from a timeserver, please enter the update interval hour numbers, select an NTP server from the drop list or manually enter a private NTP server and then click the Save Settings button. -
Page 47: Management
Confirm Password Action Information Mark this checkbox to allow remote PC accessing the configuration interface of this router. interface (default 8080). The permitted IP for accessing. The default IP 0.0.0.0 allows all IP addresses form accessing. Click on this button to update your setting. -
Page 48: Ping Test
Ping Test The Ping Test page allows the administrator to test the connecting status of Internet. Fill in the IP then click on the Ping Test button to view the result information. Config The Config page allows users to backup and download the configuration status of the device or restore the factory default configuration. -
Page 49: Firmware Upgrade
Firmware Upgrade Sometimes a new firmware may be issued to upgrade the system of this device. You could upgrade the firmware you got in this page. To upgrade the firmware, please click on the Browse button, locate the firmware in your computer and then click the Upload button to execute. -
Page 50: Packet Statistics
Routing Table This page shows the routing table in this router. Users can get connecting information including destination, gateway, net mask, flags, metric, ref, use and interface. -
Page 51: System Log
System Log This page shows the system log information. Click the Refresh button to refresh the list. Logout Logout Click the Logout button to log out the admin account from this system Reboot Click the reboot button to restart this system. This may cost 1 minute to restart the system. -
Page 52: Product Specifications
Product Specifications Standard Interface WAN Connection Cable Connections Transmission Mode LED indications Security Receiver Sensitivity Transmit Power Range Coverage Emission Operating Temperature Operating Humidity Power Supply IEEE 802.11n IEEE 802.11g, IEEE 802.11b, IEEE 802.3, IEEE 802.3u LAN: 4 port 10/100Mbps Ethernet, RJ-45 WAN: One RJ45 port 3* 802.11n/g/b wireless reverse SMA detachable antenna Ethernet 10/100 Mbps...
Need help?
Do you have a question about the ENHWI-N and is the answer not in the manual?
Questions and answers