Table of Contents
Advertisement
© 2010 Encore Electronics, Inc. All rights reserved.COVER
© 2011 Encore Electronics, Inc.
Product specifications, size, and shape are subject to change without notice, and actual product appearance may differ from that depicted herein.
All trademarks and brand names are the properties of their respective holders.
Advertisement
Table of Contents

Related Manuals for Encore ENHWI-2AN4 Series


Summary of Contents for Encore ENHWI-2AN4 Series
- Page 1 © 2010 Encore Electronics, Inc. All rights reserved.COVER © 2011 Encore Electronics, Inc. Product specifications, size, and shape are subject to change without notice, and actual product appearance may differ from that depicted herein. All trademarks and brand names are the properties of their respective holders.
-
Page 2: Table Of Contents
Product specifications, size, and shape are subject to change without notice, and actual product appearance may differ from that depicted herein. All trademarks and brand names are the properties of their respective holders. © 2011 Encore Electronics, Inc. All rights reserved. www.encore-usa.com... -
Page 3: Chapter 1: Introduction
Chapter 1: Introduction The ENHWI-1AN4x Wireless N150 Router / ENHWI-2AN4x Wireless N300 Router complies with IEEE 802.11n, and provides faster and farther range than 802.11g while being backward compatible with 802.11g and 802.11b mode. This router uses advanced broadband router chipset and wireless LAN chipset solution to let you enjoy high-speed Wired and Wireless connection. -
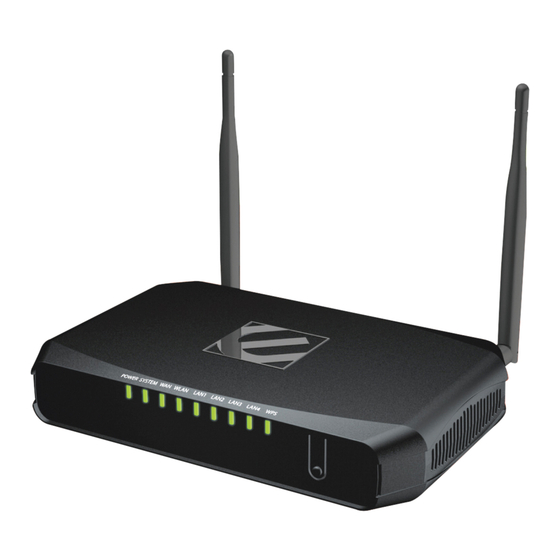
Page 4: Front Panel And Led Indicators
Front Panel and LED Indicators Status Description The router power is on. POWER The router power is off. The router is starting the system. SYSTEM Slow Blinking The router system is ready to work. WAN port is successfully connected The router is sending or receiving data Blinking through the WAN (usually is your cable/DSL modem). -
Page 5: Back Panel And Connectors
Back Panel and Connectors Port / Button Description Attach the external antenna(s) with R-SMA connector here. (The N300 Series has antenna connectors, while the N150 Antenna Series only has one.) The Reset button will restore your router to the default setting. Press and hold the button for 6 seconds to enable the reset function. -
Page 6: Connecting Your Router
Chapter 2: Connecting Your Router Attach the antenna to the back of the router. Power off your Cable/DSL modem. Connect your computer to the port on the router with an Ethernet cable. Connect your Cable/DSL modem to the port on the Router with an Ethernet cable. - Page 7 Check the LED lights (see Page 3 for more details). The LAN lights should be on for each active LAN connection. The WAN lights should be on when the Cable/DSL modem is connected. www.encore-usa.com...
-
Page 8: Configuring Your Router
Chapter 3: Configuring Your Router Accessing the Web-Based Configuration Utility Screenshot of the Web-Based Configuration Utility For the initial configuration, we recommend you connecting your computer to the LAN port with an Ethernet cable. If this cannot be done, you have to connect to the router wirelessly. Before configuring your router through wireless network, make sure that SSID, Channel and Security are set properly. - Page 9 You need a web browser to access the web-based configuration utility. Open a web browser. Type in the following URL to the address bar: http://192.168.10.1 sample screenshot from Internet Explore. The web browser will ask you for User Name and Password. The default access information is as follows: User Name: admin...
-
Page 10: Encore Setup Wizard
Encore Setup Wizard Encore Setup Wizard helps you to configure the router quickly. Simply follow the step-by-step instructions To access the Setup Wizard, click on “Wizard” at the bottom of the function menu. This is the Setup Wizard overview page. Click “Next”... - Page 11 Create your own administrative password for the router in this page. Click “Next” to continue. Choose your time zone. Click “Next” to continue. Most of the time, you can leave the DHCP Server “Enabled” and skip this page If your MODEM has router function built-in and enabled, you need to check “Disabled”...
- Page 12 Most of the time, you just need to click “Next” to continue. The Setup Wizard will attempt to detect your Internet connection type automatically (one of the six options). You can also manually select the connection type. Based on the connection type, the following pages (not shown here) will request different account information.
-
Page 13: Chapter 4: Advanced Configuration
Chapter 4: Advanced Configuration WAN (Wide Area Network) This section enables users to set up the Wide Area Network (WAN) connection: specifying the WAN IP address, adding DNS numbers, and entering the MAC address. 4.1.1 Connection Type There are five connection types to choose: ... -
Page 14: Dhcp Client Or Fixed Ip
A. DHCP Client or Fixed IP If user has the DHCP server enabled, choose "Obtain IP automatically (DHCP client)" to have the router assign IP addresses automatically. WAN IP Address Select whether you want the router to “Obtain IP Automatically” or manually input Fixed IP by checking “Specify IP.”... -
Page 15: Pppoe
B. PPPoE If connecting to the Internet using a PPPoE (Dial-up xDSL) Modem, the ISP (Internet Service Provider) will provide a Password and User Name. Choose this option and enter the required information. WAN IP Address Select whether you want the router to “Obtain IP Automatically” or manually input Fixed IP by checking “Specify IP.”... -
Page 16: Pptp/L2Tp With Dynamic Ip (Obtain Ip Automatically)
C. PPTP/L2TP with Dynamic IP (Obtain IP Automatically) If connecting to the Internet using a PPTP/L2TP (Dial-up xDSL) protocol with Dynamic IP, check “Obtain IP Automatically.” You need to enter the following information provided by your ISP: Server IP/Name, PPTP/L2TP Account, and PPTP/L2TP Password. If your ISP has provided you a DNS IP address, enter it in the “DNS”... -
Page 17: Pptp/L2Tp With Static Ip (Specify Ip)
D. PPTP/L2TP with Static IP (Specify IP) If connected to the Internet using a PPTP/L2TP (Dial-up xDSL) with static IP connection, check “Specify IP.” You need to enter the following information: IP Address, Subnet Mask, Gateway IP address, DNS IP address, Server IP/Name, PPTP/L2TP Account, and PPTP/L2TP Password. -
Page 18: Bigpond Cable
E. BigPond Cable If your ISP is Big Pond Cable, the ISP will provide you a User Name, Password, Authentication Server, and Login Server IP (Optional). Choose this option and enter the required information. www.encore-usa.com... -
Page 19: Start To Use The Internet Connection
4.1.2 Start to use the Internet connection After above configuration has been done, you could now open browser software, type in the web URL addresses of your favorite sites and enjoy the web browsing and surfing on the Internet. More but not limited to that, you could also enjoy on line shopping, gaming, music listening, video viewing, and so on. - Page 20 * Local tech-support numbers are provided in selected countries. Service may change without prior notice. Please visit our website for more details. Product specifications, size, and shape are subject to change without notice, and actual product appearance may differ from that depicted herein. www.encore-usa.com All trademarks and brand names are the properties of their respective holders.
Need help?
Do you have a question about the ENHWI-2AN4 Series and is the answer not in the manual?
Questions and answers