
Related Manuals for Sole Fitness SFI100


Summary of Contents for Sole Fitness SFI100
- Page 1 Owner’s Manual Model No. 16808091000 SFI100 FLAT INCLINE BENCH - Assembly - Operation - Adjustments - Parts - Warranty CAUTION: Read and understand this manual before operating unit Retain For Future Reference...
-
Page 2: Table Of Contents
TABLE OF CONTENTS Product Registration ................... 2 Important Safety Instructions ..............3-4 Assembly Instructions ................. 6 Unpacking ....................6 Adjusting the Bench ..................8 Resistance Training Benefits and Tips ............9 General Maintenance ................10 Exploded View Diagram ................11 Parts List .................... -
Page 3: Product Registration
Congratulations on your new SFI100 Flat Incline Bench and welcome to the Dyaco Canada family! Thank you for your purchase of this SOLE SFI100 Flat Incline Bench from Dyaco Canada Inc. Your new SFI100 Flat Incline Bench was manufactured by one of the leading fitness manufacturers in the world and is backed by one of the most comprehensive warranties available. -
Page 4: Important Safety Instructions
BEFORE YOU BEGIN Thank you for choosing the SOLE SFI100 Flat Incline Bench. We take great pride in producing this quality product and hope it will provide many hours of quality exercise to make you feel better, look better, and enjoy life to its fullest. It's a proven fact that a regular exercise program can improve your physical and mental health. - Page 5 FACILITY SAFETY PRECAUTIONS • Read the Owner’s Manual carefully before assembling, servicing or using the equipment. • Make sure that each bench is set up and operated on a solid level surface. Do not install equipment on an uneven surface. •...
- Page 6 MAINTENANCE Preventative maintenance allows proper equipment operation and reduces the risk of injury. Perform the maintenance requirements as specified in the manual (see table on page 10). STANDARD COMPLIANCE Dyaco Canada products meet or exceed applicable ASTM and EN Standards WARNING/CAUTION DECALS •...
-
Page 7: Assembly Instructions
SFI100 ASSEMBLY INSTRUCTIONS To avoid possible damage to this SFI100 Flat Incline Bench, please follow these assembly steps in the correct order. Be sure to read your Assembly/Owner’s Guide before using your new SFI100 Flat Incline Bench. Please use the various lists in this manual to account for all parts included in the assembly. - Page 8 STEP ONE SFI100 Attach the Rear Bracket (No.2) to the Base Bracket (No.1). Secure with: 2 M10 x 130 Hex Head Bolts (No. 30), 2 Nylon Lock Nut M10 (No. 39) and 4 washers φ11 x φ20 x 2 (No. 43).
-
Page 9: Adjusting The Bench
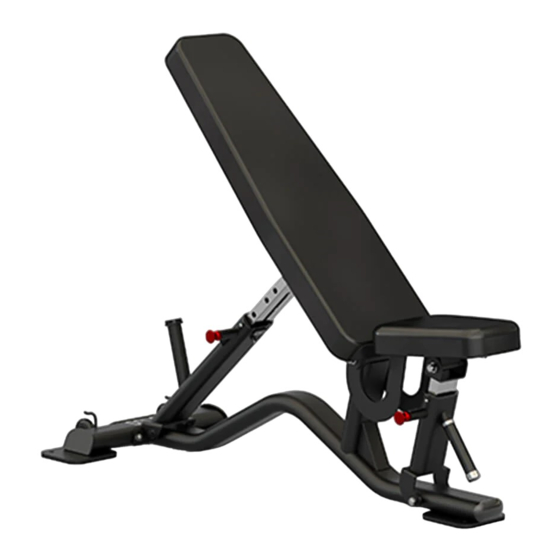
ADJUSTING THE BENCH The seat and back pad are both adjustable for a wide range of exercises. The Back pad angle is adjustable to six different settings as seen in the image. Simply pull the pop-pin adjustment knob and adjust the angle to your desired setting. Once selected, make sure the pop-pin is fully engaged in the selected hole before doing any exercise. -
Page 10: Resistance Training Benefits And Tips
EXERCISE BANDS Some users will benefit from using exercise bands with this bench. There are two hooks located at the rear of the bench near the transport wheels for use with exercise bands. Make sure any exercise bands used are in good working condition and properly secured to the bench before doing any exercise. -
Page 11: General Maintenance
GENERAL MAINTENANCE For best performance, Dyaco Canada Inc. recommends the following maintenance schedule. Check the integrity and function of the following parts. Replace all worn components immediately. Your equipment comes with a commercial schedule decal. For in home use, please follow the maintenance schedule listed below: ROUTINE COMMERCIAL... -
Page 12: Exploded View Diagram
EXPLODED VIEW DIAGRAM Customer service: 1-888-707-1880 Dyaco Canada Inc 2020 Email: customerservice@dyaco.ca... -
Page 13: Parts List
PARTS LIST KEY NO PART NO DESCRIPTION Q’TY 0910001 Base Bracket 0910002 Rear Bracket 0910003 Front Adjustable Bracket (outer) 0910004 Back Pad Bracket 0910005 Seat Pad Bracket 0910006 Front Adjustable Bracket (Inner) 0910007 Back Adjustable Bracket (Inner) 0910008 Back Adjustable Bracket (Outer) 0910009 Seat Pad 0910010... - Page 14 KEY NO PART NO DESCRIPTION Q’TY 0910035 Flat Head Cap Screw M6 x 15 0910036 Socket Set Screw M6 x 15 0910037 Socket Set Screw M5 x 3 0910038 Nylon Lock Nut M12 0910039 Nylon Lock Nut M10 0910040 Nylon Lock Nut M8 0910041 Hex Thin Nut M6 0910042...
-
Page 15: Manufacturer's Limited Warranty
MANUFACTURER’S LIMITED WARRANTY Dyaco Canada Inc. warrants all its Flat Incline Bench parts for a period of time listed below, from the date of retail sale, as determined by a sales receipt. Dyaco Canada Inc.’s responsibilities include providing new or remanufactured parts, at Dyaco Canada Inc.’s option, and technical support to our independent dealers and servicing organizations. - Page 16 Please visit us online for information about our other brands and products manufactured and distributed by Dyaco Canada Inc. spiri�itness.ca solefitness.ca xterrafitness.ca dyaco.ca/products/everlast.html dyaco.ca/UFC/UFC-home.html spiri�itness.ca/johnnyg.html trainorsports.ca For more informa�on, please contact Dyaco Canada Inc. T: 1-888-707-1880 ⏐ 5955 Don Murie St., Niagara Falls, Ontario L2G 0A9 ⏐ sales@dyaco.ca...
Need help?
Do you have a question about the SFI100 and is the answer not in the manual?
Questions and answers