
Related Manuals for ICE Games SNACK ATTACK


Summary of Contents for ICE Games SNACK ATTACK
- Page 1 ICE MINI CRANE MODELS OWNERS AND SERVICE MANUAL INNOVATIVE CONCEPTS IN ENTERTAINMENT INC. 10123 MAIN STREET, CLARENCE, NY 14031 SERVICE: 1-716-759-0360 FAX: 1-716-759-0884 E-MAIL: service@icegame.com WEBSITE: www.icegame.com...
-
Page 2: Table Of Contents
TABLE OF CONTENTS INTRODUCTION………………………………..…...PAGE 3 GAME FEATURES • GAME PLAY • SET-UP / TESTING / MAINTENANCE…………..…..PAGE 4 SAFETY PRECAUTIONS • GAME SET-UP • ASSEMBLY • TESTING • CLEANING • PROGRAMMING……………………………………..PAGE 5 - 10 PROGRAMMING MODES • OPTION MODES • ERROR CODES •... -
Page 3: Introduction
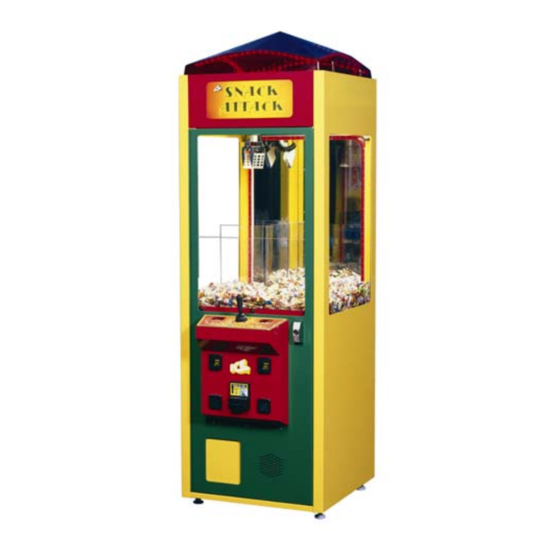
INTRODUCTION GAME FEATURES GAME PLAY The new MINI CRANE by I.C.E. was designed As coins are inserted into the MINI CRANE a with the operator in mind. Reliability, low main- coin in sound will be heard. When sufficient tenance, available custom cabinetry, and all coins have been inserted, the game sound metal exterior construction are some of the most starts, the claw clicks closed and re-opens,... -
Page 4: Set-Up / Testing / Maintenance
SET-UP / TESTING / MAINTENANCE SAFETY PRECAUTIONS TESTING After the initial setup, it is time to test your game for IMPORTANT: FAILURE TO FOLLOW THESE DIREC- proper operation. TIONS CLOSELY COULD CAUSE SERIOUS DAMAGE TO YOUR GAME. 1. Locate the game in its permanent location. 2. -
Page 5: Programming
PROGRAMMING 100 and 11, at the end of the game option 17 is ENTERING THE set to “1” (on). PROGRAMMING MODE To enter the programming mode, open the front MODE "1" GAME MODE door and press the button marked PROG. Lo- cated on the main board housing inside the front door and the crane will move to the front center There are two game modes:... - Page 6 PROGRAMMING MODE "9" AUTO MODE "5" COUNTER TYPE STRENGTH Setting this option to “0” will have the game count credits on the mechanical and software This option allows the operator to set the claw counters. Setting this option to “1” will have the strength for the auto percentaging mode.
- Page 7 PROGRAMMING This option is used to correctly center the crane MODE "15" TICKETS IF at coin up with different coin speeds and crane LOSE sizes. The operator can also use this option along with option 17 to adjust the position of the This option is used only if you have a ticket dis- crane head when the game is over.
- Page 8 PROGRAMMING MODE "19" CREDIT Entering the Accounting Mode DISCOUNTING To enter the accounting mode, open the front door and press the button marked ACCOUNT. This mode allows the operator to give a free Located on the main board housing inside the game for multiple CONSECUTIVE credits.
-
Page 9: Error Codes
PROGRAMMING and the door is closed the game will reset error Error Codes codes, run through a test mode to check for proper operation and if all is well, game play can E² (Memory) start, if the 4 decimals will once again light up, the operator will need to check the error codes Prize Sensor again. - Page 10 PROGRAMMING MODE DESCRIPTION MIN / MAX / DEF MEANING (Credit Display) (Timer Display) BASIC PROGRAMMING 0, 1, 0 Game Type 0—Left, Right, Forward, Backward, Nudge 1—Left, Right, Forward, Backward, Drop Game Mode 0, 1, 0 0—Normal Play 1—Play till you win Time 10, 60, 20 10—60 Seconds (Inc.
-
Page 11: Manual Setup / Percentaging
MANUAL SETUP / PERCENTAGING CLAW OPEN POSITION OVERVIEW The CLAW OPEN POSITION is determined by Although our crane offers the option of being how you set the adjustable washer that is able to be set up for MANUAL or AUTOMATIC located under the solenoid plunger. - Page 12 MANUAL SETUP / PERCENTAGING or lower the position of the collar to adjust the NOTE: THIS ADJUSTMENT HAS THE MOST closed position of the claws. Push the solenoid IMPACT ON YOUR PERCENTAGING. plunger in by hand to verify the claw position ALLOWING THE SLIDER MORE OR LESS and re-tighten the collar.
- Page 13 MANUAL SETUP / PERCENTAGING different size prizes, please be aware that this CALCULATIONS will affect your payout to some extent. The best way to set up your crane manually is The biggest issue with plush size will be adjust- to test it in house over a number of games. ing the slider to compensate for the different sizes.
- Page 14 MANUAL SETUP / PERCENTAGING Calculate 100 X .25 (25 cents). This equals $25.00. FINAL ADJUSTMENT Next Calculate $25.00 X .20 which is 20 per- cent. Your result will be $5.00 After playing 100 games check to see what your payout is at. Use the adjustments to change the Next, divide the $5.00 by the value of your plush percentages.
-
Page 15: Quick Troubleshooting
QUICK TROUBLESHOOTING PROBLEM PROBABLE CAUSE SOLUTION THE DECIMALS ON THE 4 THIS IS IN FACT NOT A PROBLEM BUT A WAY OPEN THE FRONT DOOR AND THE DISPLAYS ARE LIT UP OF LETTING THE OPERATOR KNOW THAT ERROR CODES ARE SHOWN ON THE THERE WAS A PROBLEM DURING THE START DISPLAYS. - Page 16 QUICK TROUBLESHOOTING A self-test will be performed each time the front door is “closed” or the game is powered up. 2. If the Wagon does not move smoothly through a full travel from left to right, check to see that the wheel spacing is correct.
-
Page 17: Game Repair
GAME REPAIR WARNING: ALWAYS REMOVE POWER TO GLASS THE GAME BEFORE ATTEMPTING ANY REPLACEMENT SERVICE, UNLESS NEEDED FOR SPECIFIC TESTING. FAILURE TO OBSERVE THIS 1. Remove all A.C power from the game. PRECAUTION COULD RESULT IN SERIOUS 2. Open the front door and unscrew the brack- INJURY TO YOURSELF OR OTHERS. - Page 18 GAME REPAIR 6. NOTE: STRING PURCHASED FROM I.C.E. tor. NOTE: Be sure to note which wire goes WILL HAVE GLUE ON THE LAST 2 INCHES to which motor lead. If they are reinstalled TO MAKE IT EASIER TO FEED UP INTO backwards the motor will run the opposite of THE MECHANISM.
- Page 19 GAME REPAIR PRIZE FENCE REPLACEMENT 1. Remove all A.C. power from the game. 2. Unlock and open the front door. 3. Carefully unbolt the 3 bolts and 2 screws holding the prize fence to the play field. 4. Remove the old prize fence. 5.
-
Page 20: Parts Listings
PARTS LISTINGS CS3040 Guide Pulley, Idler MECHANICAL PARTS CS3041 Drive Pulley, Idler CS3042 String Guide Square Drive Screw, Black 3/4" CS4001 O-Ring, Large Urethane 655S Square Drive Screw, Silver 5/8" CS4002 O-Ring, Medium Urethane 4006 Foam Weather-stripping CS4003 O-Ring, Small Urethane 5006 Cash Box CS4004... - Page 21 Tempered Glass Warning Decal CS7509 Next to front marquee, Left CS7510 Next to front marquee, Right CS7512 Control Panel CS7527 Front Marquee SNACK ATTACK CRANE CS7007 ICE Logo LIL’ RODEO CRANE CS7012 Control Panel CS7027 Front Marquee CS7600 Cabinet Side...
-
Page 42: Warranty Information
Warranty I.C.E warrants all components in the MINI CRANE game to be free of defects in materials and workmanship for a period of ninety days from the date of purchase. This warranty does not cover items damaged due to normal wear and tear, sub- jected to abuse, improperly assembled by the end user, modified, repaired, or oper- ated in a fashion other than that described in the service manual. - Page 43 WARRANTY ICE Inc warrants that all of its products will be free from defects in material and workmanship. When placing a warranty request, please be prepared to provide the following information: • Serial Number of Game or Bill of Sale •...
Need help?
Do you have a question about the SNACK ATTACK and is the answer not in the manual?
Questions and answers